UCal
  • Welcome
  • 🚀Getting Started
    • Quick Start
      • What is IS-Messenger?
      • Setting Up an Account
      • Connecting Channels
      • Inviting Your Teammates
      • Getting Contacts to Message You
      • Automated Welcome and Away Messages
      • Responding to Messages
      • Glossary of Terms
    • Connecting a Channel
    • Invite your teammates
    • Getting Contacts to Message You
    • Automated Welcome and Away Messages
    • Responding to messages
    • Glossary of Terms
    • Creating a Chatbot
  • ⚙️Workspace Modules
    • Dashboard
    • Inbox
      • Inbox Overview
      • Assignment and closing a conversations
      • Custom Inboxes
      • Interacting with Respond AI Prompts
      • Using AI Assist
    • Contacts
      • Contact Details
      • Contacts Overview
      • Merge Suggestions
      • Contact Activity
      • Contact Channels
      • Contact Import
      • Segments
    • Broadcast
      • Broadcast Overview
      • Managing Broadcasts
    • Workflow
      • Triggers
      • Workflow Step
        • Step: Send a Message
        • Step: Ask a Question
        • Step: Assign To
        • Step: Branch
        • Step: Update Contact Tag
        • Step: Update Contact Field
        • Step: Open Conversation
        • Step: Close Conversation
        • Step: Add Comment
        • Step: Jump To
        • Step: Wait
        • Step: Date & Time
        • Step: HTTP Request
        • Step: Trigger Another Workflow
        • Step: Add Google Sheets Row
        • Step: AI Agent
      • Workflow Templates
    • Reports
      • Reports: Conversations
      • Reports: Responses
      • Reports: Resolutions
      • Reports: Messages
      • Reports: Contacts
      • Reports: Assignments
      • Reports: Leaderboard
      • Reports: Users
      • Reports: Broadcasts
  • ⚙️Workspace Setting
    • Managing a Workspace
    • General
    • Users
      • Access Levels
    • Teams
    • Channels
      • Chat Menus
    • Contact Fields
    • Growth Widgets
      • Website Chat Widget Quick Start
      • Website Chat Widget Overview
      • Workspace Settings: Growth Widgets
      • Install Website Chat Widget on Squarespace
      • Install Website Chat Widget on Joomla
      • Install Website Chat Widget on Wix
      • Install Website Chat Widget on Shopify
      • Install Website Chat Widget on WordPress
      • How to Track Conversation Source from Multiple Websites
    • Respond AI
    • Integrations
      • Dialogflow
        • Dialogflow: Connecting to Dialogflow
        • Dialogflow: Creating a Chatbot
        • Dialogflow : Managing Intents
        • Dialogflow: Parameters
        • Dialogflow: Events
        • Dialogflow: Response Templates
        • Dialogflow: Custom Payloads
        • Dialogflow: Fulfillment Webhook Request
      • E-Commerce & CRM Integrations
        • E-Commerce Integration: Shopify
        • E-Commerce Integration: BigCommerce
        • E-Commerce Integration: WooCommerce
        • E-Commerce Integration: Magento
        • CRM Integration: HubSpot
        • CRM Integration: Salesforce
        • CRM Integration: Pipedrive
        • CRM Integration: ActiveCampaign
      • Zapier
      • Developer API
      • Webhooks
      • Make (formerly Integromat)
    • Closing Notes
    • Snippets
    • Files
    • Data Export
    • Data Import
  • ⚙️User Account
  • Profile
  • User Activity Status
  • Notifications
  • Resetting your Passwords
  • 👨‍👧‍👦CONTACT AND MESSAGES
    • Dynamic Variables
      • Dynamic Variables Overview
      • How to Use Dynamic Variables
    • Contact Search and Custom Inbox
    • Conversations
  • ⚙️MESSAGING CHANNELS
    • Channel Overview
    • Facebook Messenger
      • Facebook Messenger Quick Start
      • Facebook Chat Plugin
      • Private Replies
      • Message Tag
    • Instagram
      • Instagram Overview
      • Instagram Quick Start
    • WhatsApp
      • WhatsApp Business API Quick Start
      • Getting Ready for Inbound Conversations
      • Getting Ready for Promotional Messaging
      • WhatsApp Official Business Account (Green Tick)
      • Grow your WhatsApp Audience by Maximizing Entry Points
      • Get WhatsApp API Account for Government Agencies
      • Meta Business Verification
      • WhatsApp Message Templates
      • WhatsApp Pricing
      • WhatsApp Business Platform (API) Channel Configuration
      • WhatsApp Messaging Limits
      • Meta Product Catalog
      • Change Your WhatsApp Business Display Name
      • Phone Number Migration to IS-Messenger WhatsApp Business API
      • Turn-off WhatsApp Number Two-Step Verification
      • WhatsApp Cloud API
        • Migrating from On-Premises API to Cloud API
        • Migrating from Cloud API to On-Premises API
        • Set up the WhatsApp Echo Bot
        • Load Testing on Cloud API
        • Experiments
        • Webhooks Setup
      • 360Dialog WhatsApp
      • Twillio WhatsApp
      • MessageBird WhatsApp
      • Vonage WhatsApp
      • Phone Number Migration to WhatsApp Cloud API
    • Website Chat Widget
      • Install on WordPress
      • Install on Shopify
      • Install on Wix
      • Install on Squarespace
      • Install Website Chat Widget on Joomla
    • LINE
      • LINE Overview
      • LINE Quick Start
    • Telegram
      • Telegram Overview
      • Telegram Quick Start
    • Viber
      • Viber Overview
      • Viber Quick Start
    • SMS Overview
      • Twilio SMS Quick Start
        • Importing Contacts to Twilio SMS
      • MessageBird SMS Quick Start
      • Vonage SMS Quick Start
    • Twitter Overview
      • Twitter Quick Start
    • WeChat
      • WeChat Overview
      • WeChat Quick Start
    • Google Business Message
    • Email
      • Google Workspace Quick Start
      • Other Email
    • Custom Channel
      • Custom Channel Overview
      • Custom Channel Quick Start
  • New Release Update
  • Support Use Cases
    • How to Identify Contacts by Email and Phone NumberI
    • How to Enrich Customer Data from a CRM or other Business Software
    • How to Route Customers to the Right Team Automatically
    • How to Auto-Assign Customers to a Team or Dedicated Agent
    • How to Send Outbound Support Messages
    • Support: Closing Conversations
    • How to Supervise Your Support Agents
    • How to Analyze Reports for Support
    • How to Send CSAT to Customer and Save Data in Google Sheets or CRMs
  • Handling Inbound Conversations
    • Managing Spam
    • Create Automated Welcome and Away Messages
    • Get Contacts’ Consent for Personal Data Collection
    • Create Automated Chat Menus
    • Collect Contacts’ Emails and Phone Numbers
    • Route Contacts by Shifts
    • Route Contacts by Team Functions
    • Route New & Returning Contacts
    • Route VIP Contacts
    • Assignment Strategy: Automatic Contact Distribution & Load Balancing
    • Assignment Strategy: Unassign Agents after Conversations Closed
  • Capture Conversations
    • How to Streamline Meeting Scheduling via CTC Ads
    • How to Automate Product Info Sharing in Conversations Initiated via CTC Ads
    • How to Track Conversation Source from Multiple Websites
    • How to Route Contacts from CTC Ads to Agents
  • Automate Conversations
    • How to Maximize Customer Service Potential with AI Agent
    • How to Automate Contact Information Collection with AI
    • How to Route Contacts to Preferred AI Agent
    • How to Automatically Qualify Contacts Based on Budget Using AI Agent
    • How to Route Contacts by their Preferred Language
    • How to Create Automated Chat Menus
    • Assignment Strategy: How to Automate Contact Distribution & Load Balancing
    • Assignment Strategy: Unassign Agents after Conversations Closed
    • How to Create Automated Welcome and Away Messages
    • How to Block Contacts and Manage Spam
    • How to Route New and Returning Contacts
    • How to Collect Contacts’ Emails and Phone Numbers
    • How to Route New and Returning Contacts
    • How to Route Contacts by Team Functions
    • How to Route Contacts by Shifts
    • How to Get Contacts’ Consent for Personal Data Collection
    • How to Route VIP Contacts
  • How to Promptly Transfer Conversation Between Agents
  • How to Guide Customers from Exploration to Purchase with Engaging Menus
  • How to Optimize Customer Onboarding with Automated & Customized Welcome Messages
  • Converse with Customers
    • How to Get a Complete View of the Customers
    • How to Simplify Customer Escalation with Automation
    • How to Transfer Contacts to the Next Shift Automatically
    • How to Optimize Agents’ Productivity in the Messages Module
    • How to Align AI Conversations with Your Brand Voice
    • How to Draft Customer Replies with AI
    • How to Convert Image to Text Using AI
    • How Automate Calculations Using AI
  • Broadcasts Use Cases
    • How to Sending a Simple Broadcast
    • How to Start a Workflow Based on Broadcast Response
    • How to Import to Broadcast via WhatsApp
    • How to Troubleshoot a Failed Broadcast
  • Sales Use Cases
    • How to Collect Leads' Email and Phone Number
    • How to Enrich Contact Data and Qualify Leads
    • How to Route Leads
    • How to Auto-Assign Leads to Sales Agents
    • How to Send Outbound Sales Messages
    • How to Track Productivity by Closing Conversations
    • How to Supervise Sales Agents
    • How to Analyze Reports for Sales
  • Accessing Help Menu
Powered by GitBook
On this page
  • Prerequisites
  • Process Steps
  • Examples of Use Cases
  • Appointment Scheduling
  1. Capture Conversations

How to Track Conversation Source from Multiple Websites

PreviousHow to Automate Product Info Sharing in Conversations Initiated via CTC AdsNextHow to Route Contacts from CTC Ads to Agents

Last updated 1 year ago

In this article, you’ll learn how to track which website or landing page each conversation comes from, even if you're using multiple widgets of the same channel on multiple websites.

A business can use a Growth Widget on its website or landing page to allow visitors to start communicating with them via their preferred channels. If you're using the same Growth Widget on multiple websites or landing pages, you’ll know that it is difficult to track from which specific website or landing page a visitor initiated a conversation.

Discover how one setting can help you gain total control of website tracking, allowing you to gain insights on where each conversation begins.

Refer if you’d like to learn more about Growth Widget.

Prerequisites

  • You must have the Owners or Managers access level to be able to create Growth Widgets or configure its settings.

  • To create a Growth Widget, the respective channel must have already been connected to the Workspace. For an example, if you want to create a Facebook Widget, you must connect your Facebook Page to the Workspace beforehand.

Process Steps

Step 1: Create and Configure a Growth Widget

Create and configure a Growth Widget by following these steps:

  1. Go to Settings > Workspace Settings > Growth Widgets > Click +Add Widget.

  2. Select a widget and click Create Widget.

You can create a single-channel widget to allow visitors to contact you using only that particular Channel, or create a Multichannel Widget to provide more Channels that visitors can choose from to contact you.

  1. Configure the Growth Widget:

  • Website Domains: Fill in the website or landing page where you want the widget to be displayed.

  • Choose your channels: Select an available Channel based on the selected widget.
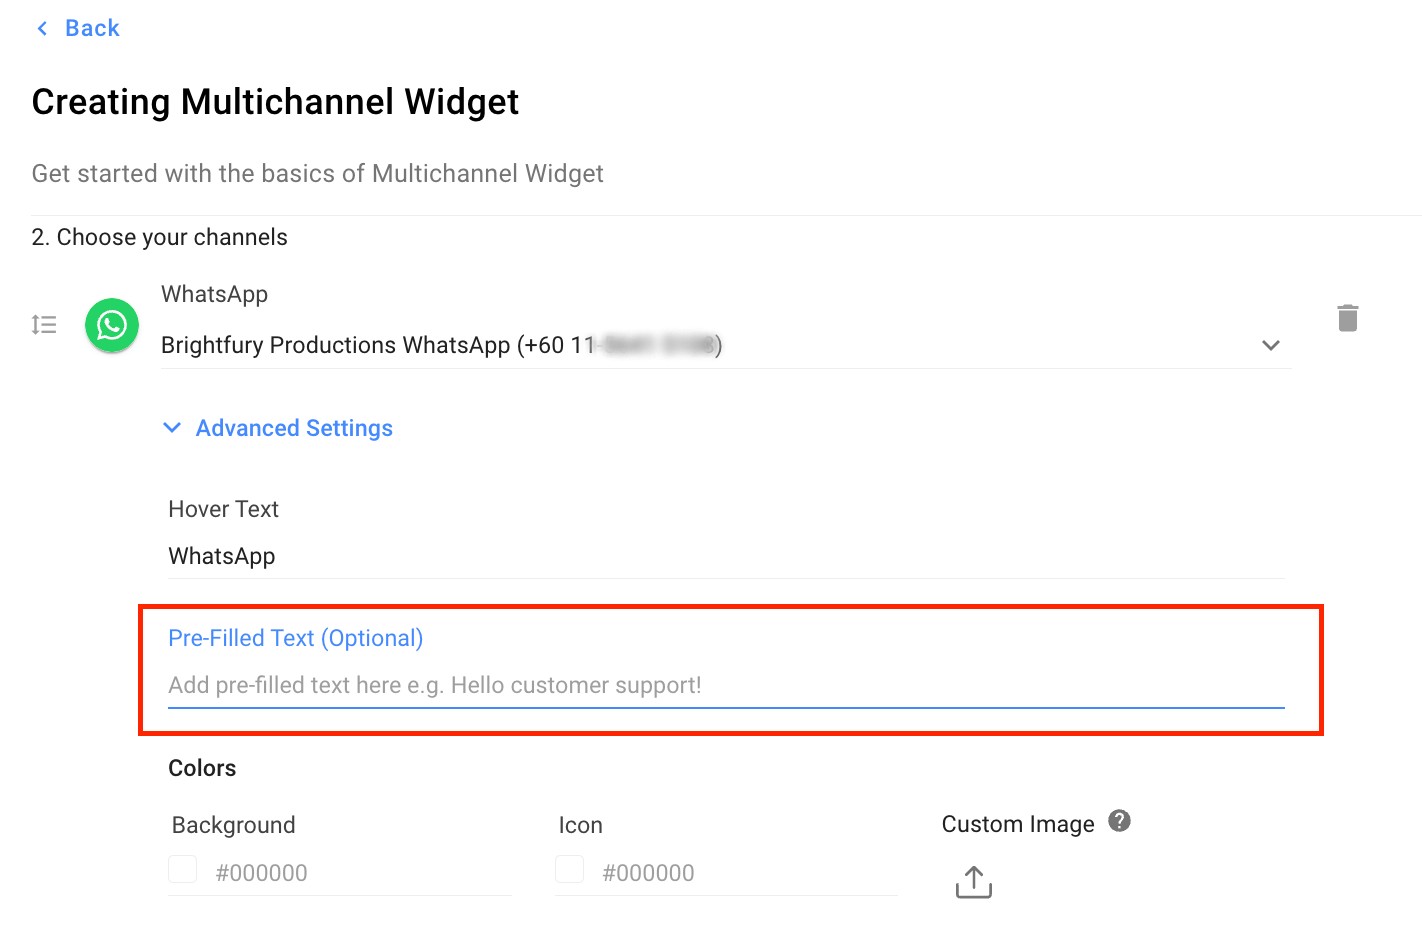
  1. Click Advanced Settings to display additional configurations. The key point in enabling the website-specific conversation tracking is by defining this field:

  • Pre-Filled Text: Type the unique message for this widget. This is the message that the visitor will see when they start a conversation from the website or landing page defined.

Pre-filled Text is only available for Channels that allow pre-filled messages to be defined, such as WhatsApp and Viber.

Step 2: Install the Growth Widget

Step 3: Repeat the Process

Examples of Use Cases

The following are use cases that can benefit from this:

Support and Information Requests

Let’s look at the step-by-step process:

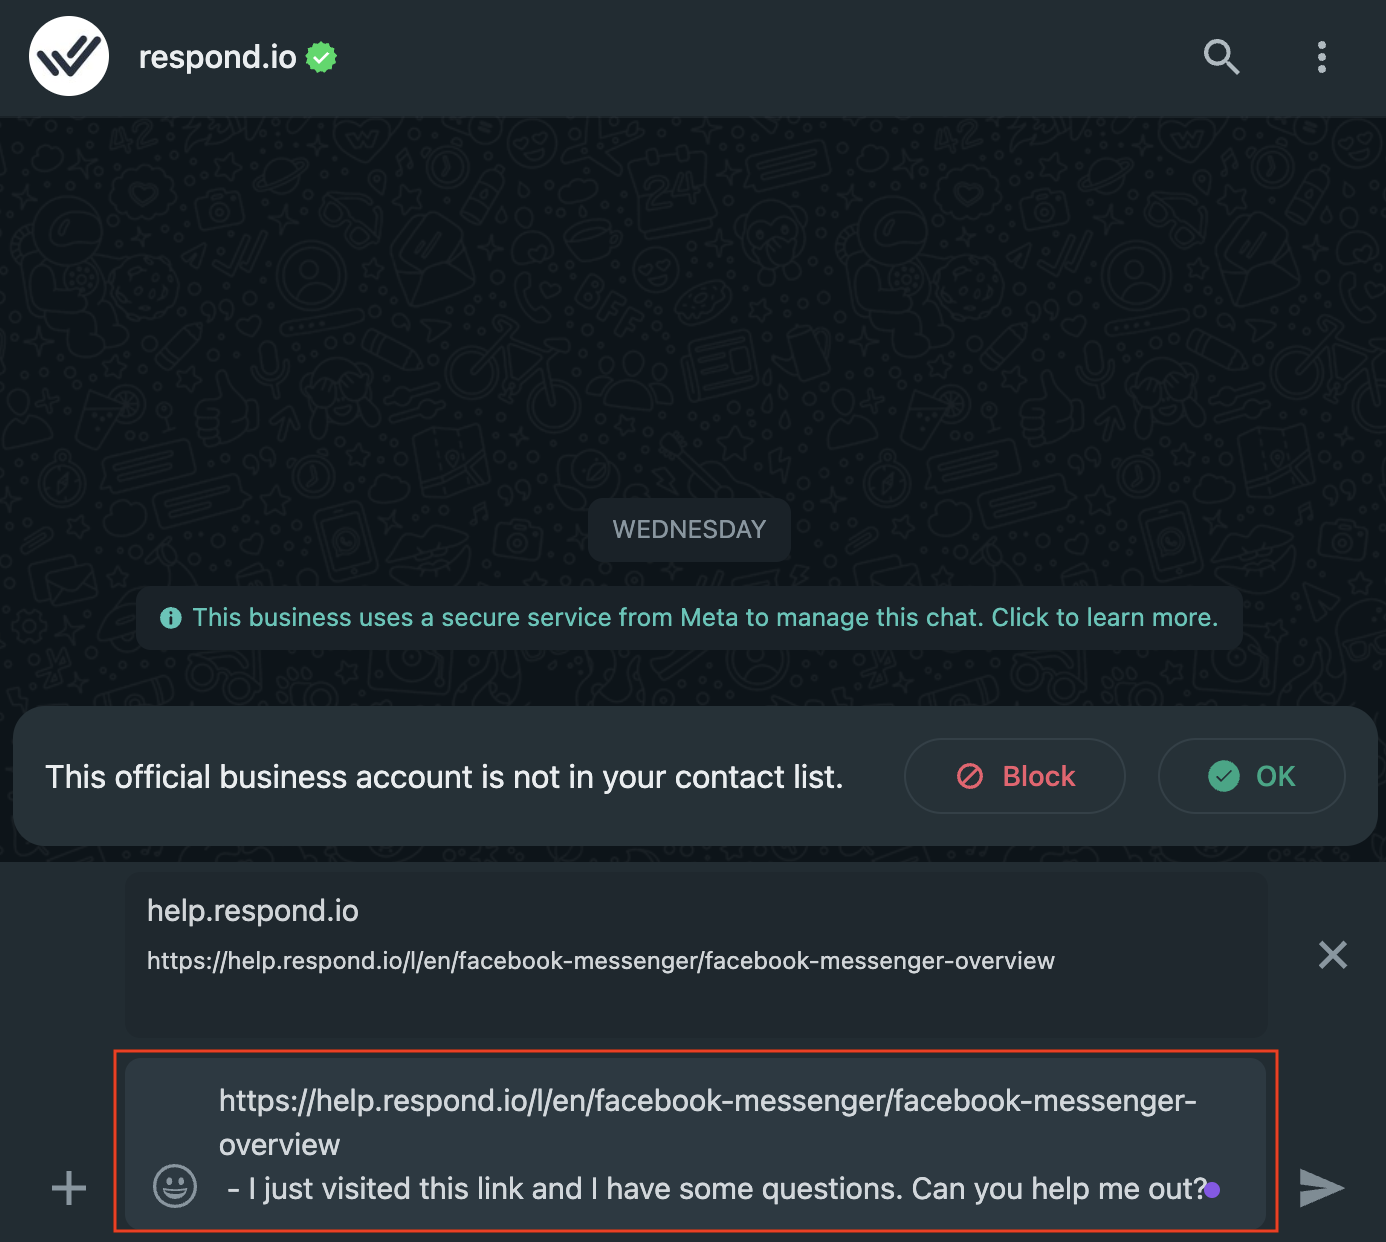
  1. A visitor lands on a help article on your website.

  2. The visitor wants assistance or more information related to the content, so he clicks the Growth Widget on the page, and then clicks the WhatsApp icon.

  3. WhatsApp (either the app or web version) is opened and populates a new message with a pre-filled text, e.g. "[Link to help article on website] - I just visited this link and I have some questions. Can you help me out?". The help article link is dynamically filled based on the specific page the visitor was on.

  4. The visitor reviews the pre-filled text and is allowed to add some personal notes, and then sends the message.

  5. You receive the message on your business's WhatsApp account. The pre-filled text lets you know which help article is generating the inquiry.

Appointment Scheduling

Let’s look at the step-by-step process:

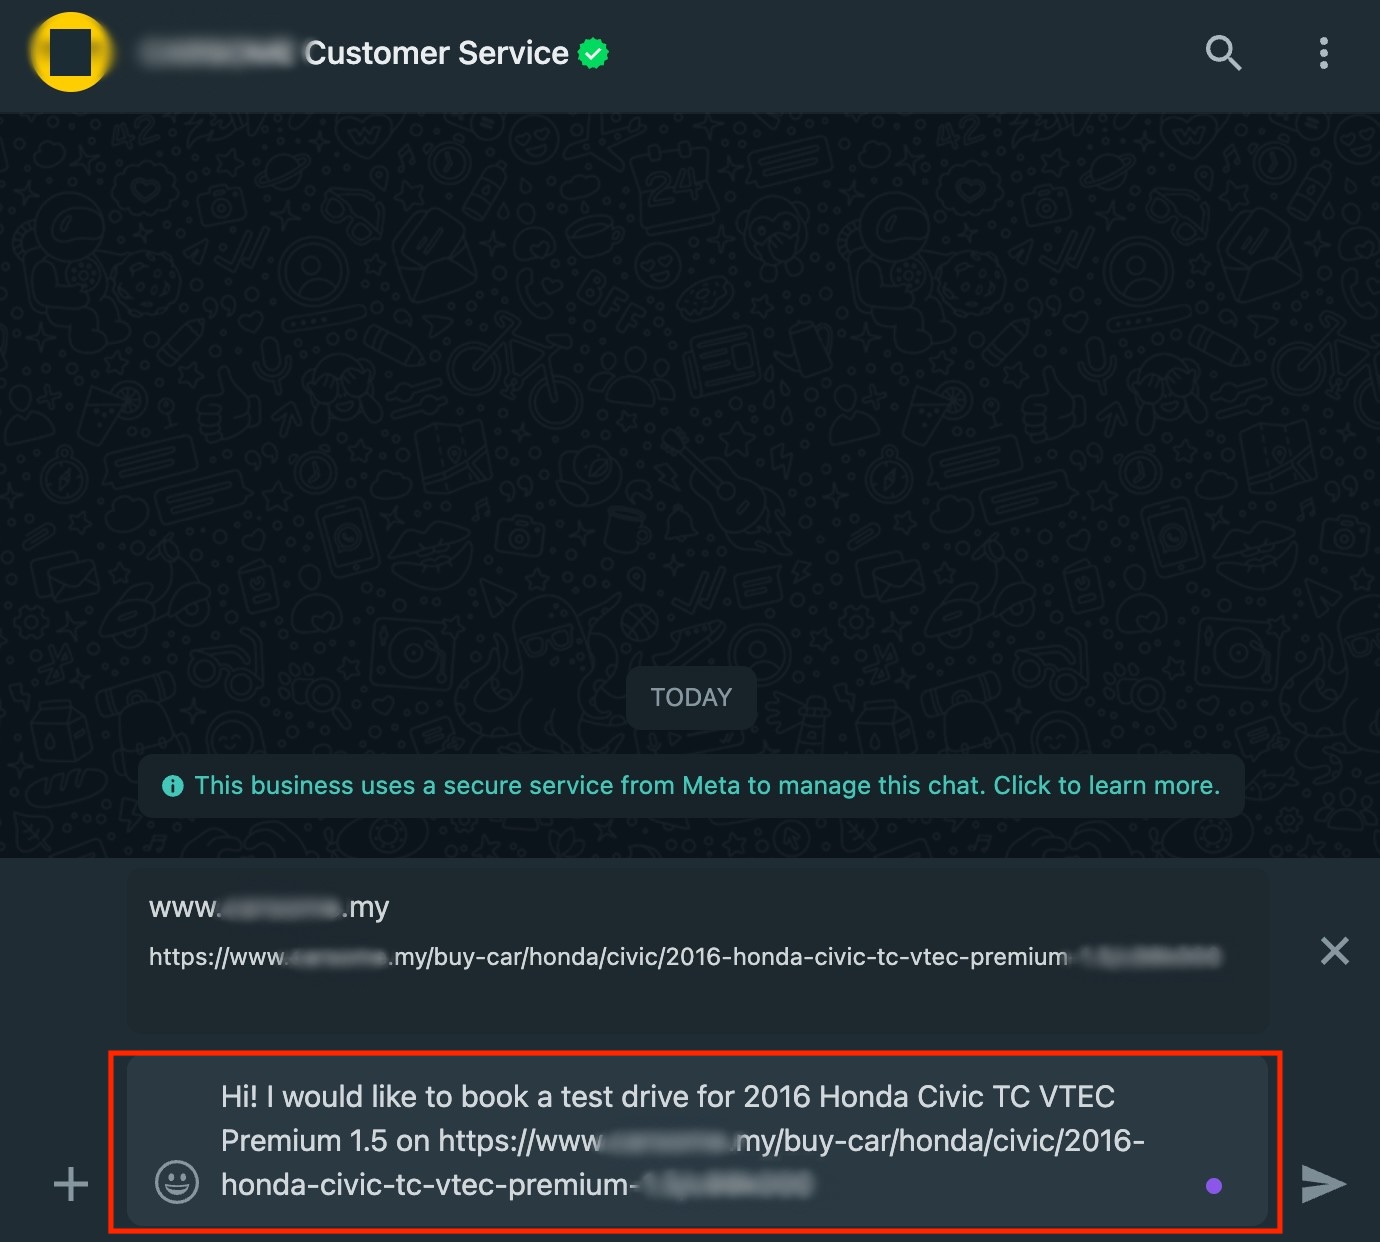
  1. A visitor navigates to a specific car's landing page on your website.

  2. The visitor wants more information or to book a test drive, so he clicks the Growth Widget on the page, and then clicks the WhatsApp icon.

  3. WhatsApp (either the app or web version) is opened and populates a new message with a pre-filled text, e.g. "Hi! I would like to book a test drive for [Car model] on [Link to the landing page of the car]". The car model and link are dynamically filled based on the specific page the visitor was on.

  4. The visitor reviews the pre-filled text and is allowed to add some personal notes, and then sends the message.

  5. You receive the message on your business's WhatsApp account. The pre-filled text lets you know exactly which car the visitor is interested in. This helps in tracking the cars that are driving appointment bookings.

Install the Growth Widget on your website or landing page by copying the widget script code and pasting it into your website’s or page’s code. This website is the same one defined at Website Domains at .

Repeat and for each website where you want to use the Growth Widget. Remember to fill in a unique pre-filled text for each widget so that you can identify the source of the conversation.

For more detailed information of the steps, refer to .

here
Step 1
Step 1
Step 2
this page
Pre-Filled Text
Appointment scheduling scenario
Support and information requests scenario