# How to Guide Customers from Exploration to Purchase with Engaging Menus
{% hint style="success" %}
In this article, you’ll discover how to create comprehensive Main and Sub Menus for inbound Contacts that allow them to self-explore your product line. You will also learn how to aid product exploration and tag their interest on the platform for targeting later.
{% endhint %}
Automate the process of showcasing your extensive product line and sharing product information using interactive product menus. When a Contact initiates a conversation, they are greeted with a menu that lists products amongst other options. Upon selecting a prodyct from the menu, the Contact immediately receives specific information about that product, at the same time, the Contact’s interests are tagged on the platform. Contacts interested in Sales are facilitated by providing access to Sales team using the same menu options.
To achieve these results use a combination of the **Multi-Level Chat Menu: Main Menu** and **Multi-Level Chat Menu: Sub Menu** Workflow Templates.
### Benefits
Use the interactive chat menus to:
* Empower Contacts with prompt access to product information around the clock.
* Provide interested Contacts direct access to your Sales team.
* Keep track of Contact preferences and behaviors to understand market trends and for retargeting.
### Workflow Setup
To use the **Multi-Level Chat Menu: Main Menu** workflow template, in the **Workflows** module, click **+ Add Workflow** > Click **Multi-Level Chat Menu Main Menu** > Click **Use Template**.
1. [**Trigger**](/ismessenger/modules/workflow/triggers.md): The Workflow starts when a conversation is opened by a Contact.
2. **Greeting Message**: Provide a standard greeting message that acts as an immediate response to your Contact. This [greeting message](/ismessenger/modules/workflow/workflow-step/step-send-a-message.md) can be edited. The following options are selected:
* **Channel**: Last Interacted Channel so the message is sent to the same channel as the Contact.
* **Message Type**: Text.
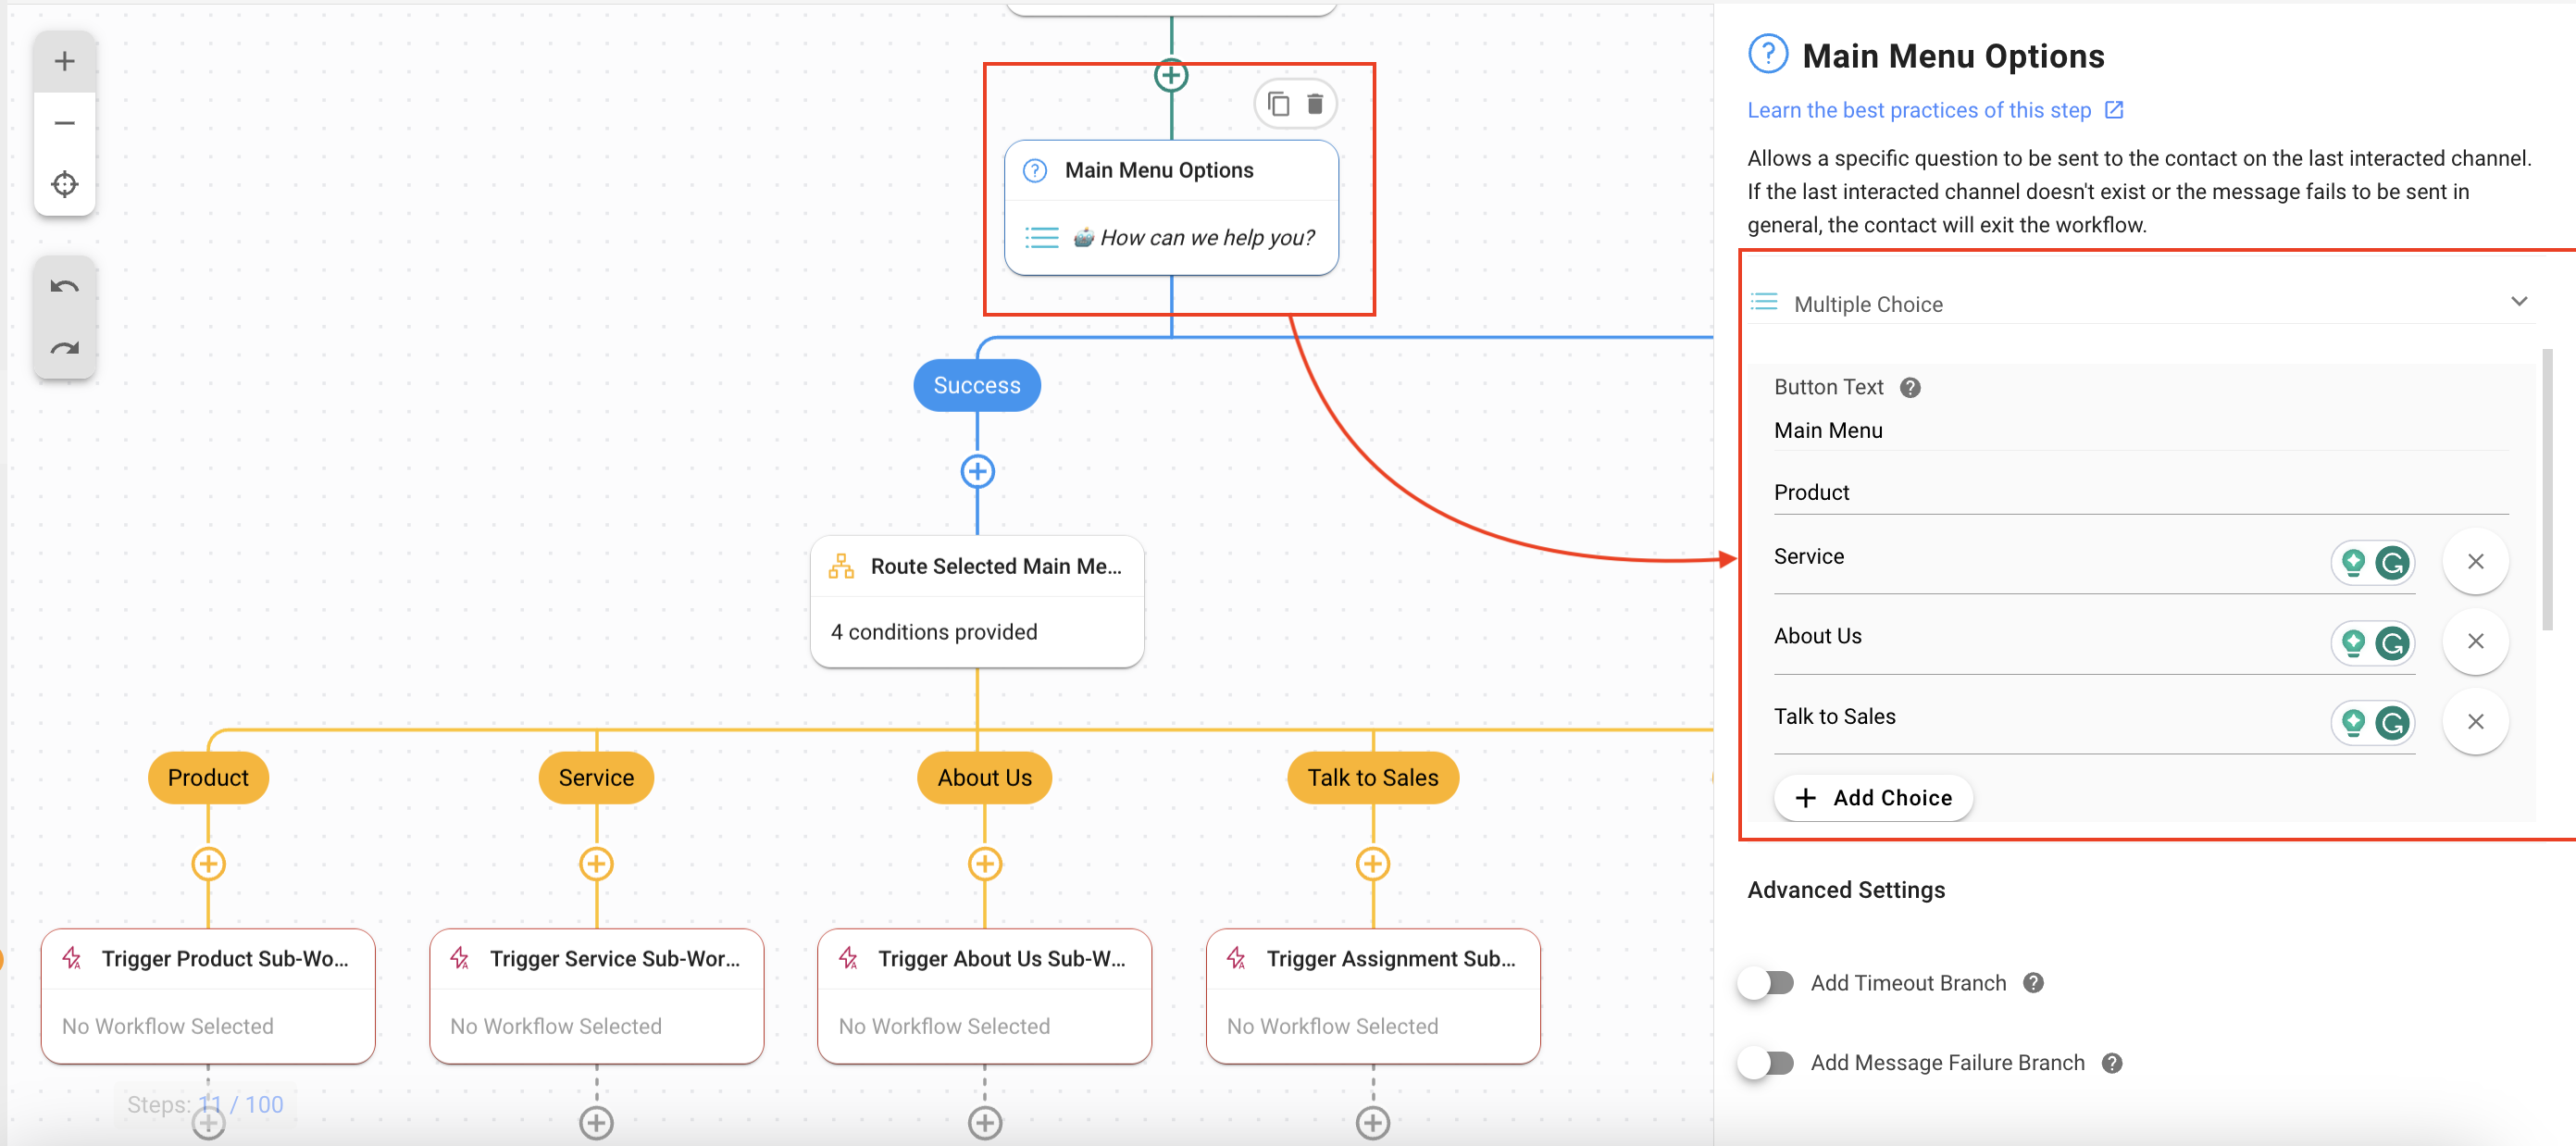
3. **Main Menu Options**: This Step presents a menu to the Contact with several options for selection. In this template, the **Ask a Question** Step is used to present four options to the user. The options are:
* **Question Text**: The Contacts are asked what they need help with.
* **Question Type**: Using **Multiple Choice**, four menu options are presented.
* There are four options: **Product**, **Service**, **About Us**, and **Talk to Sales**. You can edit these values as per your need.
* The selected option is saved as a variable called **mainmenu\_all**. This name can be edited as per your need.
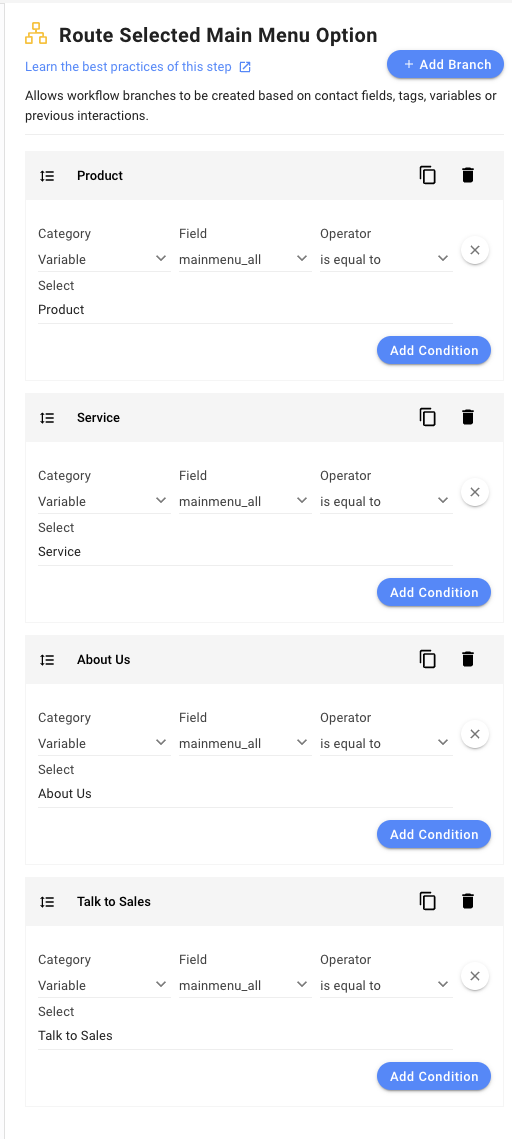
4. **Route Selected Main Menu Option**: This Step routes the Contact to a branch based on the option they selected from the menu using the **Branch** Step. Four branches have been added to handle the four options presented in the **Main Menu Options** Step.
5. **Product** branch: When the Contact selects **Product** from the Main Menu, this branch handles it. The following options were selected to create this branch:
* **Category**: Variable
* **Field**: mainmenu\_all (this is the variable that was used to keep a record of the Contact’s selection)
* **Operator**: is equal to
* **Select**: Product
6. **Service** branch: When the Contact selects **Service** from the Main Menu, this branch handles it. The following options were selected to create this branch:
* **Category**: Variable
* **Field**: mainmenu\_all (this is the variable that was used to keep a record of the Contact’s selection)
* **Operator**: is equal to
* **Select**: Service
7. **About Us** branch: When the Contact selects **About Us** from the Main Menu, this branch handles it. The following options were selected to create this branch:
* **Category**: Variable
* **Field**: mainmenu\_all (this is the variable that was used to keep a record of the Contact’s selection)
* **Operator**: is equal to
* **Select**: About Us
8. **Talk to Sales** branch: When the Contact selects **Talk to Sales** from the Main Menu, this branch handles it. The following options were selected to create this branch:
* **Category**: Variable
* **Field**: mainmenu\_all (this is the variable that was used to keep a record of the Contact’s selection)
* **Operator**: is equal to
* **Select**: Talk to Sales
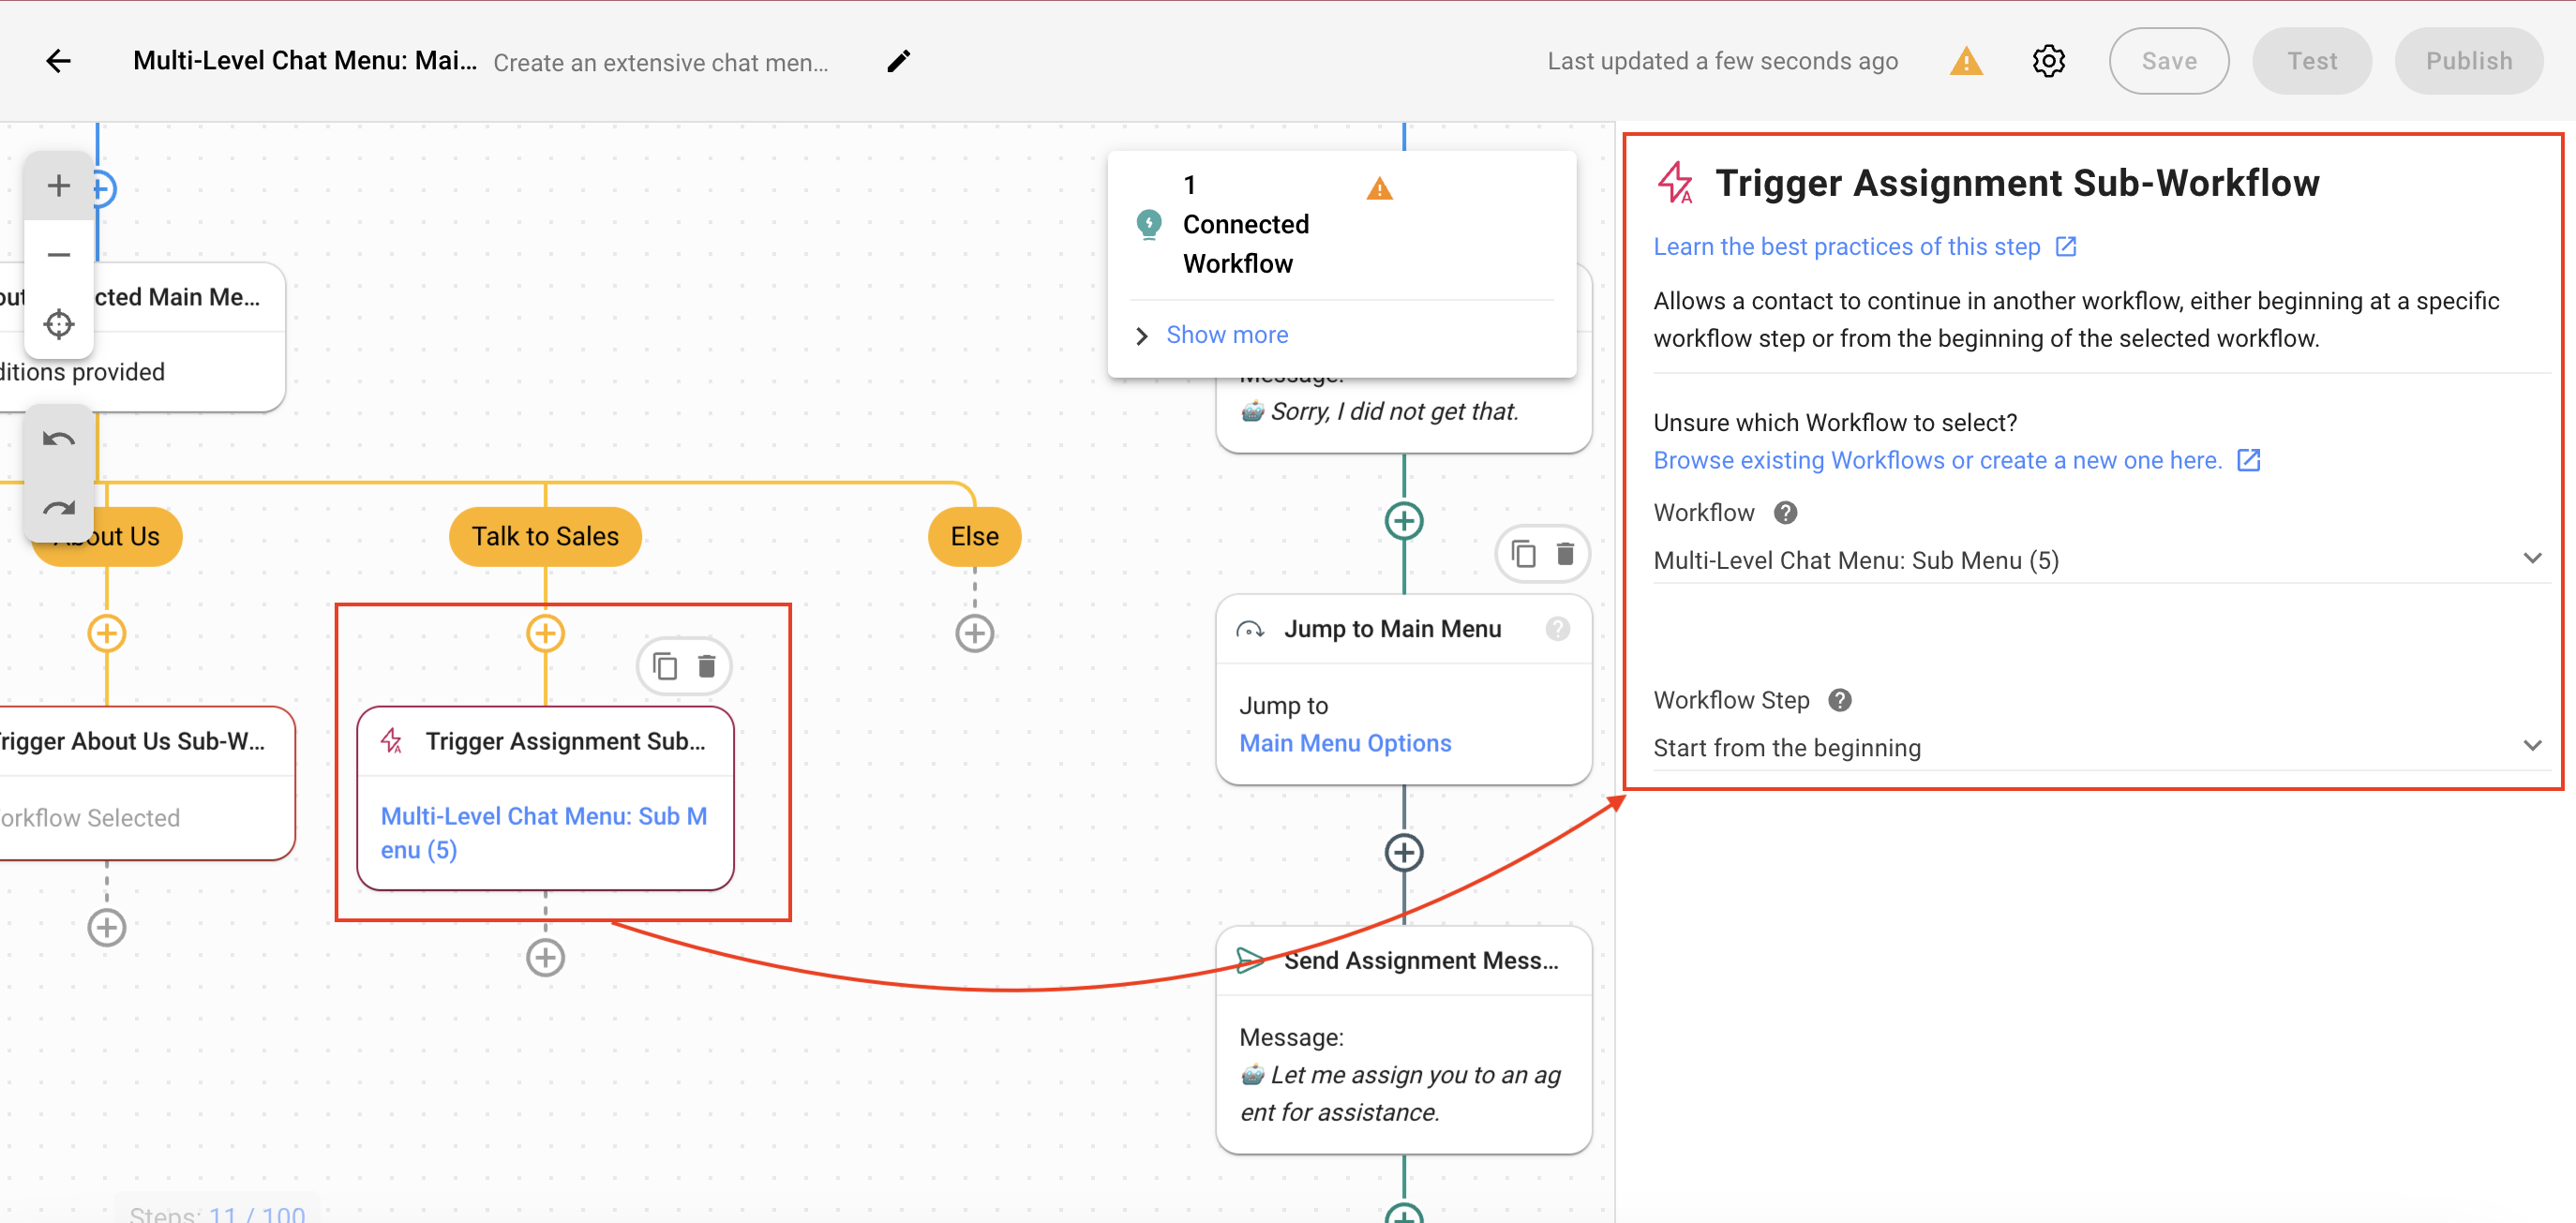
9. **Trigger Sub-Workflow**: This Step triggers a new workflow template (**Multi-Level Chat Menu: Sub Menu**) that provides a tailored menu related to the option selected by the Contact. This Workflow Template is triggered using the [**Trigger Another Workflow**](/ismessenger/modules/workflow/workflow-step/step-trigger-another-workflow.md) [Step](https://help.respond.io/l/en/workflows/step-jump-to) and the following options are set:
* **Workflow**: Multi-Level Chat Menu: Sub Menu.
* **Workflow Step**: Start from the beginning.
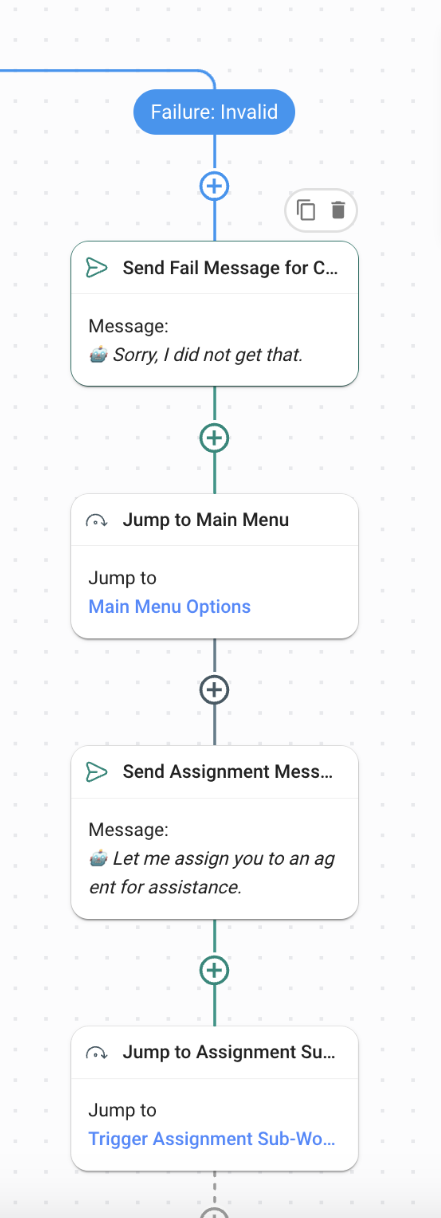
10. **Failure** branch: This a default branch of the **Ask a Question** Step and is used in case, the Contact does not select a valid option, the Workflow goes into the **Failure: Invalid** branch (this is a default branch). Here, the Contact is sent a polite message, and the main menu is shown again.
* **Jump to Main Menu**: This Step presents the main menu to the Contact again so that they can make the correct selection using the Step called **Jump to Another Step**. The following options are selected:
* **Step**: For this workflow template the **Main Menu Options** Step is used.
* **Send Assignment Message**: Sends the Contact a message that they are being directed to an agent.
* **Jump to Assignment Sub Workflow Step**: The Step assigns the Contact to an agent by jumping to the **Trigger Assignment Sub-Workflow** Step of the **Multi-Level Chat Menu: Sub Menu** workflow template.
To use the **Multi-Level Chat Menu: Sub Menu** workflow template, in the **Workflows** module, click **+ Add Workflow** > Click **Multi-Level** **Chat Menu: Sub Menu** > Click **Use Template**.
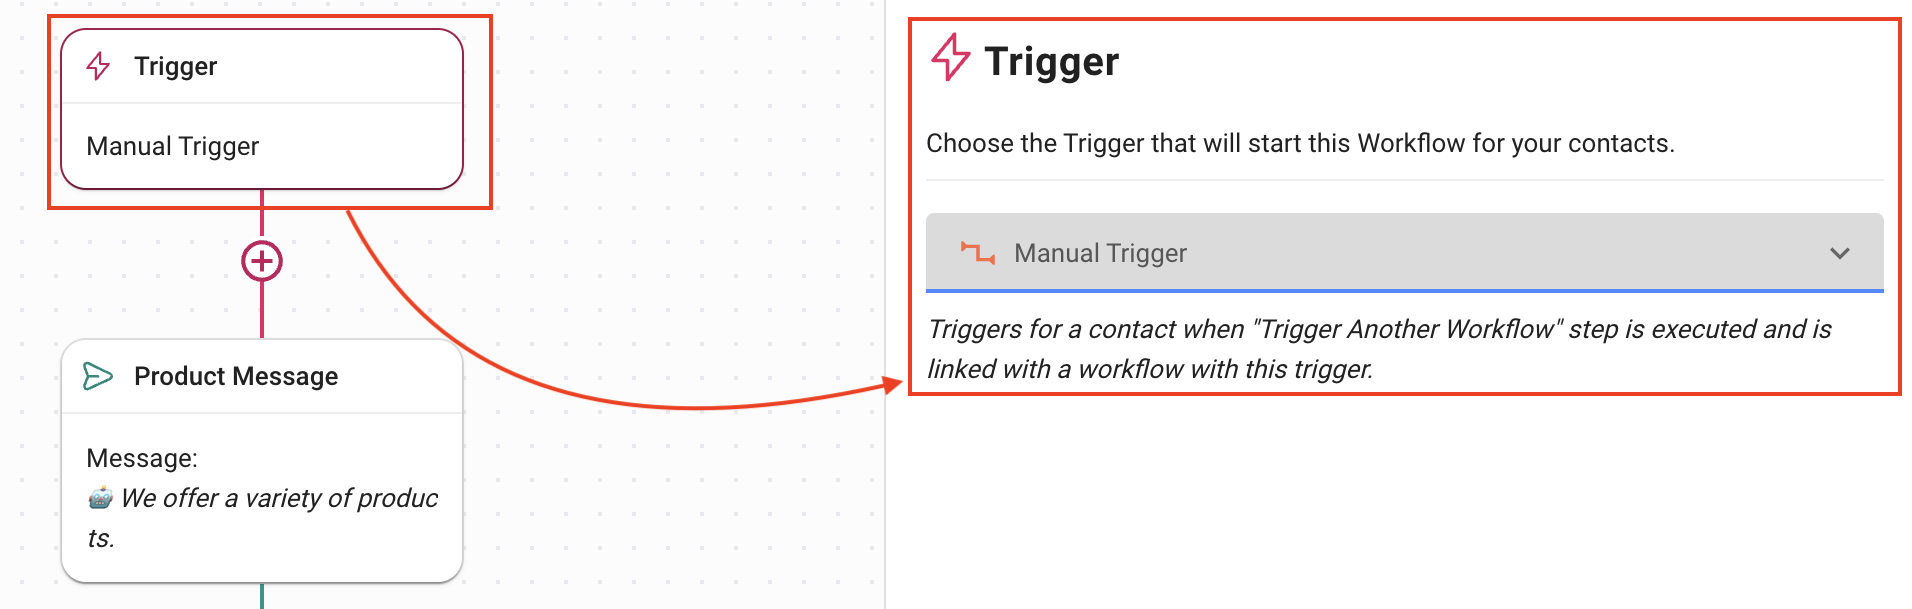
1. [**Trigger**](https://help.respond.io/workflows/workflow-triggers): The Workflow starts when it is manually [triggered by another workflow](/ismessenger/modules/workflow/workflow-step/step-trigger-another-workflow.md) i.e., the **Multi-Level Chat Menu: Sub Menu** workflow template in this case.
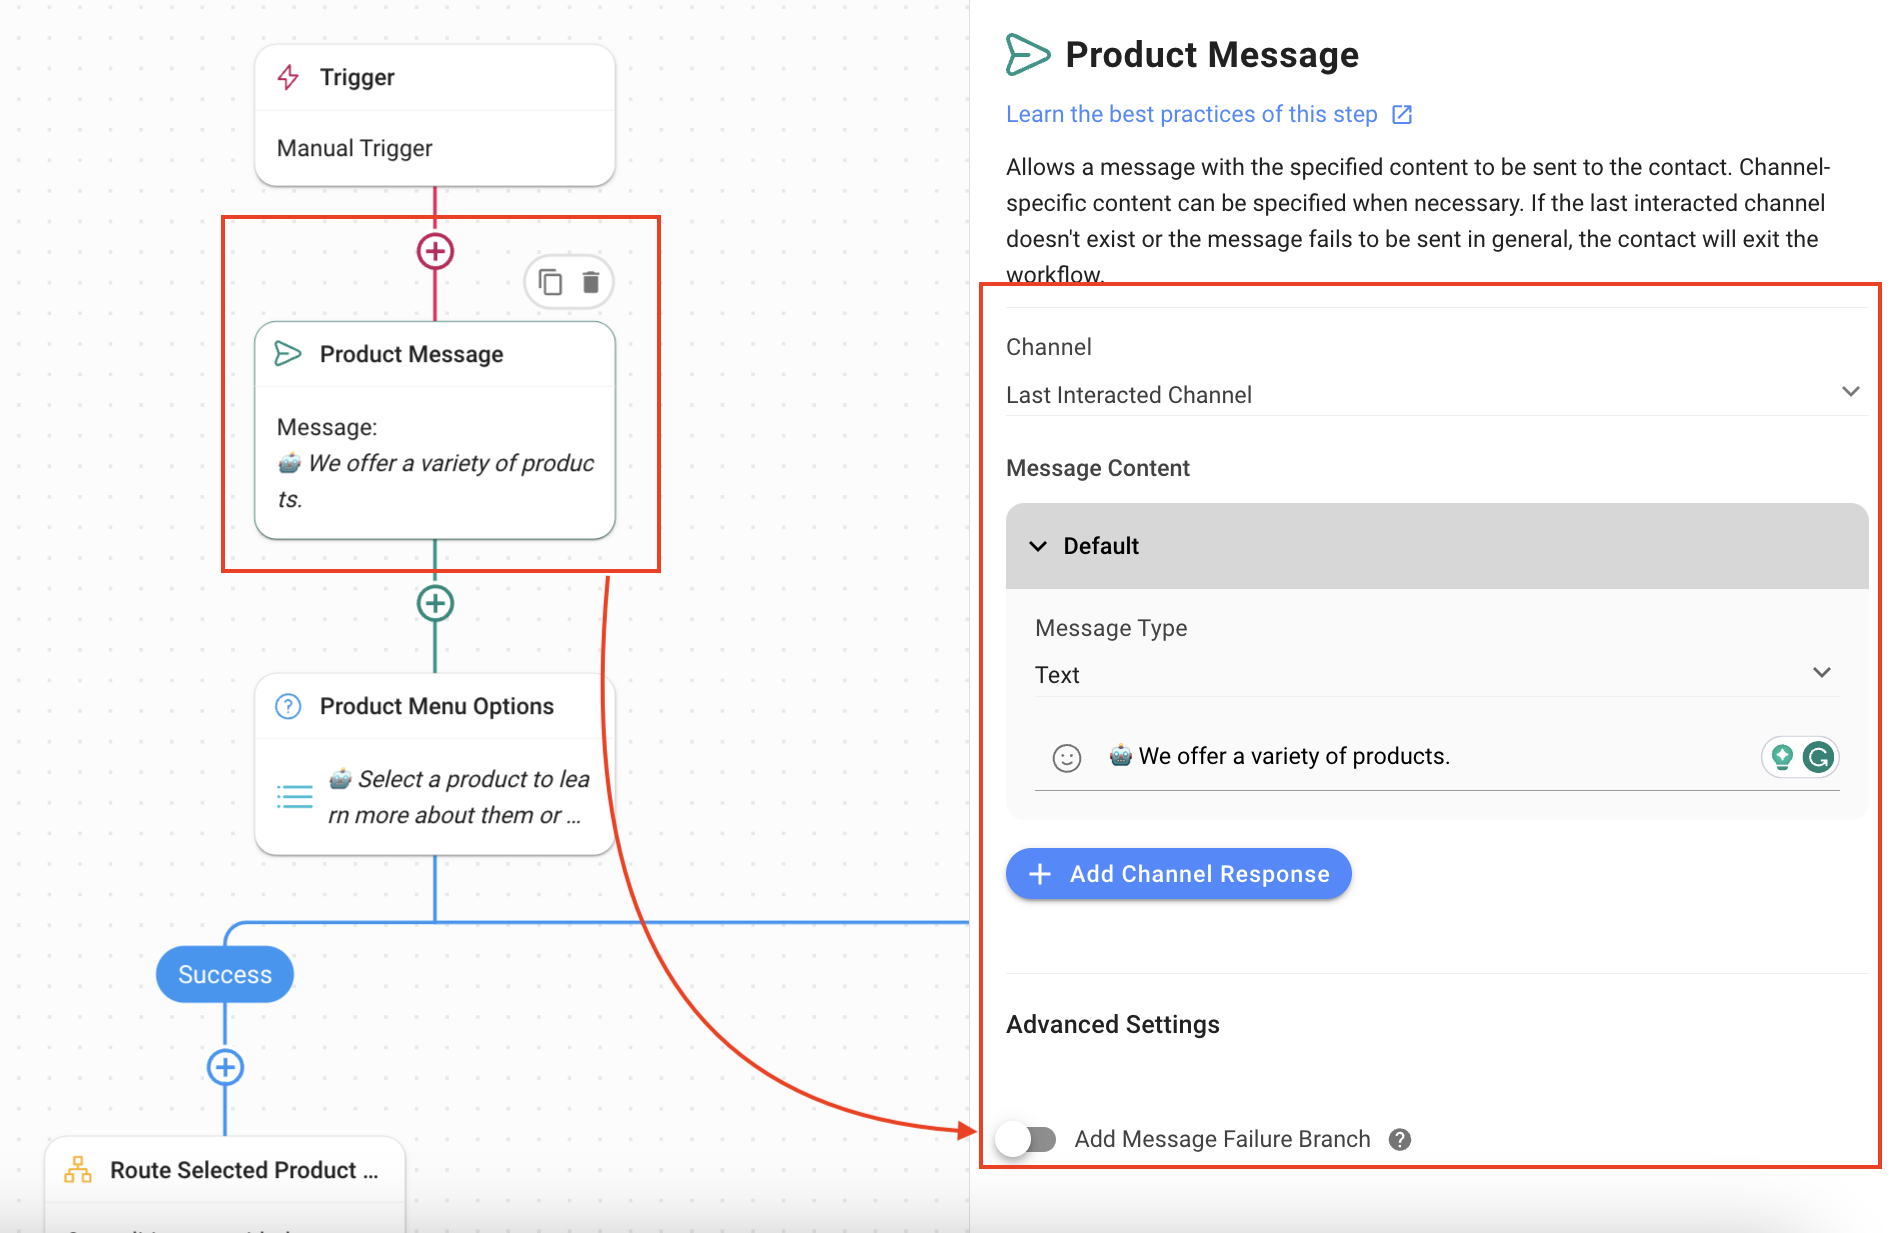
2. **Product Message**: Provides a standard product-related informative message using the [**Send a Message**](/ismessenger/modules/workflow/workflow-step/step-send-a-message.md) Step. The following options are selected:
* **Channel**: Last Interacted Channel so the message is sent to the same channel as the Contact.
* **Message Type**: Text.
3. **Product Menu Options**: This step presents a menu to the Contact with several options for selection. In the template, the **Ask a Question** Step is used to present three options to the user.
* **Question Text**: The Contacts are asked which product they need to learn more about.
* **Question Type**: Using **Multiple Choice**, three menu options are presented, i.e., **Product A, Product B**, and **Back to Main Menu**. You can edit these values as per your requirements.
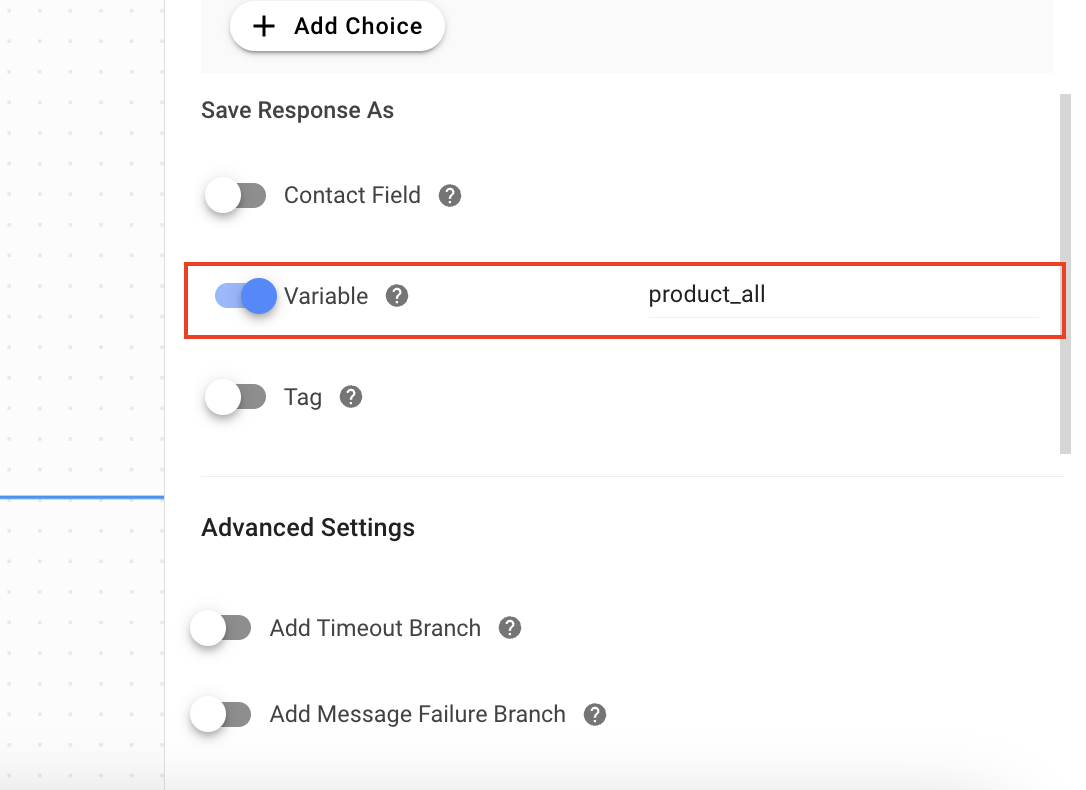
* The Contact’s response will be saved in a variable called **product\_all** adjacent to the **Variable** toggle. You can name this variable as per your requirement.
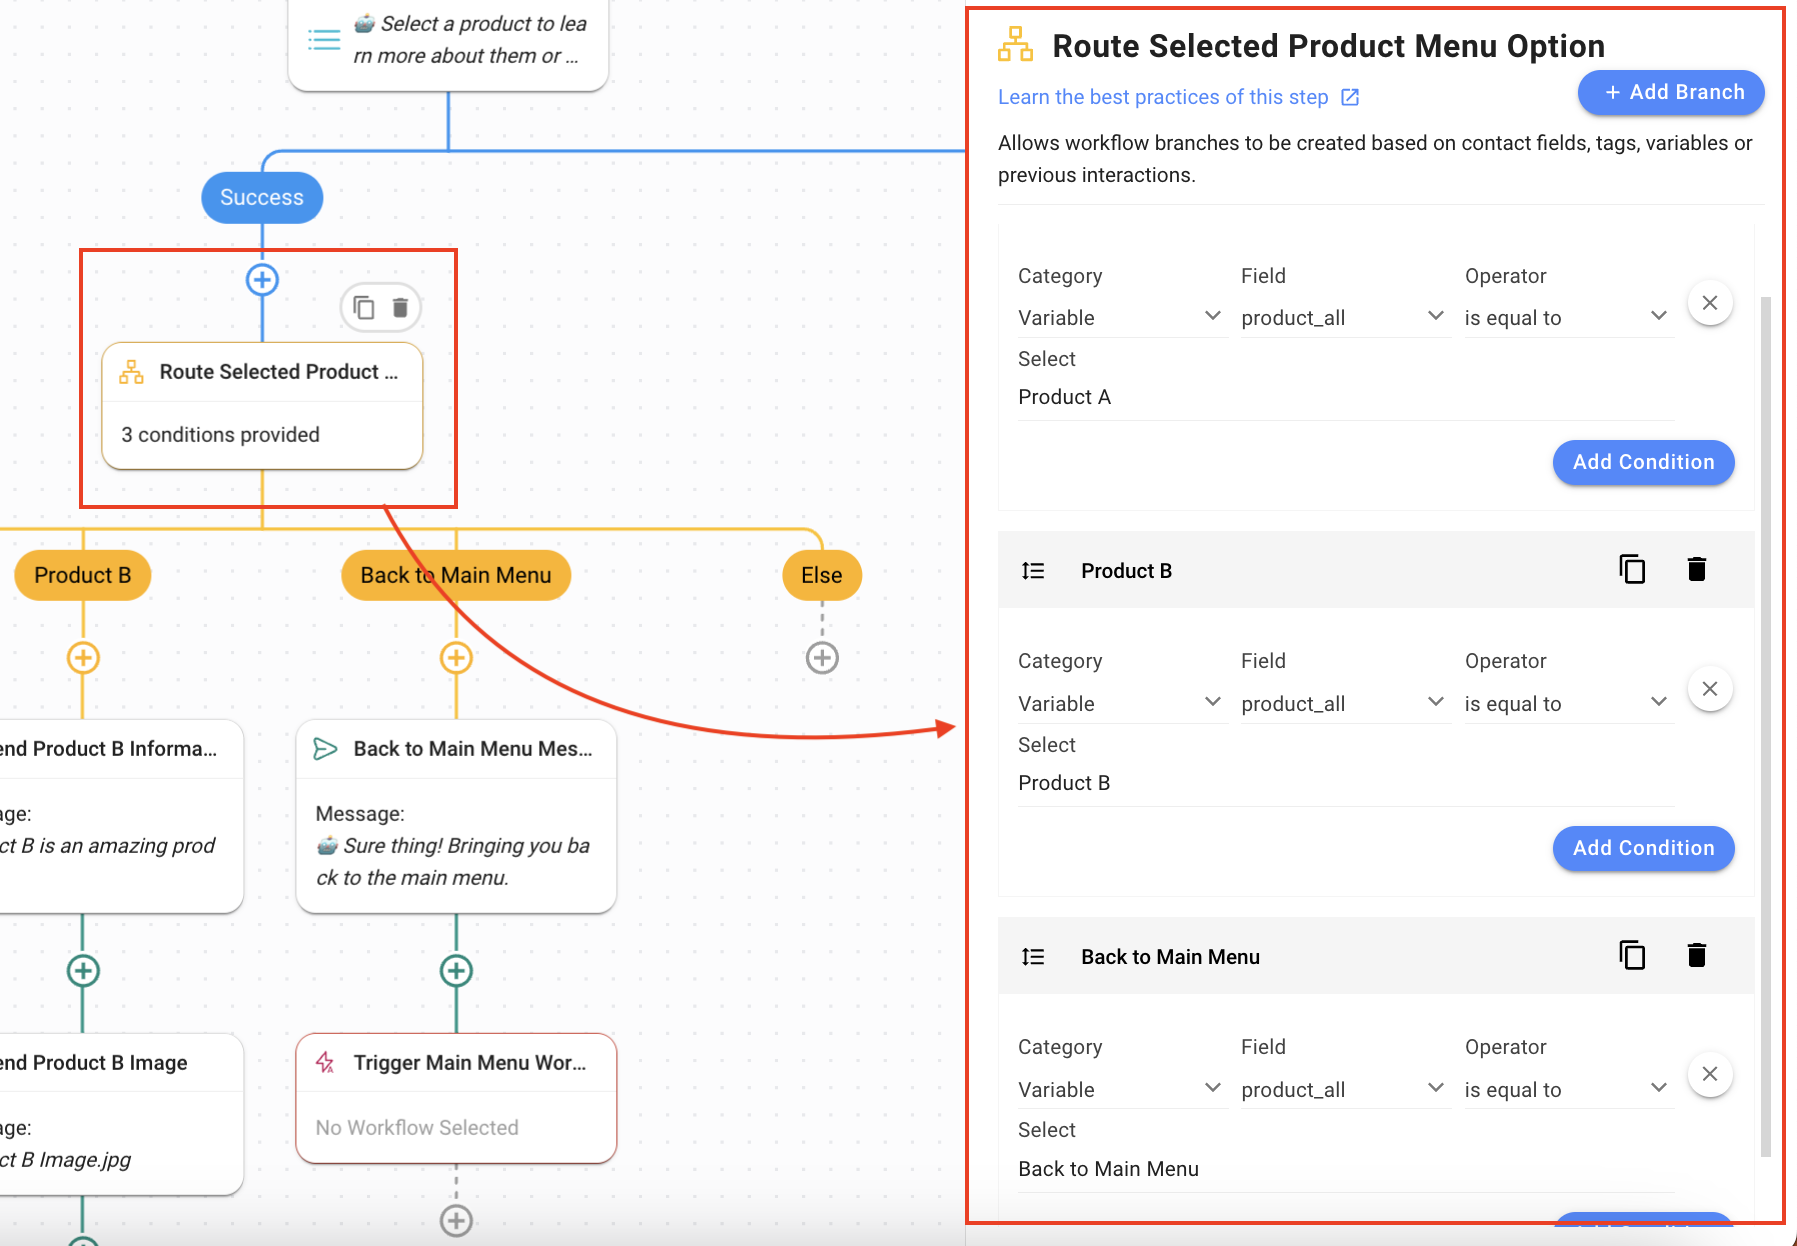
4. **Route Selected Main Menu Option**: Four branches are added using the **Branch** Step to handle the four options presented to the Contact.
5. **Product A** branch: When the Contact selects **Product A** from the Product Menu, this branch handles it. The following options are selected to create this branch:
* **Category**: Variable
* **Field**: product\_all (this is the variable that was used to keep a record of the Contact’s selection)
* **Operator**: is equal to
* **Select**: Product A
6. **Product B** branch: When the Contact selects **Product B** from the Product Menu, this branch handles it. The following options were selected to create this branch:
* **Category**: Variable
* **Field**: product\_all (this is the variable that was used to keep a record of the Contact’s selection)
* **Operator**: is equal to
* **Select**: Product B
7. **Back to Main Menu** branch: When the Contact selects **Back to Main Menu** from the Product Menu, i.e., they want to return to the menu presented by the **Multi-Level Chat Menu: Main Menu** template\*\*,\*\* this branch handles it. The following options were selected to create this branch:
* **Category**: Variable
* **Field**: product\_all (this is the variable that was used to keep a record of the Contact’s selection)
* **Operator**: is equal to
* **Select**: Back to Main Menu
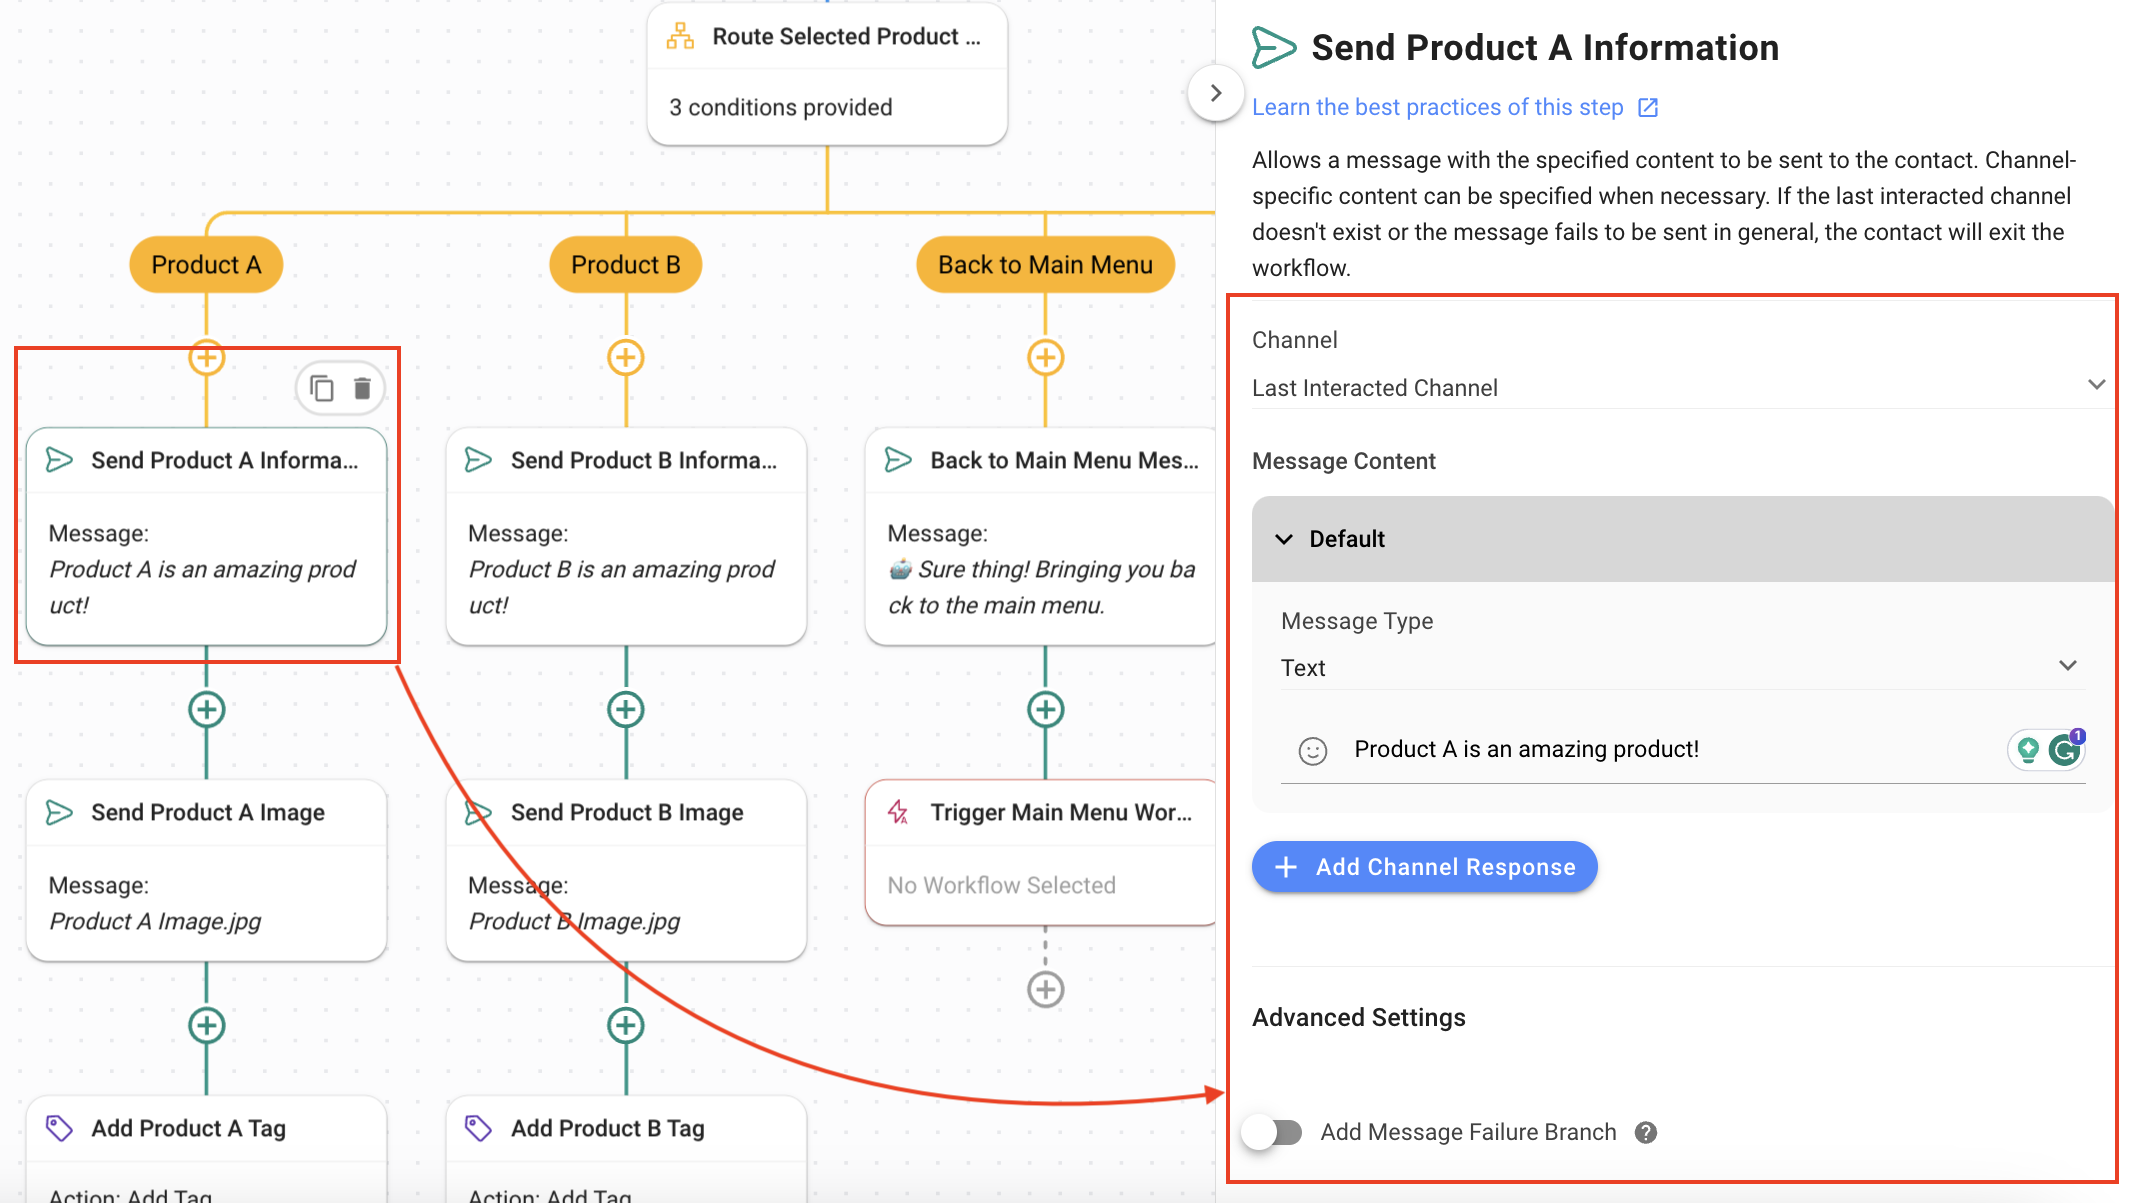
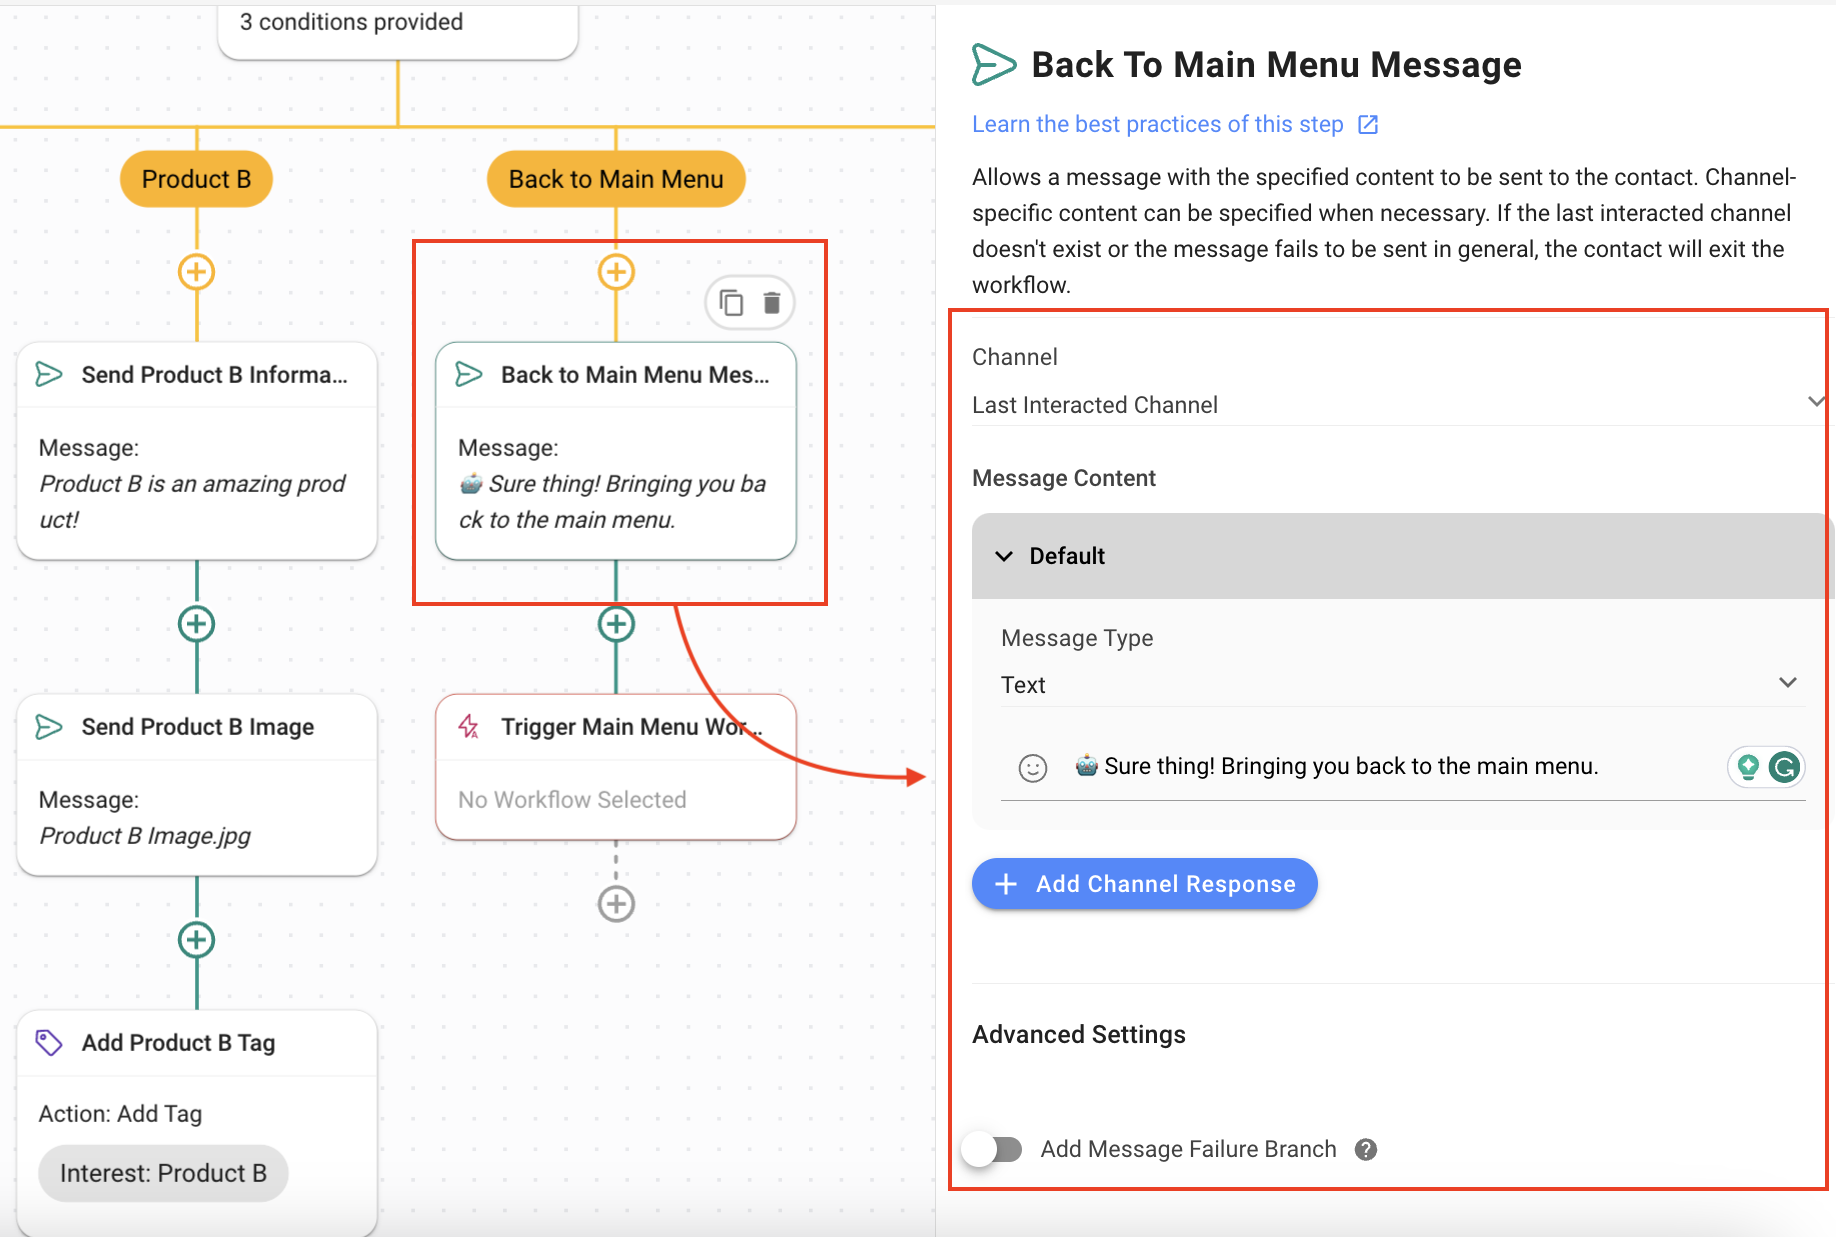
8. **Send Product Information**: These are the first Steps in the **Product A** and **Product B** branches that send a descriptive message about the product to the Contact using the **Send Message** Step:
* **Channel**: **Last Interacted Channel** is used so the Contact gets the information on the channel they are using.
* **Message Type**: Text.
* The product information can be provided here.
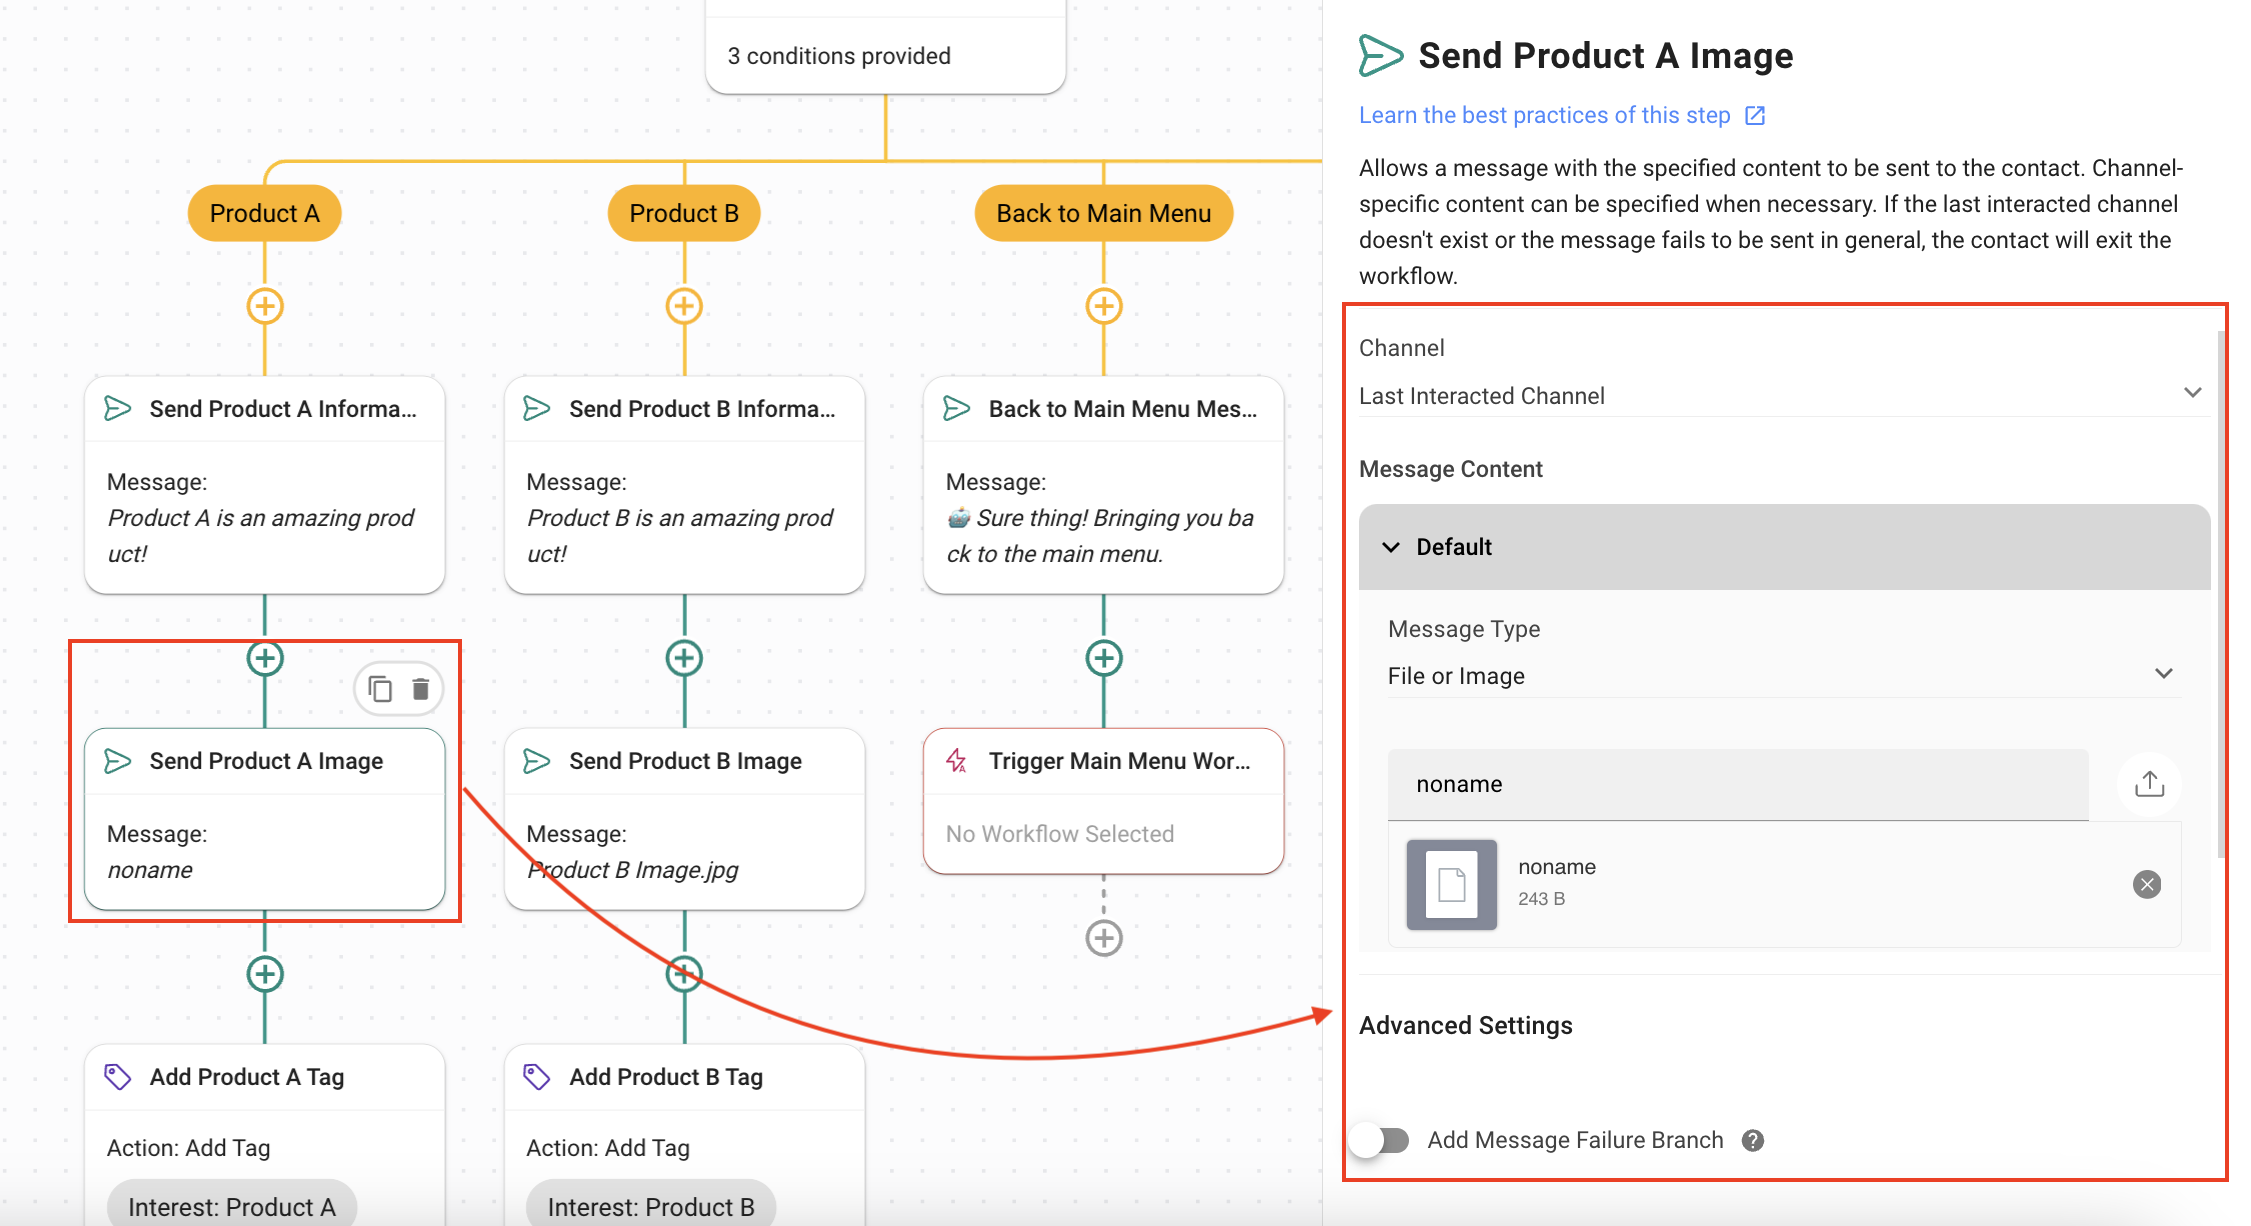
9. **Send Product Image**: Send the product image to the Contact using the **Send Message** Step:
* **Channel**: **Last Interacted Channel** is used so the Contact gets the information on the channel they are using.
* **Message Type**: File or Image.
* The product image is uploaded.
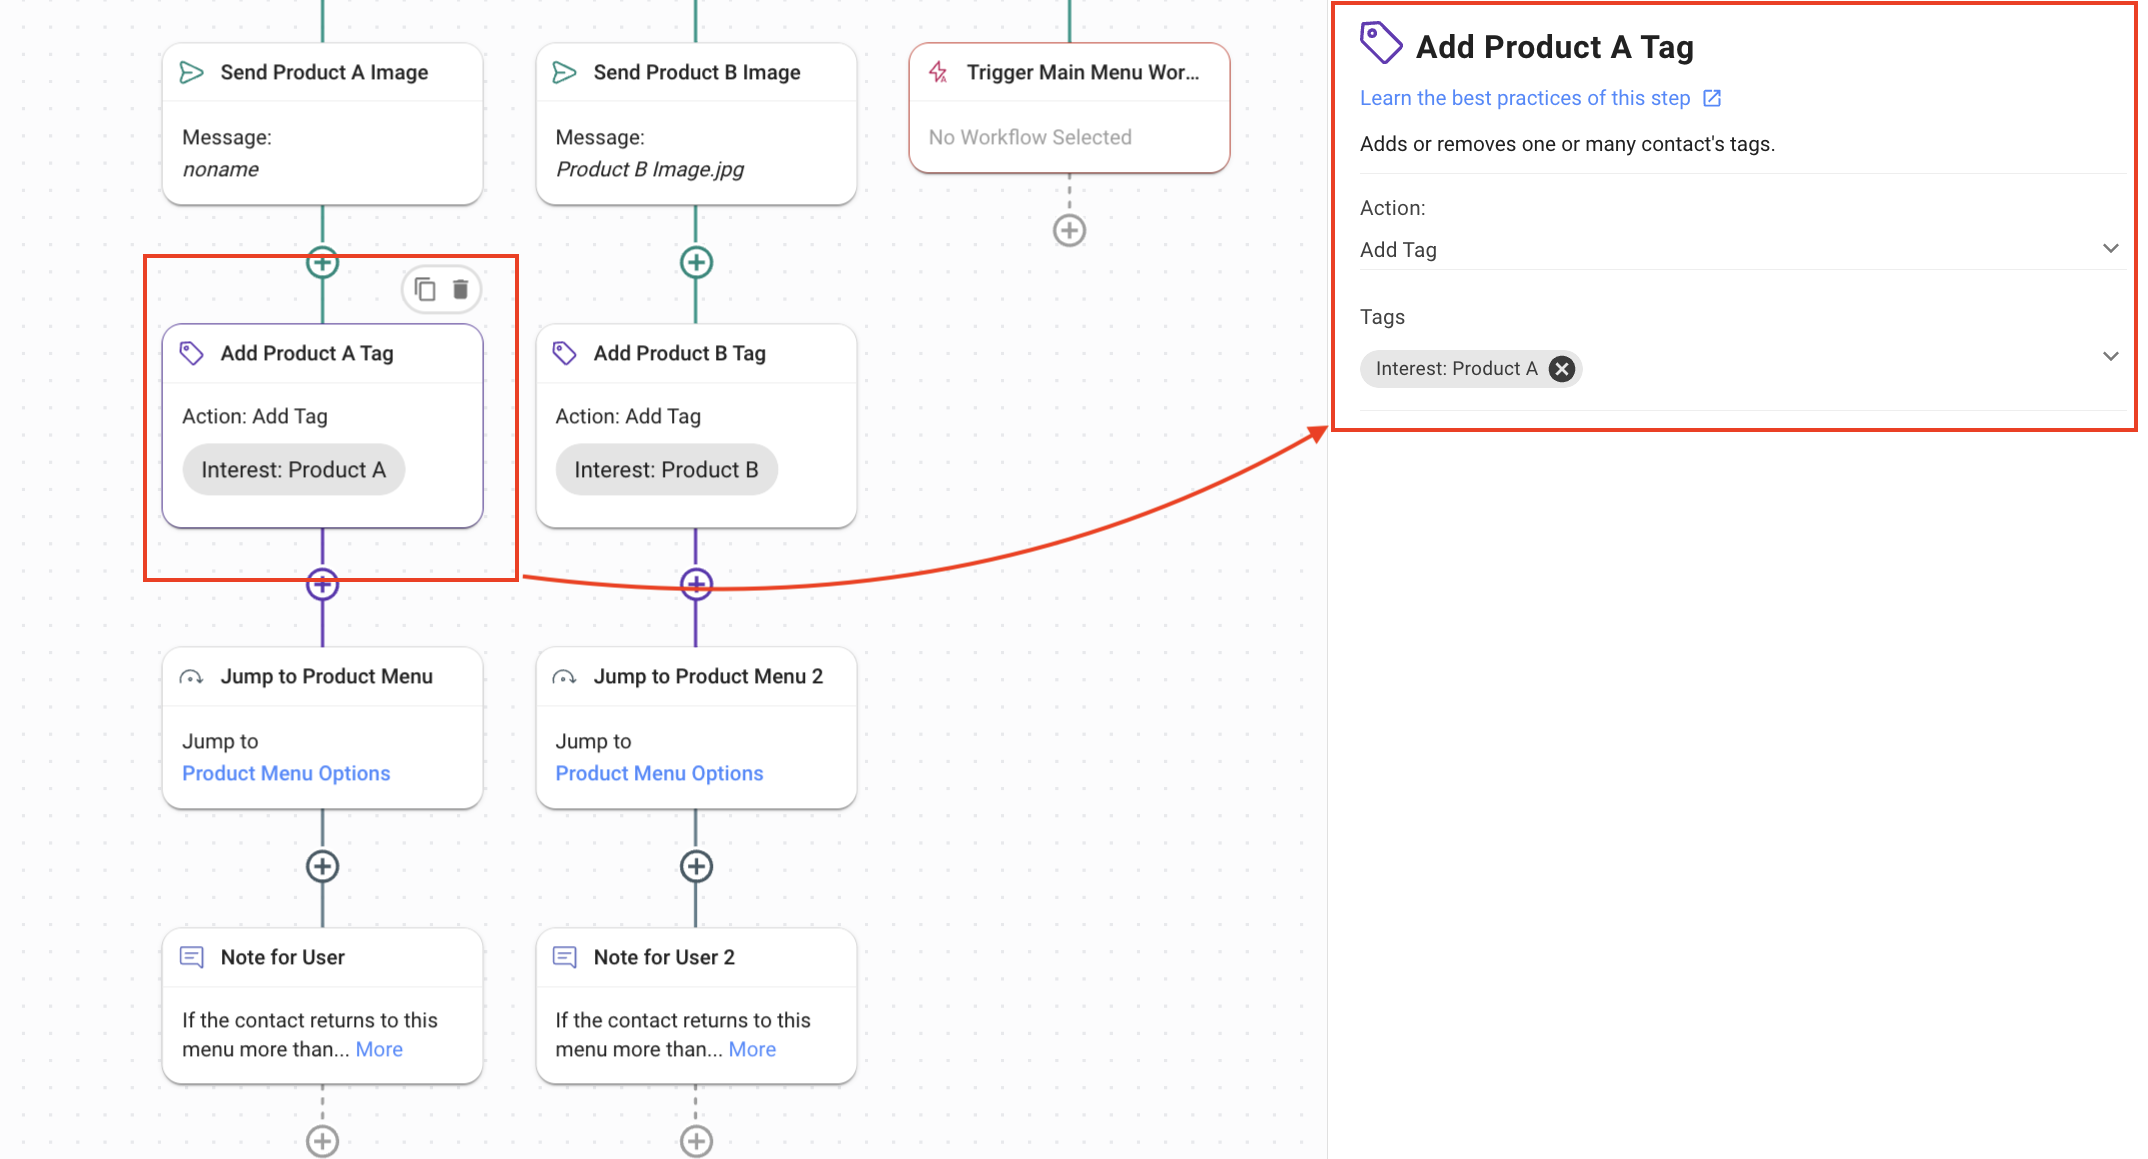
10. **Tag Product Interest**: Tag the Contact’s interest using the **Update Contact’s Tag** Step. This information is useful for retargeting the Contact. The options selected are:
* **Action**: Add Tag.
* **Tag**: A tag that shows the Contact’s interest e.g., Product A or Product B.
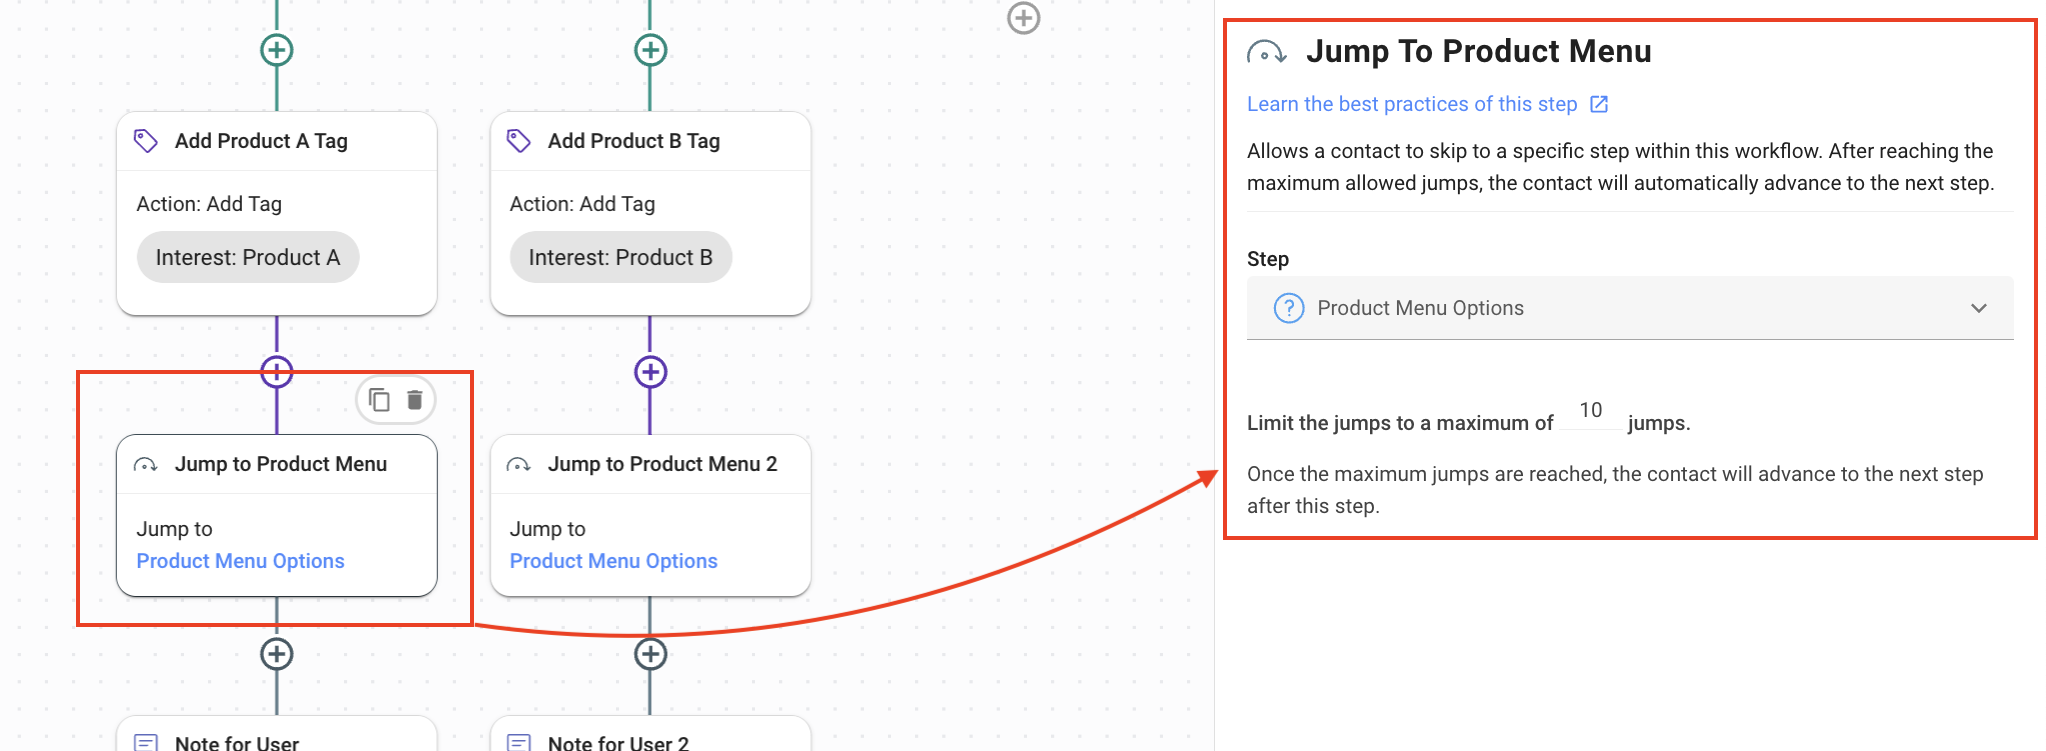
11. **Jump to Product Menu**: The Contact returns to the **Product Menu** Step using the **Jump to Another Step** after having consumed all the information they need. You can select the required step from the **Step** dropdown list.
12. **Back to Main Menu Message**: This is the first Step in the **Back to Main Menu** branch and sends a message to the Contact that they are returning to the main menu i.e., the menu presented by the **Multi-Level Chat Menu: Main Menu** template\*\*.\*\*
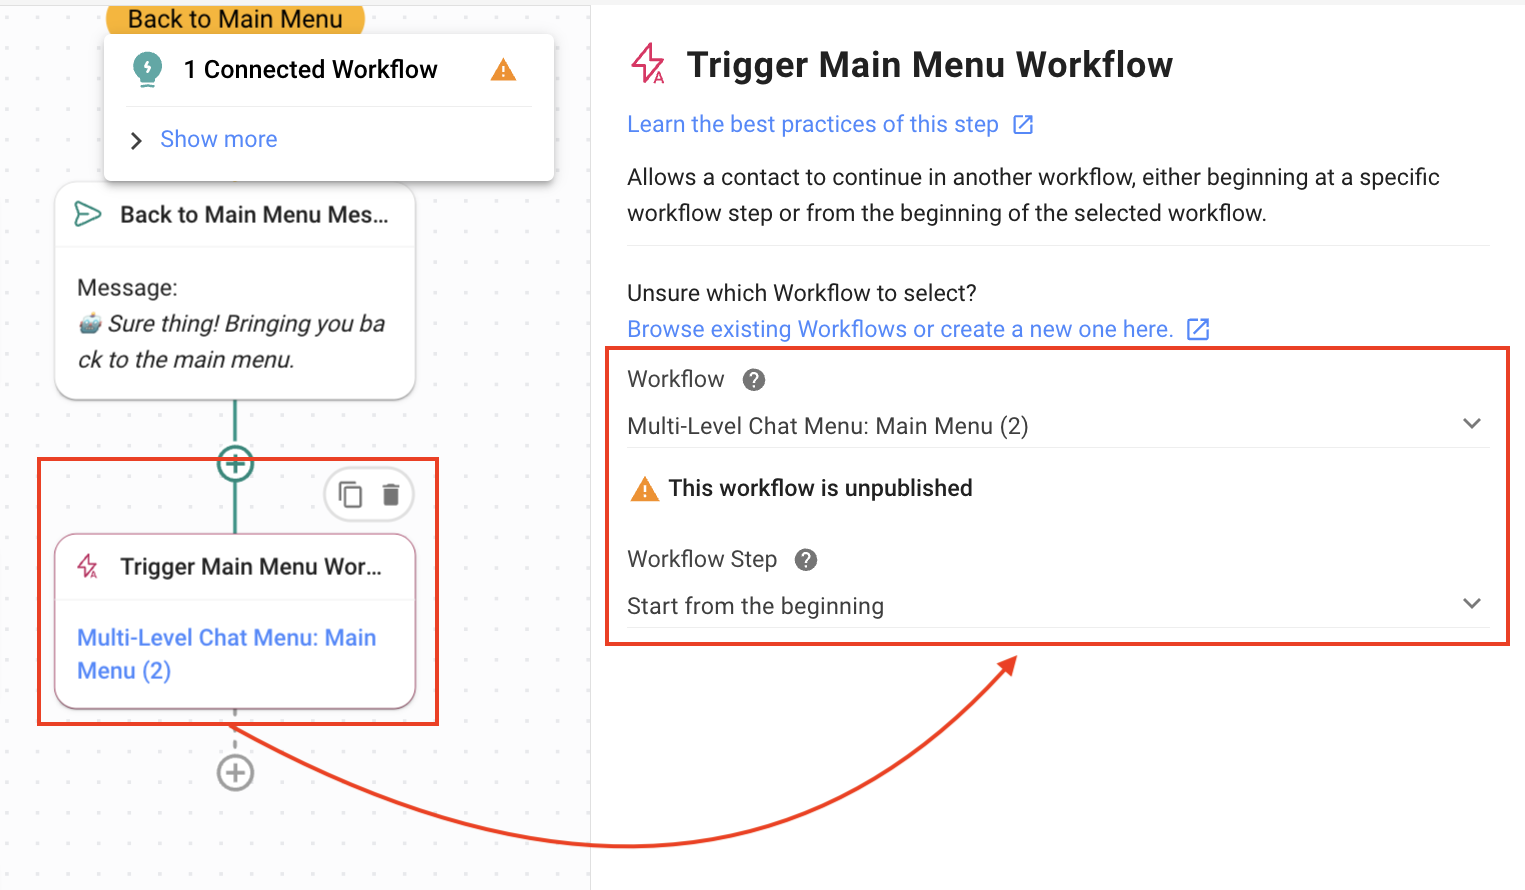
13. **Trigger Main Menu Workflow**: This Step triggers the **Multi-Level Chat Menu: Main Menu** Workflow which shows the Contacts the options of the main menu.
{% hint style="success" %}
You have created extensive Main and Sub Menus for inbound Contacts to allow them to self-explore your product line, provide them with product information, tag their interest on the platform, and access the Sales team when required.
{% endhint %}
---
# Agent Instructions: Querying This Documentation
If you need additional information that is not directly available in this page, you can query the documentation dynamically by asking a question.
Perform an HTTP GET request on the current page URL with the `ask` query parameter:
```
GET https://docs.is-messenger.com/ismessenger/how-to-guide-customers-from-exploration-to-purchase-with-engaging-menus.md?ask=
```
The question should be specific, self-contained, and written in natural language.
The response will contain a direct answer to the question and relevant excerpts and sources from the documentation.
Use this mechanism when the answer is not explicitly present in the current page, you need clarification or additional context, or you want to retrieve related documentation sections.