# How to Automatically Qualify Contacts Based on Budget Using AI Agent
{% hint style="success" %}
In this article, you’ll discover how to automatically qualify Contacts based on whether they have the budget for your service using AI Agent.
{% endhint %}
For businesses managing a high volume of incoming leads, sales agents may face challenges in promptly identifying those with a higher likelihood of conversion. This may result in agents occasionally investing time in leads that are not viable, potentially missing opportunities with more promising leads. To mitigate this risk, an AI Agent is utilized to promptly qualify leads, allowing for prioritization based on lead quality.
### Benefits of Automated Collection of Information
Qualify Contacts by budget via AI Agent because:
* Facilitate contact conversion by automating the qualification process.
* Reduce manual effort required to sort and tag qualified Contacts.
* Handle basic Contact queries using AI.
### Workflow Setup
To use the **Lead Qualification via AI/Lead Qualification via AI: Click to Chat Ads** workflow template, download one of these JSON files:
click **+ Add Workflow** > Click Lead Qualification with AI or Lead Qualification with AI: Click to Chat Ads > **Use Template** in the **Workflows** module.
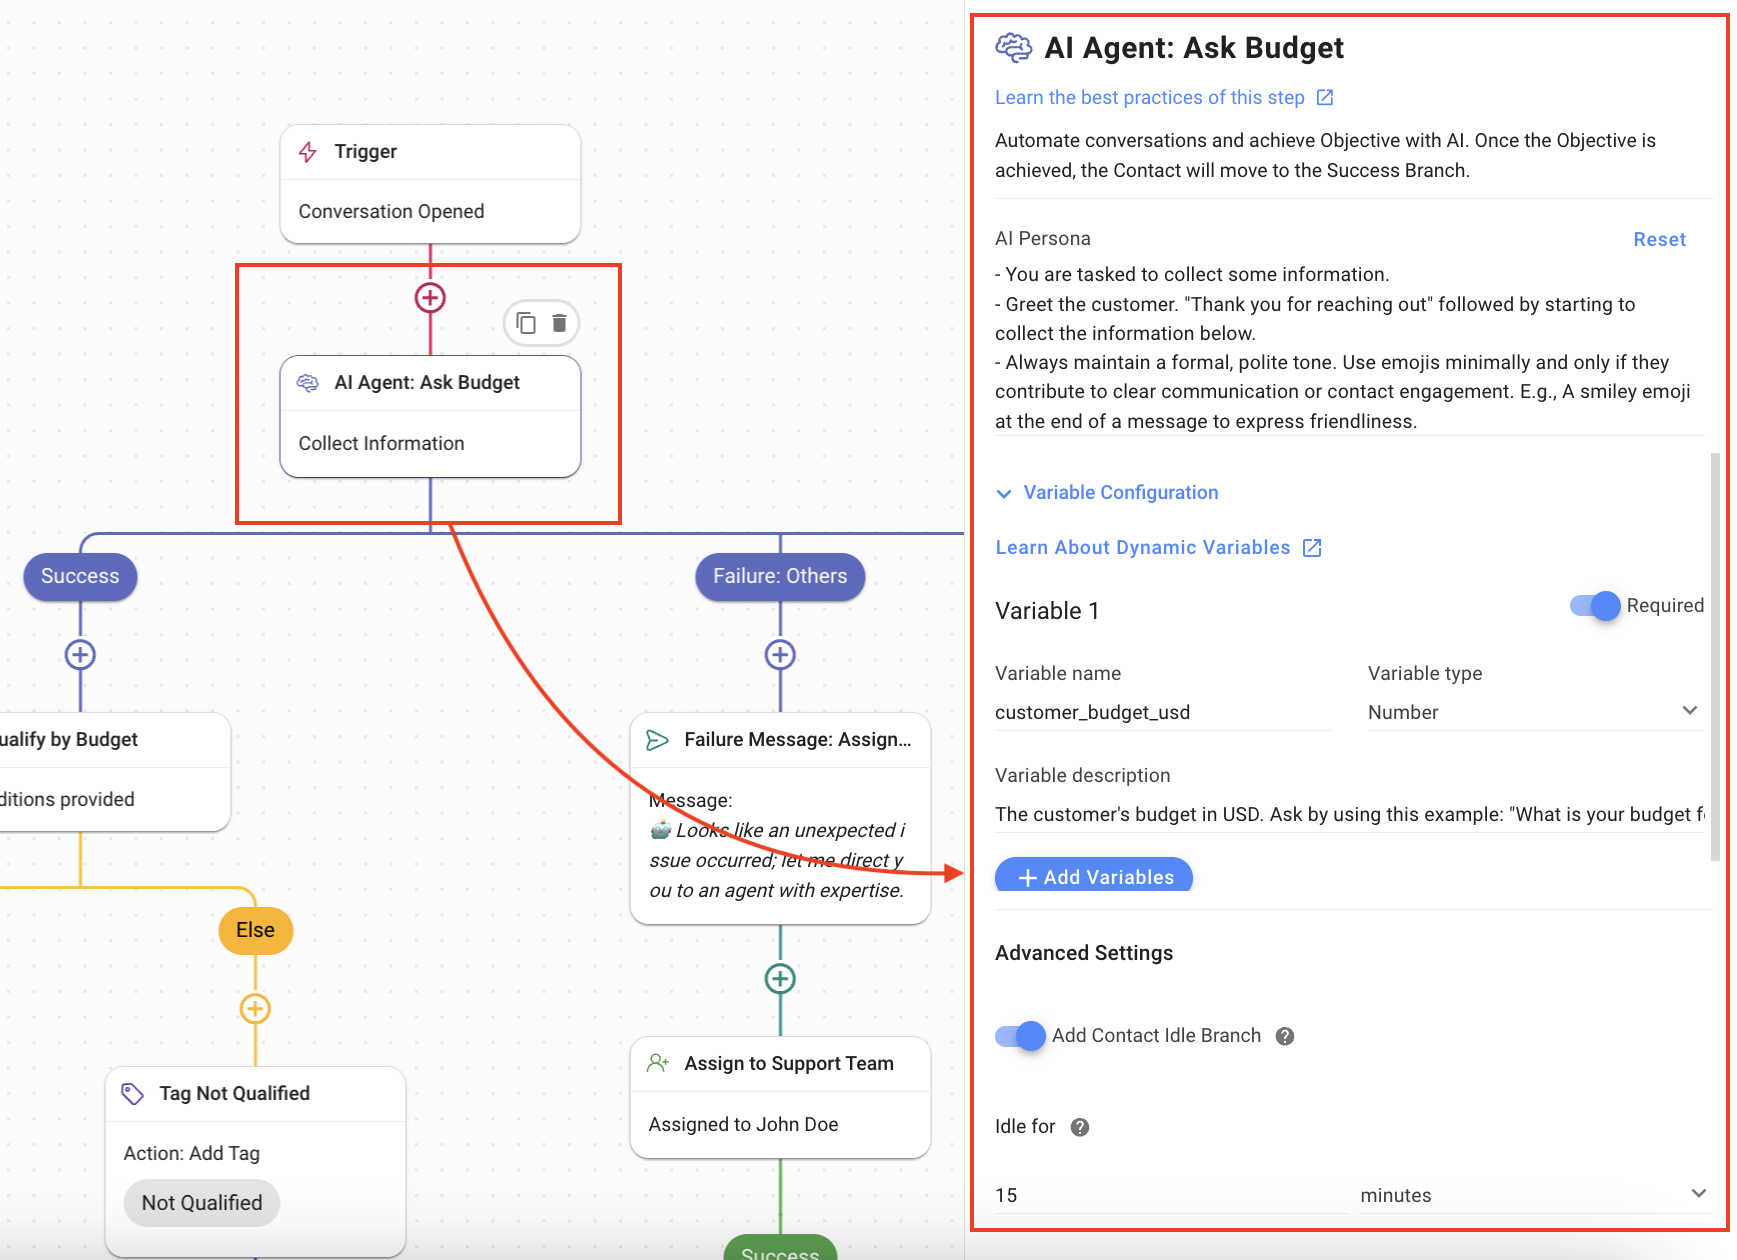
1. [**Trigger**](https://help.respond.io/l/en/workflows/workflow-triggers): The Workflow starts when a conversation is opened by the Contact by sending a message or by clicking a Click to Chat Ad.
2. **AI Agent: Ask Budget**: The **AI Agent** Step is used to find out what the Contact’s budget is for the service. The following settings were used:
3. **AI Persona**: The persona ensures that the AI Agent starts the conversation, greets the Contact and then immediately collects the required information. All of this is done while maintaining a formal but polite tone.
4. **Variable**: The Contact’s budget information is saved in a variable, **customer\_budget\_usd**.
* **Variable name**: customer\_budget\_usd
* **Variable type**: Number
* **Variable description**: The budget is in USD.
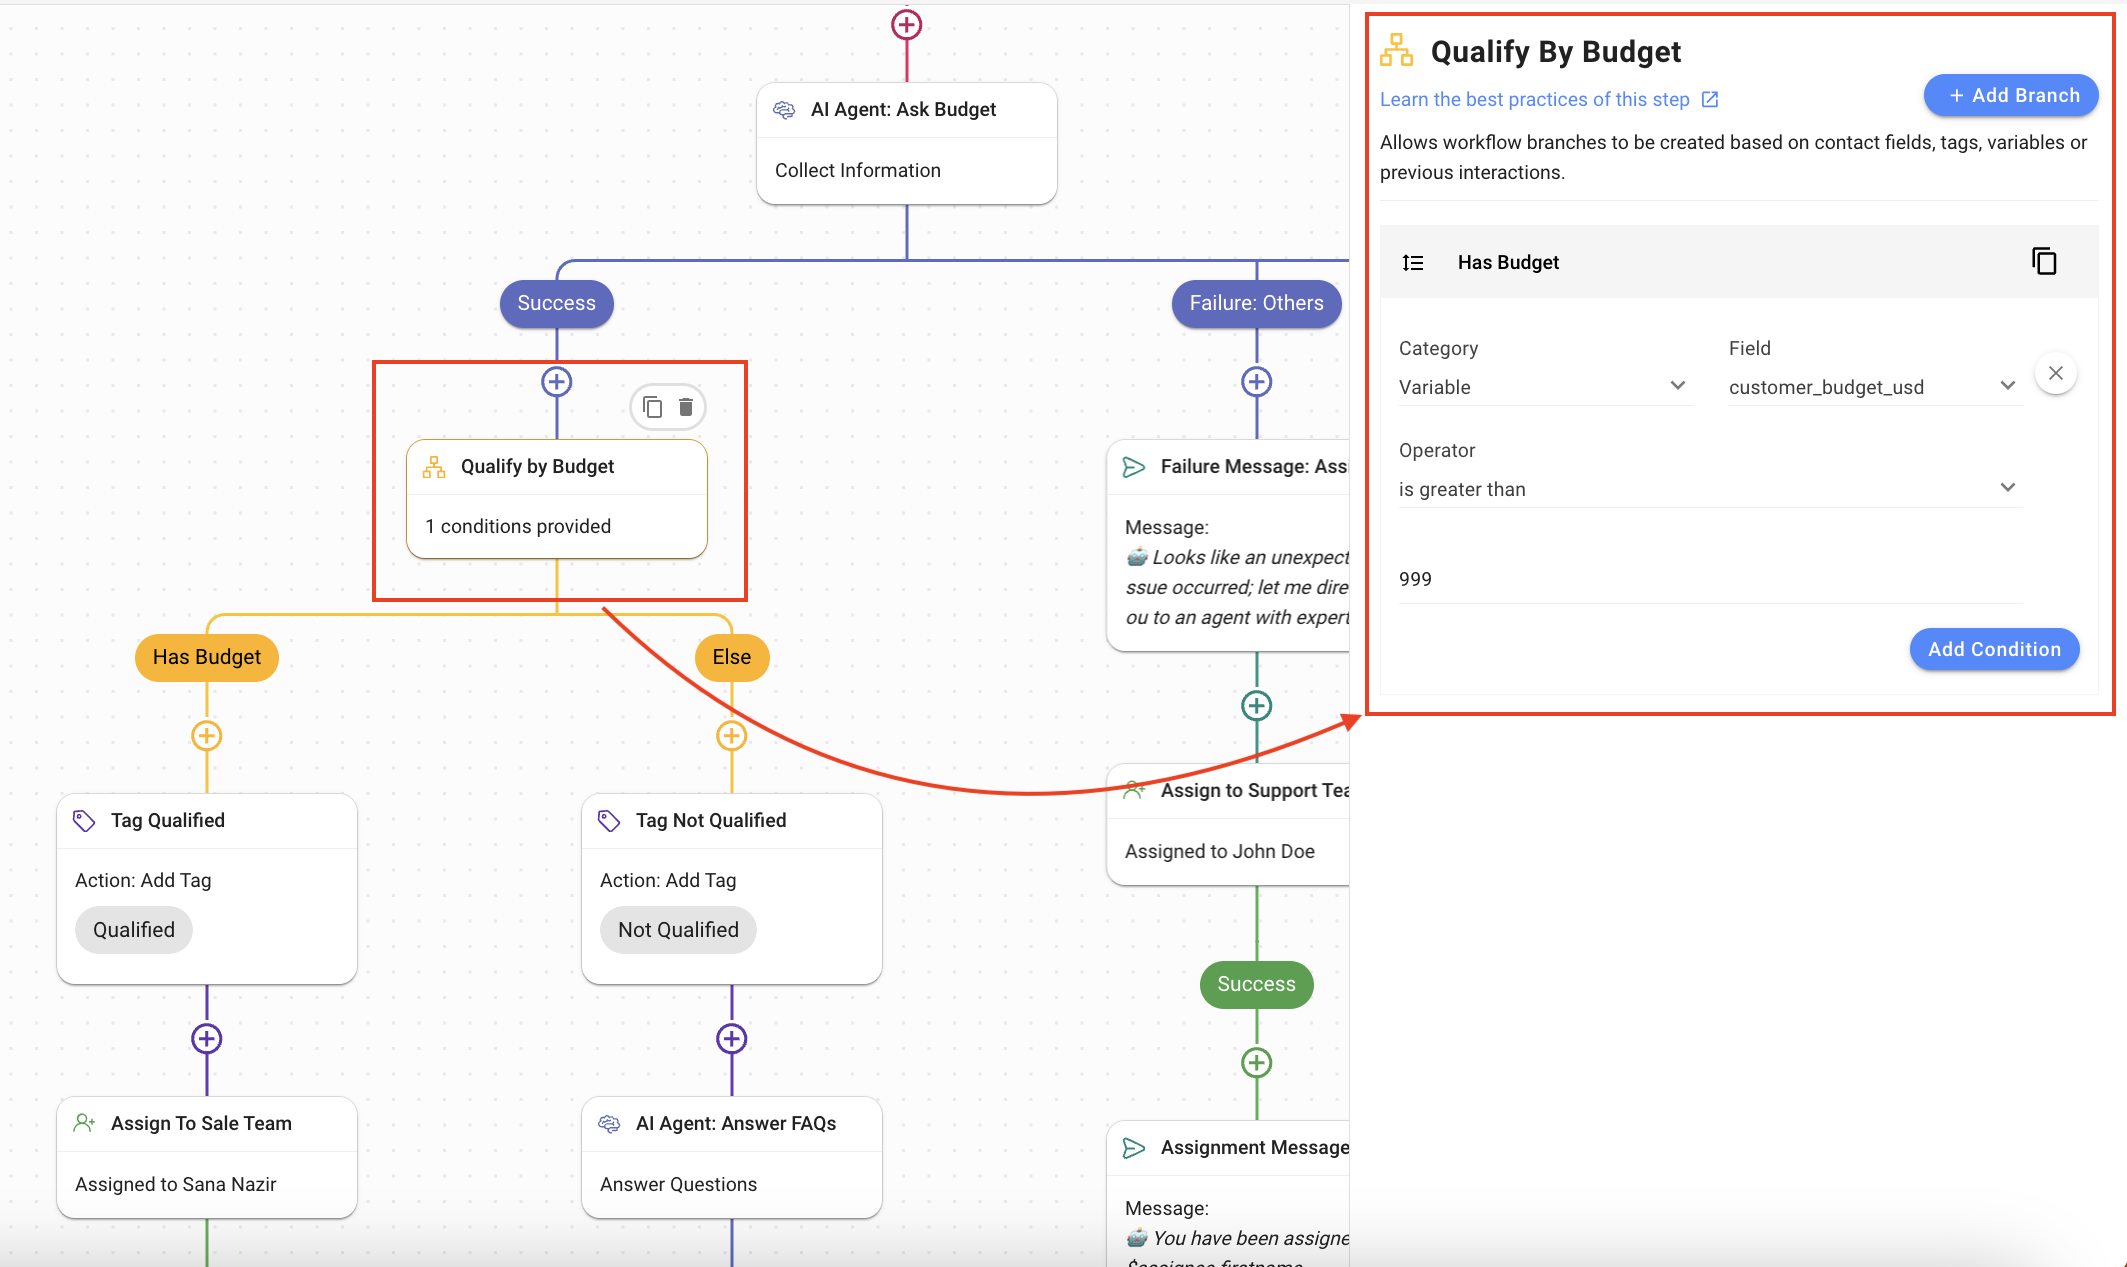
5. **Qualify by Budget**: The Branch Step is used to check if the budget provided is enough for the service. In this workflow template, a minimum budget of 1000 USD is required. The settings used are:
* **Category**: Variable
* **Field**: customer\_budget\_usd
* **Operator**: is greater than
* the minimum budget required; 1000 USD (and above). You can use the currency and number that best suits your service.
6. **Has Budge**t: This branch handles the situation when the budget specified by the Contact is greater than 900 USD.
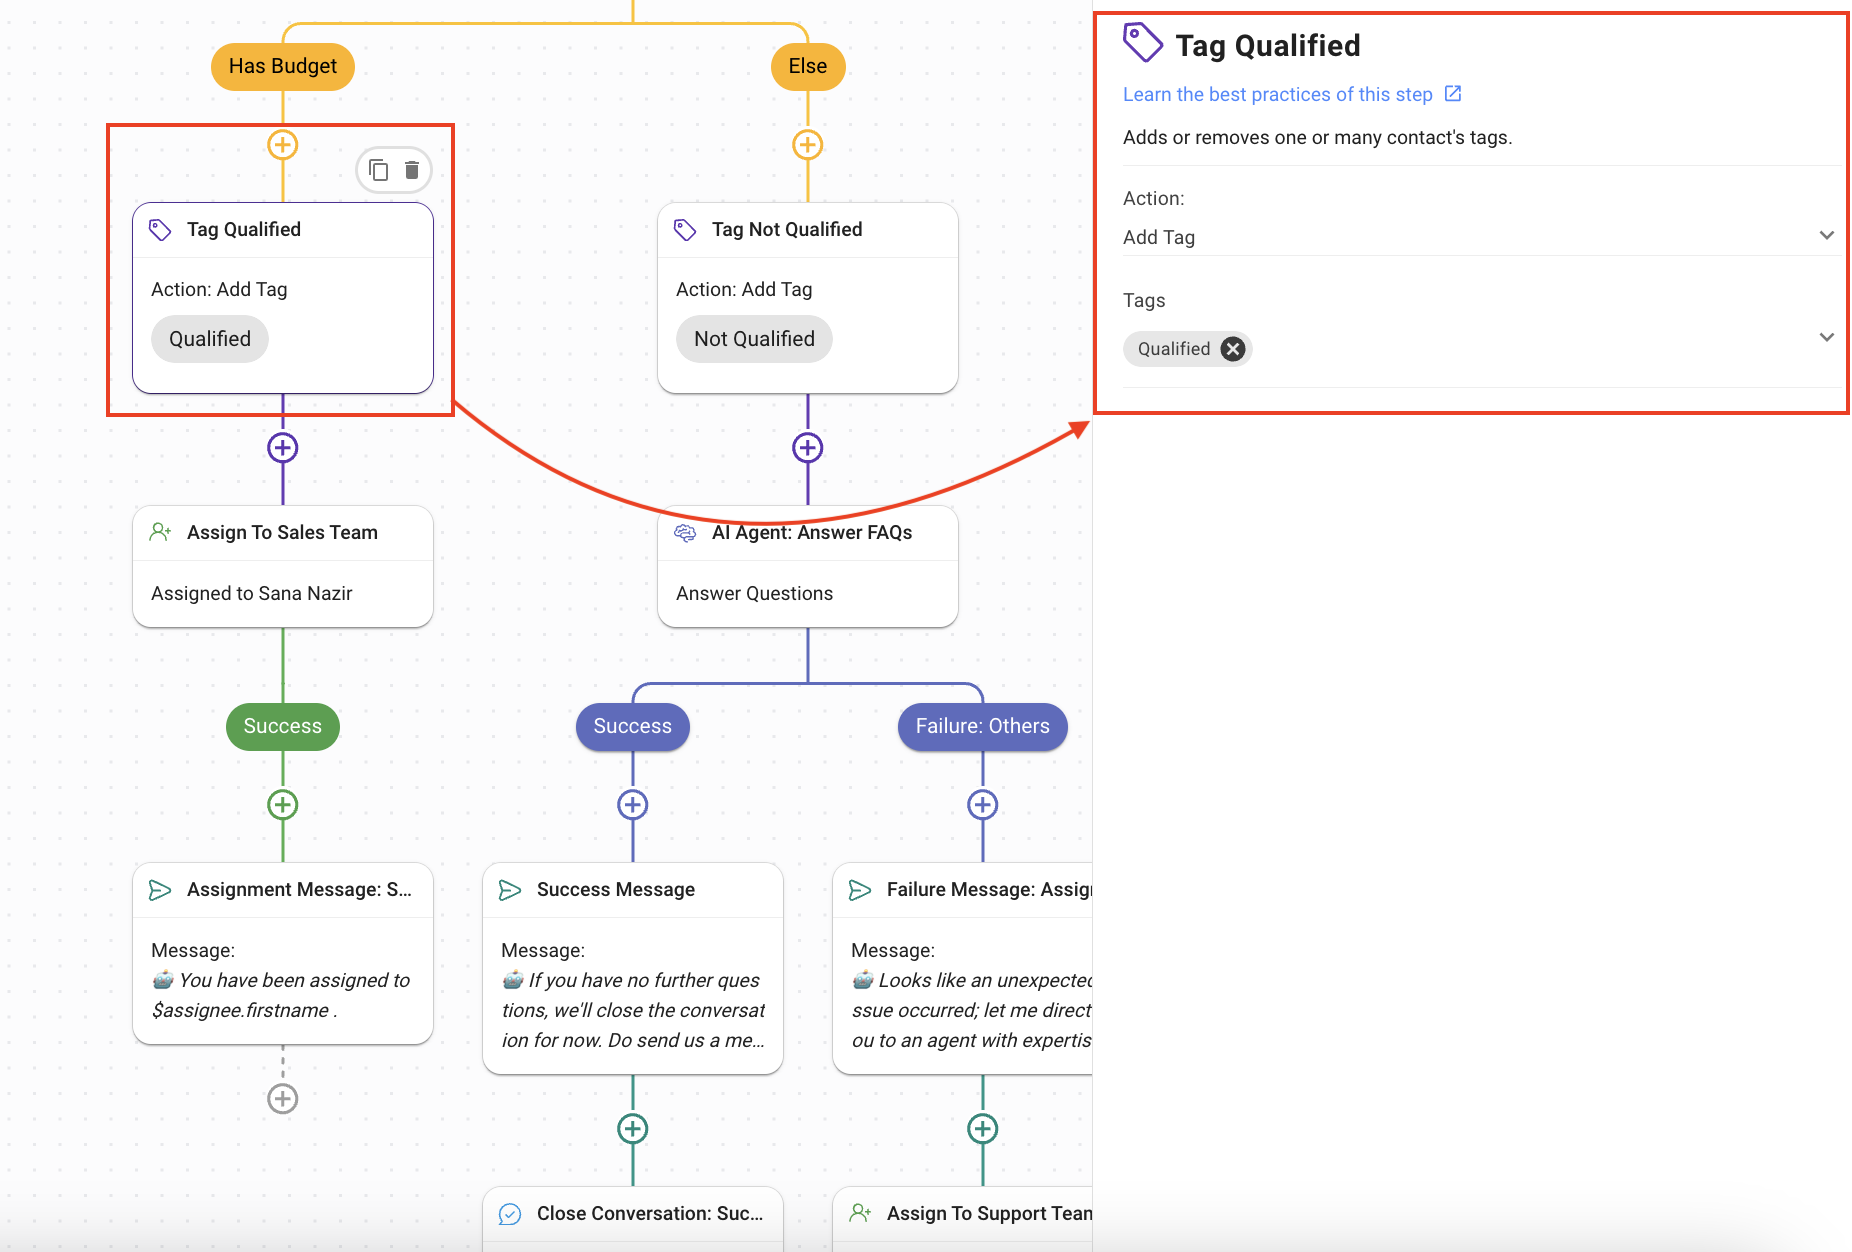
7. **Tag Qualified**: Using the **Update Contact Tag** Step, the Contact is tagged as “Qualified”.
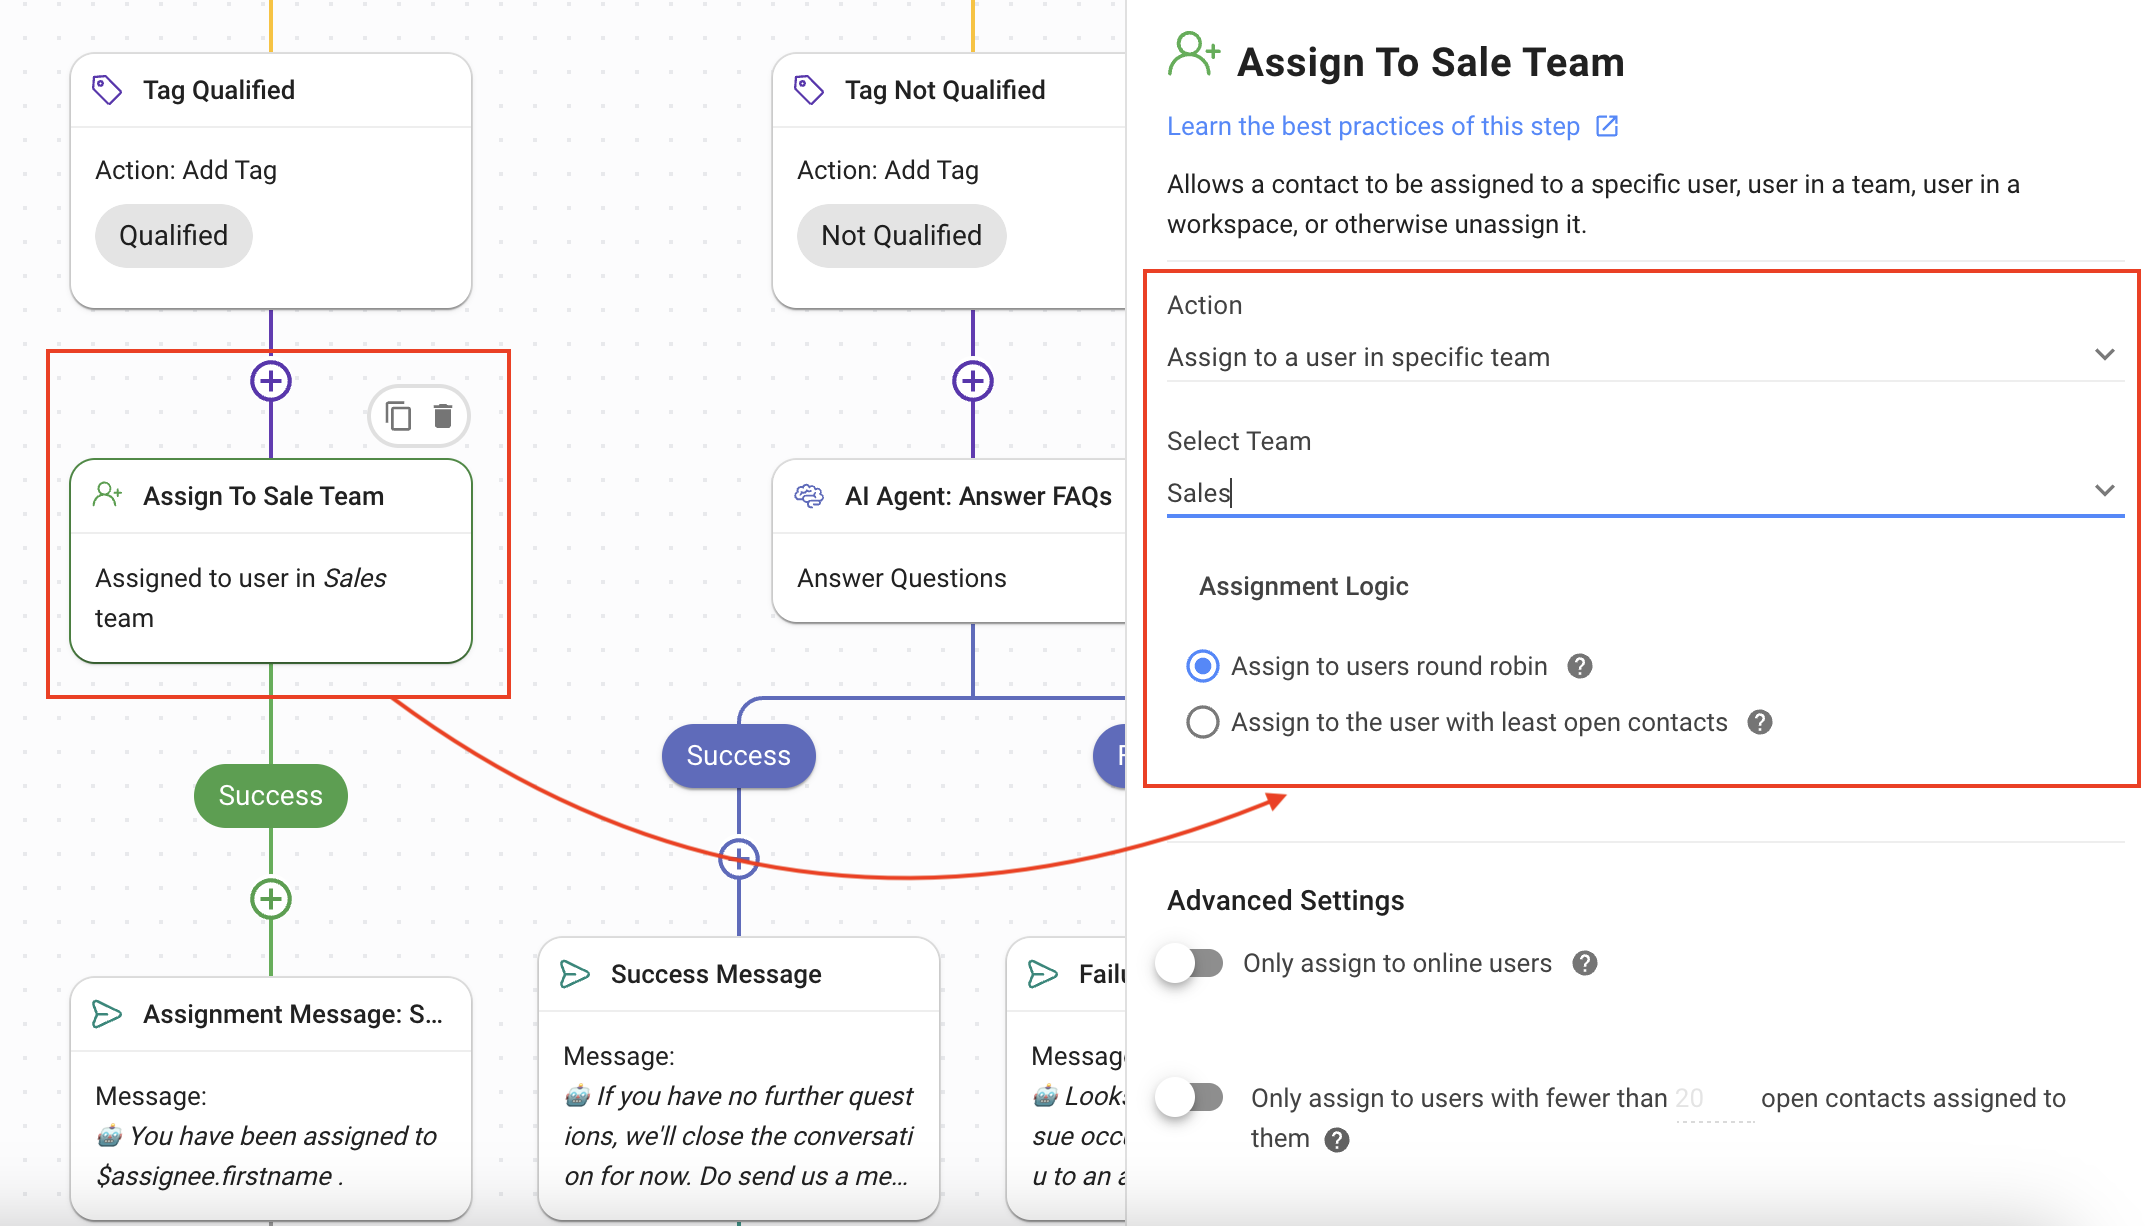
8. **Assign to Sales Team**: Using the **Assign To Team** step, the Contact is directed to the sales team that can assist the Contact through the sales process.
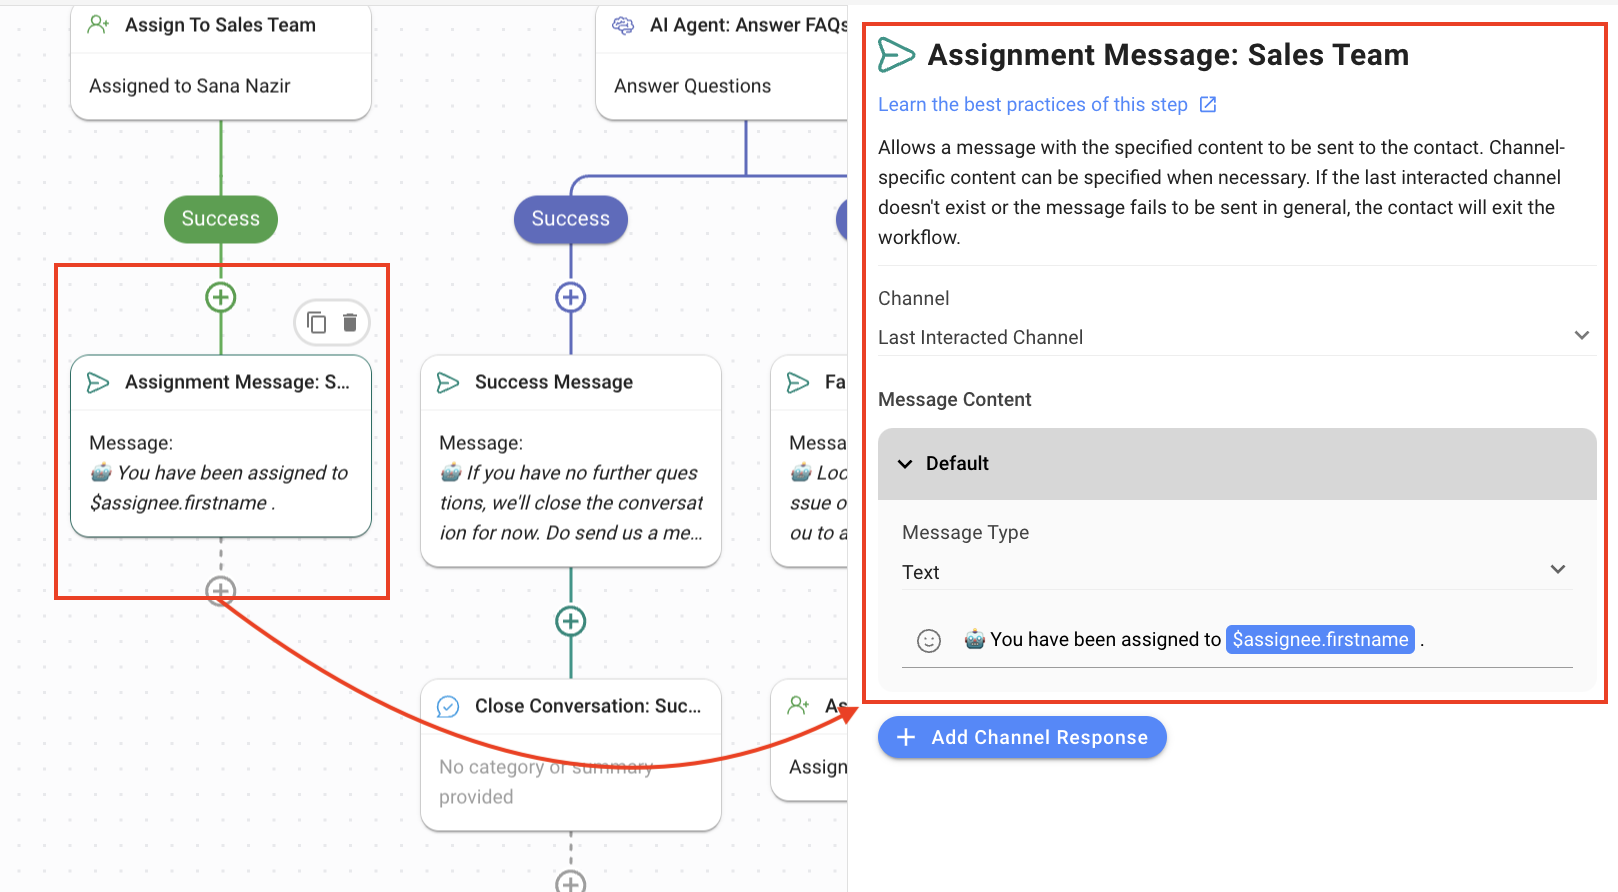
9. **Assignment Message**: The Contact is informed who they have been assigned to using the **Send a Message** Step.
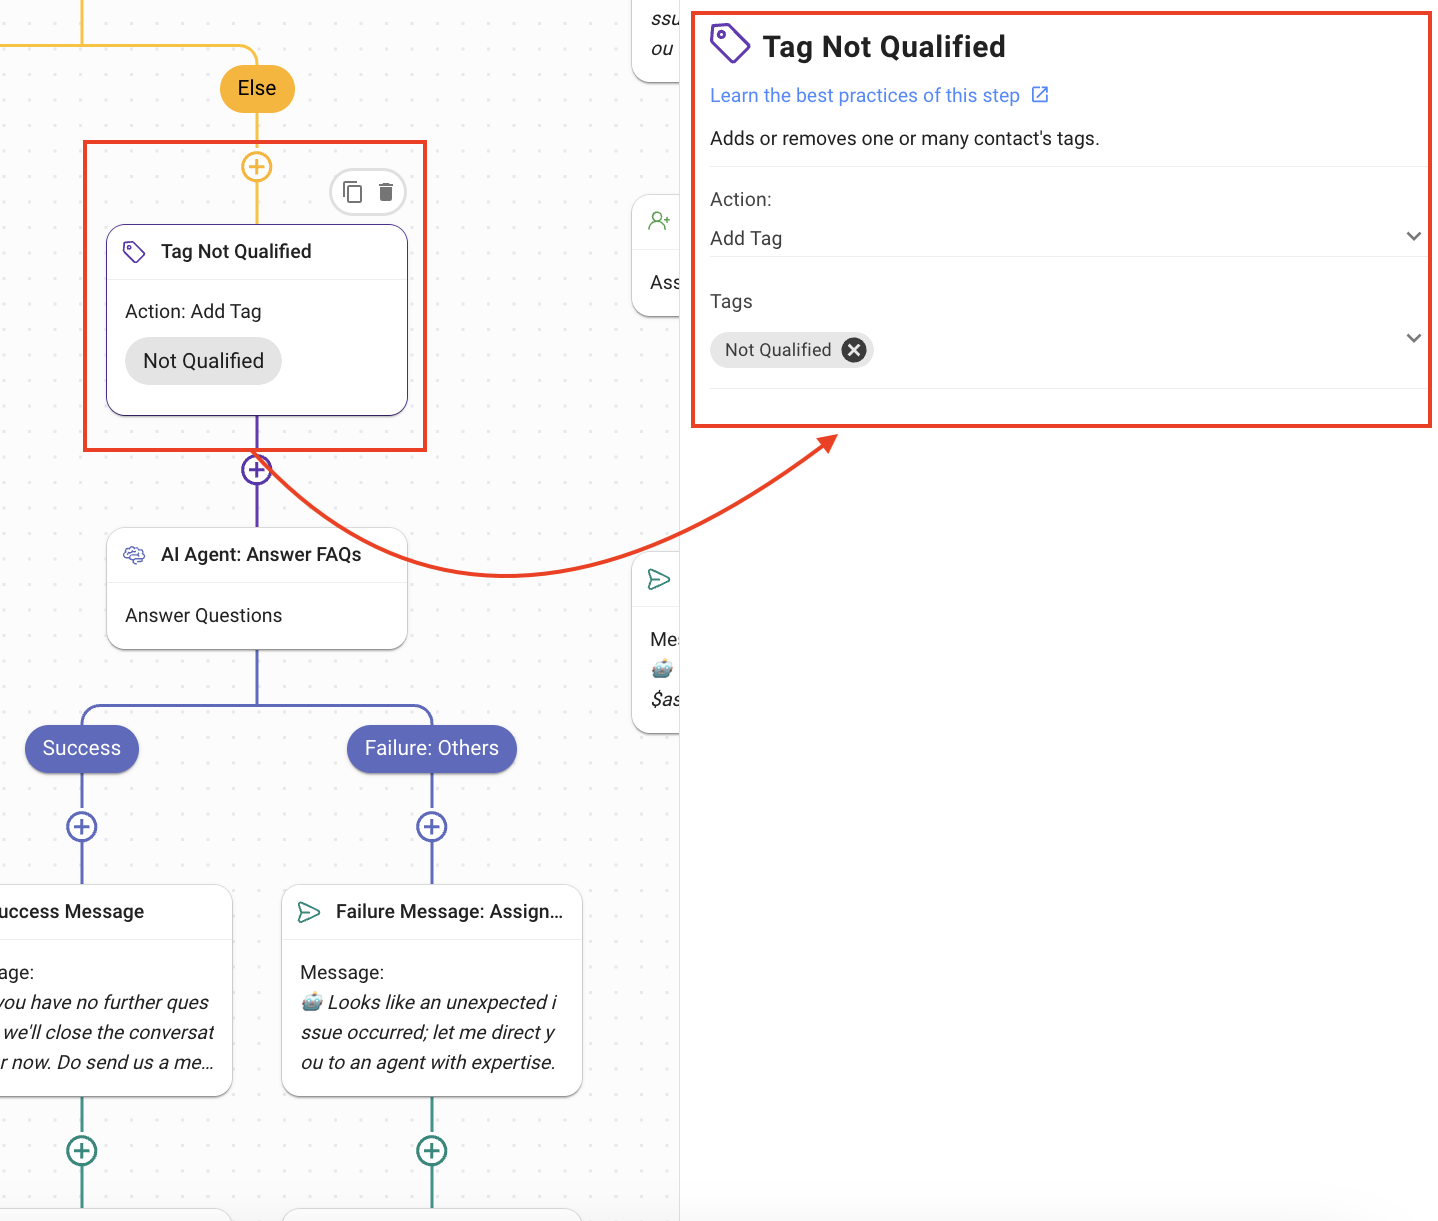
10. **Else**: The default branch handles the scenario when the Contact did not meet the budget requirement (i.e., 1000 USD and above).
11. **Tag Not Qualified**: Using the **Update Contact Tag** Step, the Contact is tagged as “Not Qualified”.
12. **AI Agent: Answer FAQs**: The Contact that does not have the required budget is not directed towards Sales but instead is sent to the Support team to provide clarity regarding the services you offer. This AI Agent handle’s the Contact’s basic queries based on the [Knowledge Sources](/ismessenger/workspace-setting/respond-ai.md#knowledge_sources) provided to it.
13. **Objective**: The **Answer Questions** objective is chosen to enable the agent to answer the Contact’s queries.
14. **AI Persona**: The persona is set to provide support to the Contact.
15. **Knowledge Source**: Provide the [knowledge source](/ismessenger/workspace-setting/respond-ai.md#knowledge_sources) that applies to the business needs.
16. **Use Snippets as Knowledge Source**: Enabling this toggle allows AI Agent to access [Snippets](https://help.respond.io/l/en/workspace-settings/snippets) for responses.
17. **Success**: When the AI Agent has answered all the queries, this is the branch the Contact’s journey follows.
18. **Assign to Sales Team**: Using the **Assign To** Step, assign the Contact to the Sales team.
19. **Assignment Message:** The Contact is informed that they are being assigned to an agent using the **Send a Message** Step. The following settings have been used:
* **Channel**: Last Interacted Channel, to send the message to the channel the Contact is using.
* **Message Type**: Text
* The message informs the user that the conversation is closing after success.
20. **Failure: Others**: If a technical issue occurs, this branch handles the scenario by assigning the Contact a Support agent.
21. **Failure Message: Assignment**: Using the **Send a Message** Step, the Contact is informed that they are being assigned to an agent with expertise.
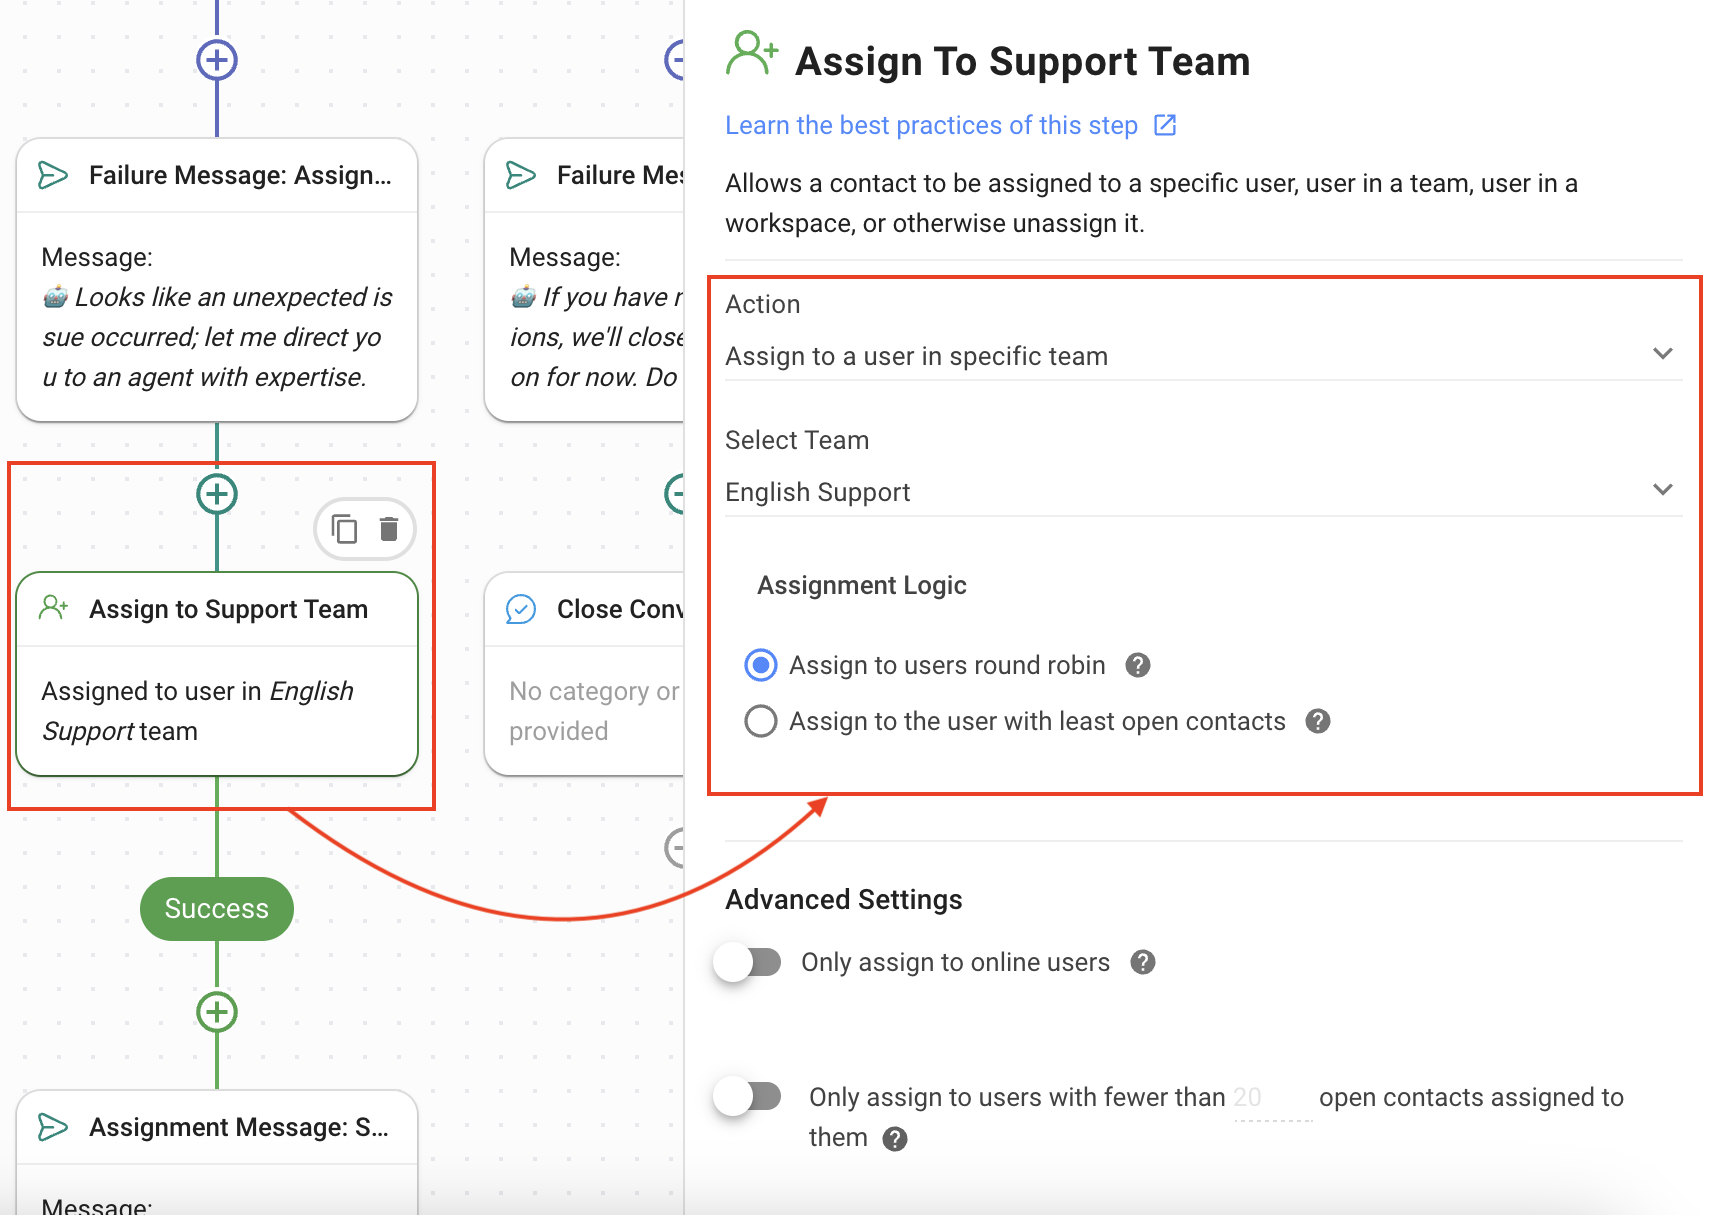
22. **Assign to Support Team**: Using the **Assign To Step**, the Contact is assigned to a support agent.
23. **Failure: Others**: The condition for this branch is met when an unexpected technical issue has occurred, e.g., Channel disconnected, Respond AI credits run out, etc. The Contact is sent a message that they are being re-directed to the human agent for further correspondence.
24. **Failure Message: Assignment**: Using the Send a Message Step, the Contact is informed that they are being assigned to an agent with expertise.
25. **Assign to Support Team**: Using the **Assign To** Step, assign the Contact to the Support team.
26. **Assignment Message: Support Team**: Using the **Assign a Message** Step, the Contact is assigned to the available agent.
27. **Failure: Idle**: The condition for this branch is met when the conversation has been idle for more than 15 minutes. The Contact is sent a message that the conversation is closing because it has been idle, but they can open it again by sending a message.
{% hint style="info" %}
The AI Agent has collected the Contact’s budget, based on which it has been determined if the Contact has the budget for the service or not.
{% endhint %}
---
# Agent Instructions: Querying This Documentation
If you need additional information that is not directly available in this page, you can query the documentation dynamically by asking a question.
Perform an HTTP GET request on the current page URL with the `ask` query parameter:
```
GET https://docs.is-messenger.com/ismessenger/automate-conversations/how-to-automatically-qualify-contacts-based-on-budget-using-ai-agent.md?ask=
```
The question should be specific, self-contained, and written in natural language.
The response will contain a direct answer to the question and relevant excerpts and sources from the documentation.
Use this mechanism when the answer is not explicitly present in the current page, you need clarification or additional context, or you want to retrieve related documentation sections.