UCal
  • Welcome
  • 🚀Getting Started
    • Quick Start
      • What is IS-Messenger?
      • Setting Up an Account
      • Connecting Channels
      • Inviting Your Teammates
      • Getting Contacts to Message You
      • Automated Welcome and Away Messages
      • Responding to Messages
      • Glossary of Terms
    • Connecting a Channel
    • Invite your teammates
    • Getting Contacts to Message You
    • Automated Welcome and Away Messages
    • Responding to messages
    • Glossary of Terms
    • Creating a Chatbot
  • ⚙️Workspace Modules
    • Dashboard
    • Inbox
      • Inbox Overview
      • Assignment and closing a conversations
      • Custom Inboxes
      • Interacting with Respond AI Prompts
      • Using AI Assist
    • Contacts
      • Contact Details
      • Contacts Overview
      • Merge Suggestions
      • Contact Activity
      • Contact Channels
      • Contact Import
      • Segments
    • Broadcast
      • Broadcast Overview
      • Managing Broadcasts
    • Workflow
      • Triggers
      • Workflow Step
        • Step: Send a Message
        • Step: Ask a Question
        • Step: Assign To
        • Step: Branch
        • Step: Update Contact Tag
        • Step: Update Contact Field
        • Step: Open Conversation
        • Step: Close Conversation
        • Step: Add Comment
        • Step: Jump To
        • Step: Wait
        • Step: Date & Time
        • Step: HTTP Request
        • Step: Trigger Another Workflow
        • Step: Add Google Sheets Row
        • Step: AI Agent
      • Workflow Templates
    • Reports
      • Reports: Conversations
      • Reports: Responses
      • Reports: Resolutions
      • Reports: Messages
      • Reports: Contacts
      • Reports: Assignments
      • Reports: Leaderboard
      • Reports: Users
      • Reports: Broadcasts
  • ⚙️Workspace Setting
    • Managing a Workspace
    • General
    • Users
      • Access Levels
    • Teams
    • Channels
      • Chat Menus
    • Contact Fields
    • Growth Widgets
      • Website Chat Widget Quick Start
      • Website Chat Widget Overview
      • Workspace Settings: Growth Widgets
      • Install Website Chat Widget on Squarespace
      • Install Website Chat Widget on Joomla
      • Install Website Chat Widget on Wix
      • Install Website Chat Widget on Shopify
      • Install Website Chat Widget on WordPress
      • How to Track Conversation Source from Multiple Websites
    • Respond AI
    • Integrations
      • Dialogflow
        • Dialogflow: Connecting to Dialogflow
        • Dialogflow: Creating a Chatbot
        • Dialogflow : Managing Intents
        • Dialogflow: Parameters
        • Dialogflow: Events
        • Dialogflow: Response Templates
        • Dialogflow: Custom Payloads
        • Dialogflow: Fulfillment Webhook Request
      • E-Commerce & CRM Integrations
        • E-Commerce Integration: Shopify
        • E-Commerce Integration: BigCommerce
        • E-Commerce Integration: WooCommerce
        • E-Commerce Integration: Magento
        • CRM Integration: HubSpot
        • CRM Integration: Salesforce
        • CRM Integration: Pipedrive
        • CRM Integration: ActiveCampaign
      • Zapier
      • Developer API
      • Webhooks
      • Make (formerly Integromat)
    • Closing Notes
    • Snippets
    • Files
    • Data Export
    • Data Import
  • ⚙️User Account
  • Profile
  • User Activity Status
  • Notifications
  • Resetting your Passwords
  • 👨‍👧‍👦CONTACT AND MESSAGES
    • Dynamic Variables
      • Dynamic Variables Overview
      • How to Use Dynamic Variables
    • Contact Search and Custom Inbox
    • Conversations
  • ⚙️MESSAGING CHANNELS
    • Channel Overview
    • Facebook Messenger
      • Facebook Messenger Quick Start
      • Facebook Chat Plugin
      • Private Replies
      • Message Tag
    • Instagram
      • Instagram Overview
      • Instagram Quick Start
    • WhatsApp
      • WhatsApp Business API Quick Start
      • Getting Ready for Inbound Conversations
      • Getting Ready for Promotional Messaging
      • WhatsApp Official Business Account (Green Tick)
      • Grow your WhatsApp Audience by Maximizing Entry Points
      • Get WhatsApp API Account for Government Agencies
      • Meta Business Verification
      • WhatsApp Message Templates
      • WhatsApp Pricing
      • WhatsApp Business Platform (API) Channel Configuration
      • WhatsApp Messaging Limits
      • Meta Product Catalog
      • Change Your WhatsApp Business Display Name
      • Phone Number Migration to IS-Messenger WhatsApp Business API
      • Turn-off WhatsApp Number Two-Step Verification
      • WhatsApp Cloud API
        • Migrating from On-Premises API to Cloud API
        • Migrating from Cloud API to On-Premises API
        • Set up the WhatsApp Echo Bot
        • Load Testing on Cloud API
        • Experiments
        • Webhooks Setup
      • 360Dialog WhatsApp
      • Twillio WhatsApp
      • MessageBird WhatsApp
      • Vonage WhatsApp
      • Phone Number Migration to WhatsApp Cloud API
    • Website Chat Widget
      • Install on WordPress
      • Install on Shopify
      • Install on Wix
      • Install on Squarespace
      • Install Website Chat Widget on Joomla
    • LINE
      • LINE Overview
      • LINE Quick Start
    • Telegram
      • Telegram Overview
      • Telegram Quick Start
    • Viber
      • Viber Overview
      • Viber Quick Start
    • SMS Overview
      • Twilio SMS Quick Start
        • Importing Contacts to Twilio SMS
      • MessageBird SMS Quick Start
      • Vonage SMS Quick Start
    • Twitter Overview
      • Twitter Quick Start
    • WeChat
      • WeChat Overview
      • WeChat Quick Start
    • Google Business Message
    • Email
      • Google Workspace Quick Start
      • Other Email
    • Custom Channel
      • Custom Channel Overview
      • Custom Channel Quick Start
  • New Release Update
  • Support Use Cases
    • How to Identify Contacts by Email and Phone NumberI
    • How to Enrich Customer Data from a CRM or other Business Software
    • How to Route Customers to the Right Team Automatically
    • How to Auto-Assign Customers to a Team or Dedicated Agent
    • How to Send Outbound Support Messages
    • Support: Closing Conversations
    • How to Supervise Your Support Agents
    • How to Analyze Reports for Support
    • How to Send CSAT to Customer and Save Data in Google Sheets or CRMs
  • Handling Inbound Conversations
    • Managing Spam
    • Create Automated Welcome and Away Messages
    • Get Contacts’ Consent for Personal Data Collection
    • Create Automated Chat Menus
    • Collect Contacts’ Emails and Phone Numbers
    • Route Contacts by Shifts
    • Route Contacts by Team Functions
    • Route New & Returning Contacts
    • Route VIP Contacts
    • Assignment Strategy: Automatic Contact Distribution & Load Balancing
    • Assignment Strategy: Unassign Agents after Conversations Closed
  • Capture Conversations
    • How to Streamline Meeting Scheduling via CTC Ads
    • How to Automate Product Info Sharing in Conversations Initiated via CTC Ads
    • How to Track Conversation Source from Multiple Websites
    • How to Route Contacts from CTC Ads to Agents
  • Automate Conversations
    • How to Maximize Customer Service Potential with AI Agent
    • How to Automate Contact Information Collection with AI
    • How to Route Contacts to Preferred AI Agent
    • How to Automatically Qualify Contacts Based on Budget Using AI Agent
    • How to Route Contacts by their Preferred Language
    • How to Create Automated Chat Menus
    • Assignment Strategy: How to Automate Contact Distribution & Load Balancing
    • Assignment Strategy: Unassign Agents after Conversations Closed
    • How to Create Automated Welcome and Away Messages
    • How to Block Contacts and Manage Spam
    • How to Route New and Returning Contacts
    • How to Collect Contacts’ Emails and Phone Numbers
    • How to Route New and Returning Contacts
    • How to Route Contacts by Team Functions
    • How to Route Contacts by Shifts
    • How to Get Contacts’ Consent for Personal Data Collection
    • How to Route VIP Contacts
  • How to Promptly Transfer Conversation Between Agents
  • How to Guide Customers from Exploration to Purchase with Engaging Menus
  • How to Optimize Customer Onboarding with Automated & Customized Welcome Messages
  • Converse with Customers
    • How to Get a Complete View of the Customers
    • How to Simplify Customer Escalation with Automation
    • How to Transfer Contacts to the Next Shift Automatically
    • How to Optimize Agents’ Productivity in the Messages Module
    • How to Align AI Conversations with Your Brand Voice
    • How to Draft Customer Replies with AI
    • How to Convert Image to Text Using AI
    • How Automate Calculations Using AI
  • Broadcasts Use Cases
    • How to Sending a Simple Broadcast
    • How to Start a Workflow Based on Broadcast Response
    • How to Import to Broadcast via WhatsApp
    • How to Troubleshoot a Failed Broadcast
  • Sales Use Cases
    • How to Collect Leads' Email and Phone Number
    • How to Enrich Contact Data and Qualify Leads
    • How to Route Leads
    • How to Auto-Assign Leads to Sales Agents
    • How to Send Outbound Sales Messages
    • How to Track Productivity by Closing Conversations
    • How to Supervise Sales Agents
    • How to Analyze Reports for Sales
  • Accessing Help Menu
Powered by GitBook
On this page
  • Before connecting Gmail
  • Connecting Google Workspace
  • Channel Configuration
  • FAQ and Troubleshooting
  1. ⚙️MESSAGING CHANNELS
  2. Email

Google Workspace Quick Start

PreviousEmailNextOther Email

Last updated 1 year ago

To connect Gmail, a Google Workspace (formerly known as GSuite) account is required. Read more here on how to create the account.

Gmail is a free email service developed by Google. Users can access Gmail on the web and using third-party programs that synchronize email content through POP or IMAP protocols.

This feature is still currently in BETA release and undergoing verification by the Google Cloud team. You might be presented with "The app isn't verified" during the connection process.

As of now, the Gmail channel does not support Contacts API and Zapier Integration due to technical regulations.

If you are looking to connect your personal Gmail account, refer here.

Before connecting Gmail

Due to security purposes, you will need to whitelist the IS-Messenger Google app in your Google Workspace Admin before connecting your organization's account to the platform.

You may refer to this official guide by Google on how to whitelist a third-party app to access Google Workspace data.

Step 1: Log in to your Google Workspace Admin

Navigate to this link and log in with your administrator account.

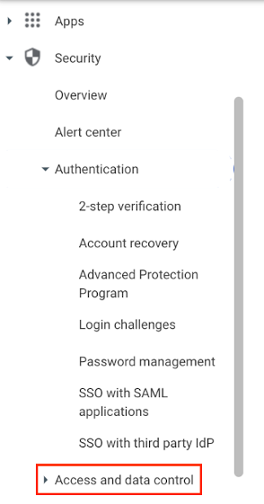
Step 2: Navigate to Security Settings

From the navigation drawer, select Security > Access and data control > API Controls.

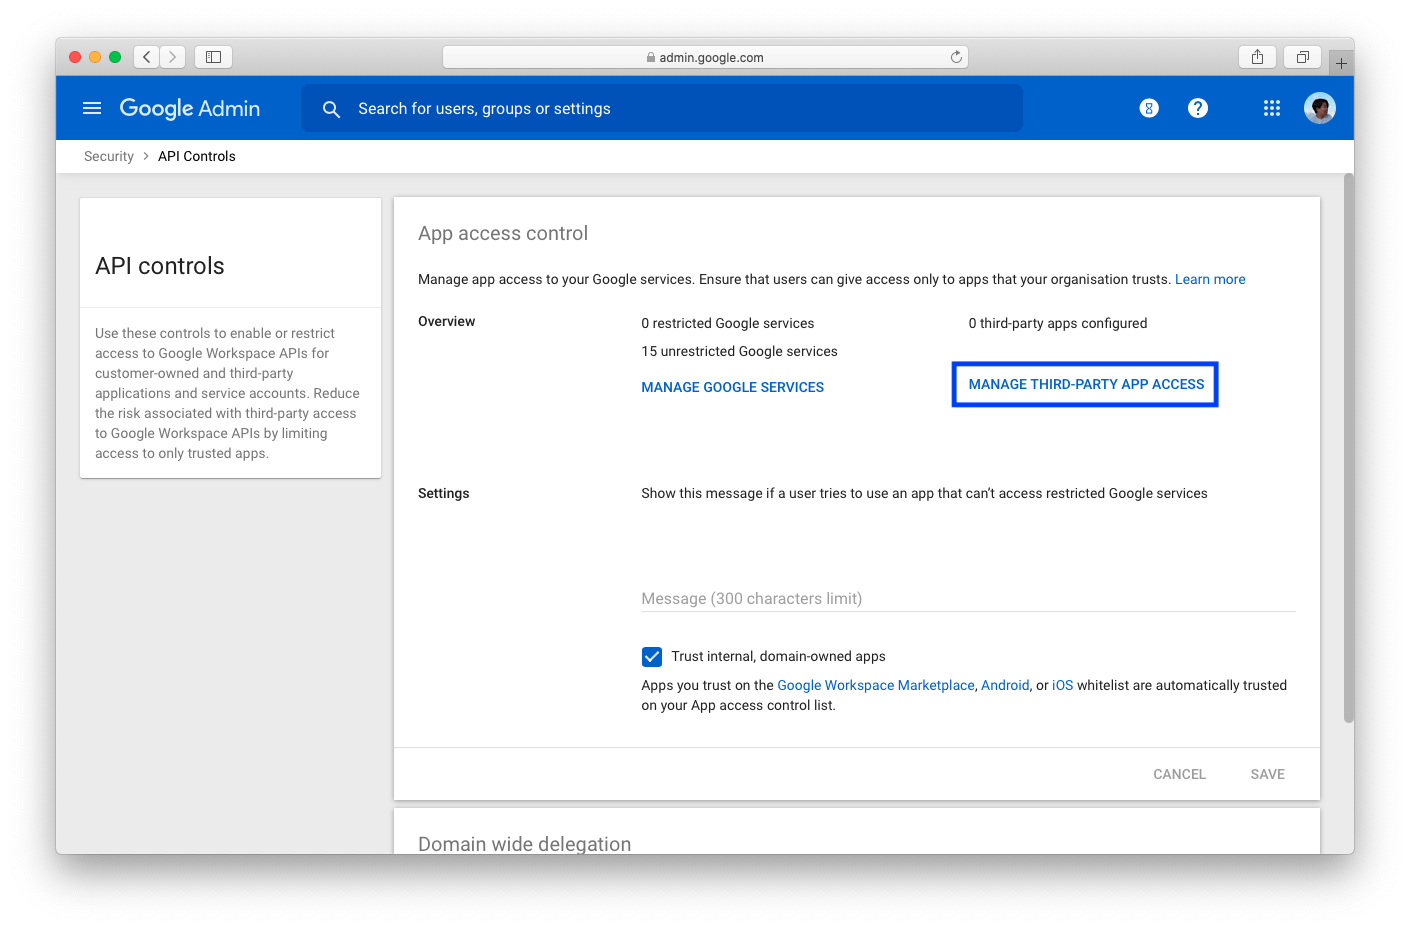
Step 3: Locate API controls

Navigate to the App Access Controls section and click MANAGE THIRD-PARTY APP ACCESS.

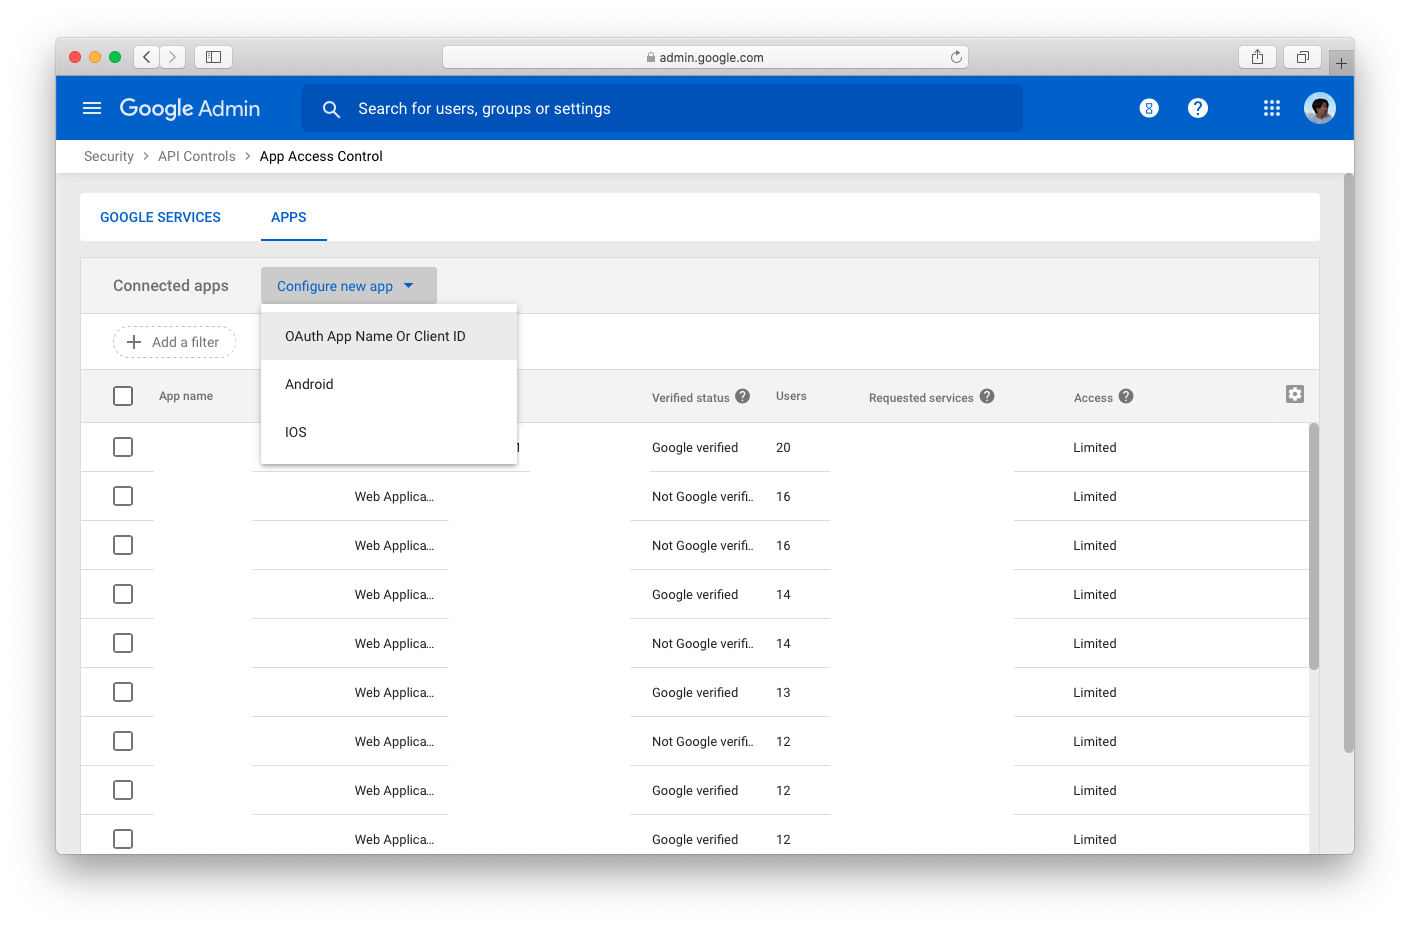
Step 4: Configure New app

Click on Configure New App and choose OAuth App Name or Client ID.

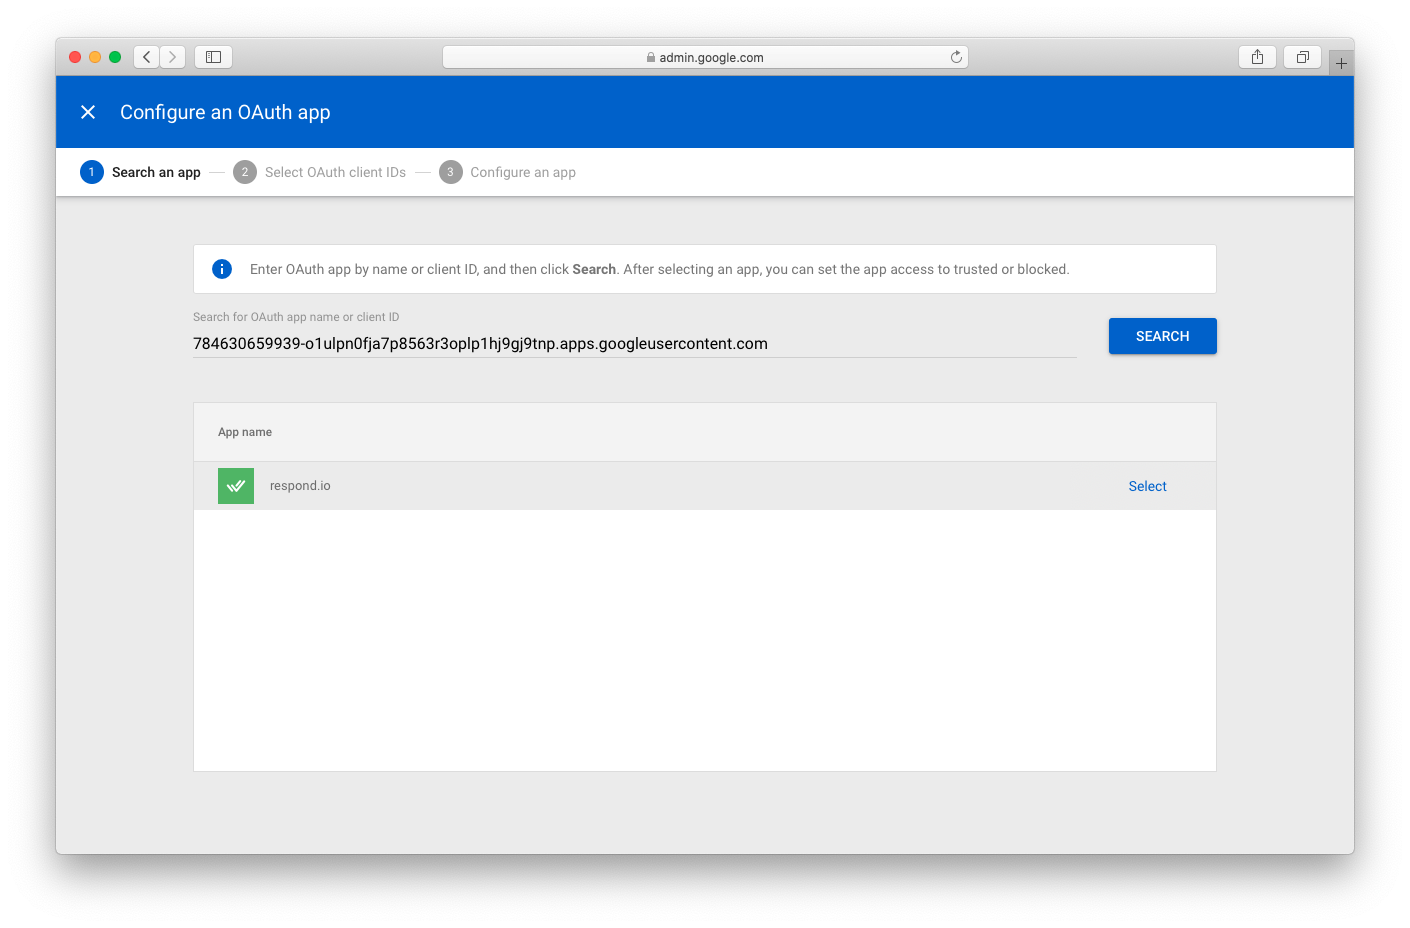
Step 5: Search for IS-Messenge App

Under Search OAuth App name or client ID, enter the client ID. Select the IS-Messenger app.

784630659939-o1ulpn0fja7p8563r3oplp1hj9gj9tnp.apps.googleusercontent.com

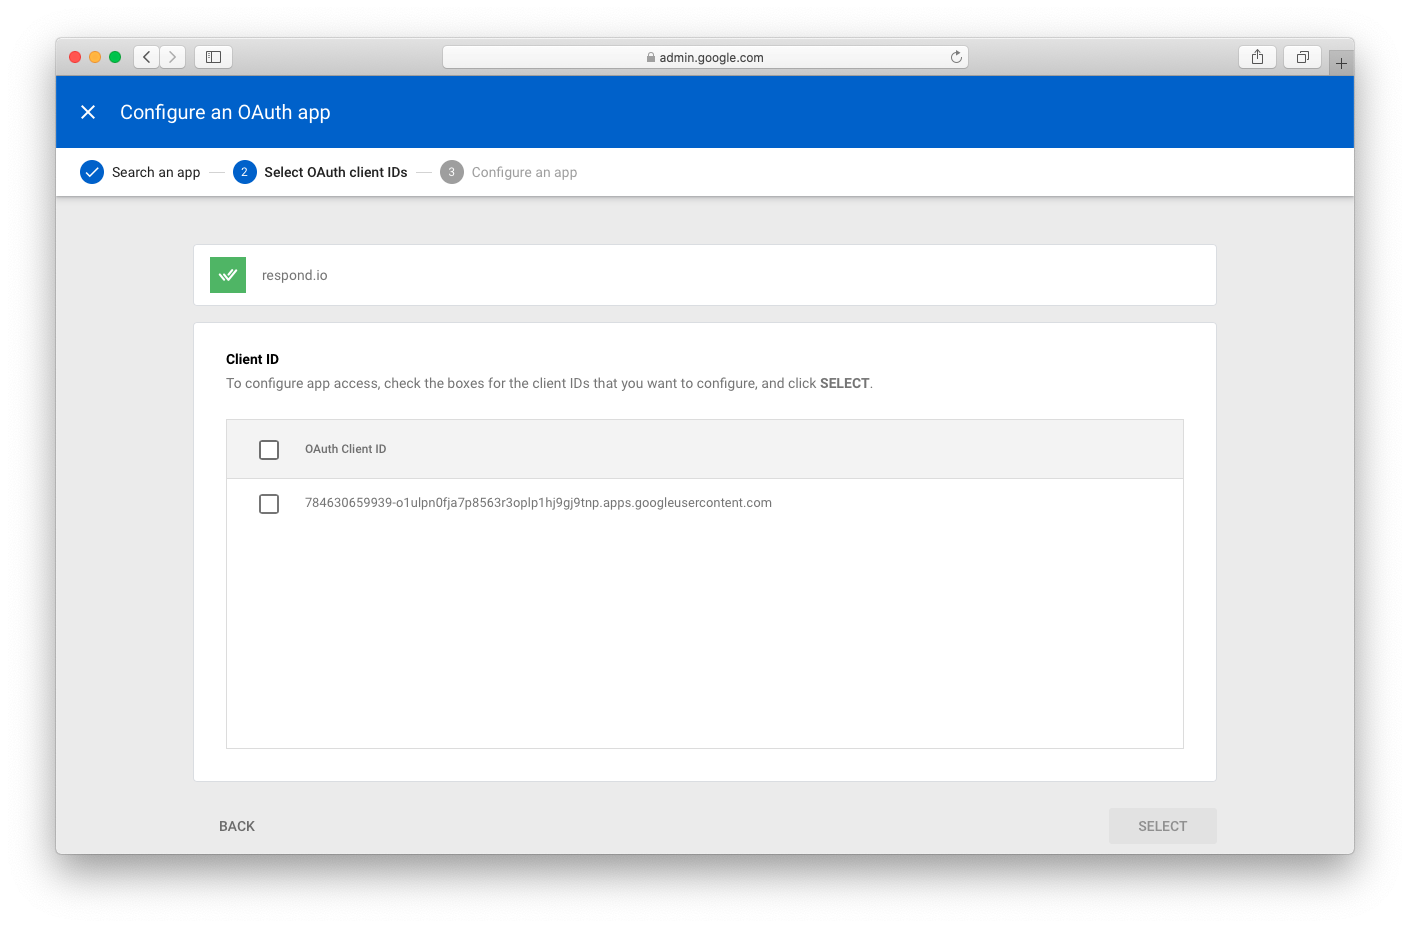
Step 6: Select the OAuth Client ID

Select the OAuth Client ID from the list that matches the provided ID above.

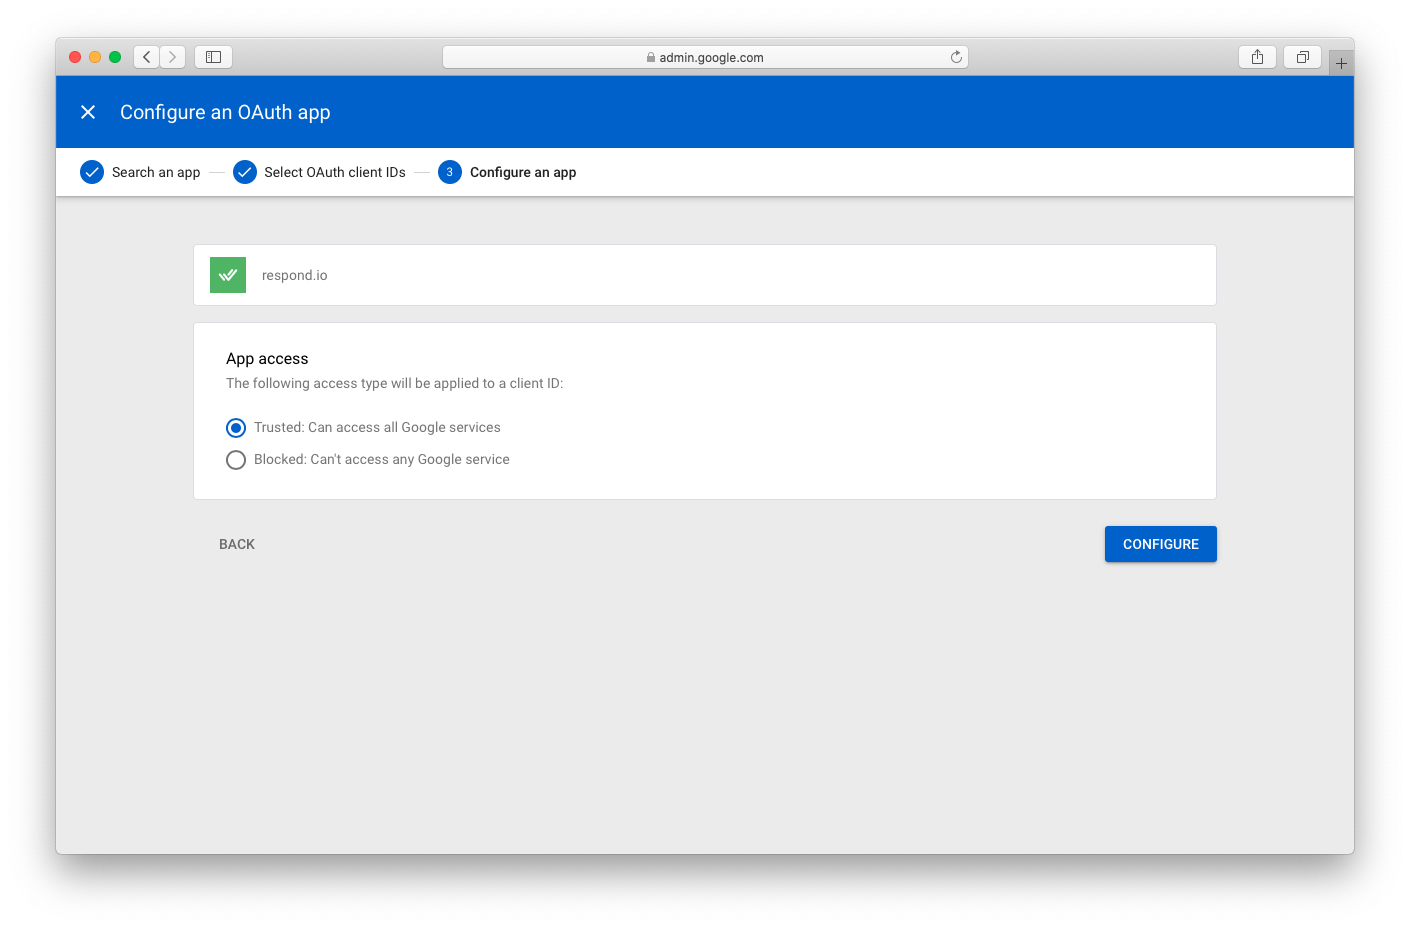
Step 7: Confirm and Add

Select Trusted to allow access. Press Configure to add the IS-Messenger Google app to your Google Workspace trusted list.

The app is now whitelisted and you may proceed to connect your organization's Gmail to IS-Messenger.

Connecting Google Workspace

Step 1: Navigate to Workspace Settings > Click Add Channel

Step 2: Locate the Google Workspace Channel > Click Connect

Step 3: Click Connect > check the “I have whitelisted the app / informed my administrator to do so” checkbox

Step 4: Click Connect with Google. This will redirect you to sign in with your desired Google account.

Step 5: Once you have signed in with the desired Google account, the dialog will show the Gmail account. Click Create Channel to confirm.

Once you've completed the setup, any emails sent to your Gmail will now be received in your Workspace.

If you encounter errors when connecting to Gmail, please ensure that you've enabled cookies and pop up in your browser.

Channel Configuration

Gmail channel can be configured with a unique channel name.

Note: The ability to hide the IS-Messenger branding is only available to organizations with subscriptions.

Step 1: Navigate to Workspace Settings > Click Channels.

Step 2: Locate the Google Workspace Channel > Click Manage > Configuration.

You can configure the following:‌

  • Channel name - Name used internally to identify the account.

  • Sender name - The sender name is what your customers will see in their inbox as the sender of the email. By default, the sender name includes the name of the agent assigned to the conversation (using our variables) and the name of the company.

  • Workflow sender name - The sender name is what your customers see in their inbox as the sender of the email when it is sent through the workflow. By default, the sender name is set as the name of the company.

  • Signature - You have the option to create your own signature that will be automatically added to all your outgoing emails. If desired, you can choose to hide the signature by unchecking the checkbox. By default, the signature will be in the following format: Regards The first and last name of the assigned agent (using our variables) Company name

In addition, you have the ability to include an image and customize your signature using our rich text editor to create your desired format. By default, this signature will be applied to customers who are connecting a new email channel. For existing users, your previous settings will remain in effect until you modify your configurations.

  • Hide IS-Messenger branding in reply - Option to hide the is-messenger branding in replies to your Gmail contacts (Available to organizations with subscriptions).

  • Default copied email address: This option allows emails added here to be automatically copied in every outgoing email.

  • HTML Background: This option enables or disables the HTML background in the emails that are sent out.

  • Additional Settings - Email credentials and IMAP/SMTP settings are used to connect the inbox to receive and send emails to/from the platform.

Step 3: Click Done to update the Channel configuration‌.

FAQ and Troubleshooting

Can I connect my personal Gmail account?

To connect a Gmail Channel, a Google Workspace Account is required. You can create a Google Account here.

How much does a Google Workspace Account cost?

The Google Workspace Accounts are available in 3 versions: Business Starter, Business Standard, and Business Plus. You can check more details about the plans here.

Will I be able to use my Gmail Alias on the platform?

The Gmail Channel will send emails from the main account connected.

Can I add Gmail Shared Groups to the IS-Messenger platform via Email (Gsuite) Integration?

No, connecting a group Gmail account to the Gmail channel is not possible due to limitations within Gmail. You can only connect individual email accounts to the IS-Messenger platform.

Gmail Logo
Configure OAuth App page
Security menu
Google Workspace Admin App Access Control page
Google Workspace Admin API Controls
Select the OAuth Client ID page
add the respond.io Google app to your Google Workspace trusted list