# Phone Number Migration to WhatsApp Cloud API
### Benefits of Migrating to WhatsApp Cloud API
WhatsApp Cloud API is a new platform that offers businesses a direct connection to WhatsApp's infrastructure and it’s a self-service option as compared to going through WhatsApp partners (BSPs). Some benefits of using WhatsApp Cloud API are:
* a more cost-effective option.
* a more reliable and stable connection to the platform.
* the ability to build custom integrations that fit your specific business needs.
* a flexible and scalable solution for businesses of all sizes.
{% hint style="info" %}
Learn more about [WhatsApp Cloud API here](/ismessenger/messaging-channels/whatsapp/whatsapp-cloud-api.md).
{% endhint %}
### What will be Migrated?
Note that the following elements can be migrated from the WhatsApp BSP to the WhatsApp Cloud API.
**Can be migrated**
* Phone number associated with the account.
* Any previously approved high-quality message templates.
* Display name of the Phone number.
* Quality rating of the Phone number.
* Messaging limits.
* Official WABA status.
**Cannot be migrated**
* Low-quality, rejected, or pending message templates.
### Pre-Migration Requirements: What to Prepare for Your Migration Setup
{% hint style="info" %}
Take note of phrases that will be frequently used throughout this document:\
-**Source WABA**: The WhatsApp BSP from which we are migrating.\
-**Destination WABA**: The WhatsApp Cloud API to which we are migrating.
{% endhint %}
**Pre-Migration Requirements Checklist:**
* **Existing Meta Developer App:** If you do not have a developer app created, [click here to create your app in Meta Business Manager (MBM)](https://developers.facebook.com/docs/development/create-an-app/) and get started with WhatsApp Cloud API. This app must be created under the same business account (business ID) as the source WABA.
* **Business ID:** The Source and Destination WABAs must be associated with the same MBM or have the same business ID.
* **Business Verification:** The Business ID has to be verified. If your business is not yet verified, [follow these steps to get it verified](https://www.facebook.com/business/help/2058515294227817?id=180505742745347).
* **WABA Review Status:** The review status of the Source and Destination WABAs must be approved.
* **Payment** **Method:** A payment method must be configured for both the Source and Destination WABA. Ensure that the payment method is set up at both the source and the destination.
* **Two-Step Verification:** Two-step verification must be disabled on the phone number being migrated.
{% hint style="success" %}
When all of the above is checked and completed, the migration process can continue.
{% endhint %}
### **Configuring Phone Numbers and WABA IDs**
Meta has designed the WABA IDs to not be migratable. Due to certain limitations, a workaround has been implemented as a solution. For migration of phone numbers to occur, both source and destination WABA IDs must be under the same Meta business manager account. This means that migrating a phone number will only result in the transfer of that number between WABAs and will not allow for any other changes. To successfully migrate a phone number, the following steps must be carried out:
* **Add a new number to the destination WABA**: This will generate a new WABA ID for the number you wish to migrate to. You may skip this step if you have an existing WABA with a number that is no longer being used.
* **Delete the new number from the destination WABA**: This will vacate a spot for a number to be added to the destination WABA. Alternatively, if you have an existing unused number, you can delete that number.
{% hint style="success" %}
Once the number is deleted, proceed to migrate the customer's current number to the new WhatsApp business.
{% endhint %}
### API Documentation for the Migration Process
{% hint style="info" %}
It is important to note that currently, these migration steps outlined in the API documentation can only be executed by a developer or someone with a similar technical background. However, we understand that this can be a limitation for some and we are working towards developing a more user-friendly and accessible solution in the future. Need help? Contact Support
{% endhint %}
### **Step 1: Begin Phone Number Migration**
**Callback URL:**
```
POST
```
| **Name** | **In** | **Required** | **Type** | **Description** |
| -------- | ------ | ------------ | -------- | ------------------------------- |
| version | path | True | string | The API version. |
| wabaId | path | True | string | The WhatsApp Cloud API WABA ID. |
{% hint style="info" %}
Go to [Business Manager > Business Settings > Accounts > WhatsApp Business Accounts](https://business.facebook.com/settings/whatsapp-business-accounts/) to find the ID of a WhatsApp Business Account. Select the account you want to use. A panel with account information, including the ID will appear.
{% endhint %}
### **Parameters**
**Header**
`Authorization: Bearer {Access Token}`
{% hint style="info" %}
The System user generates your Access Token in the WhatsApp Business Accounts tab of the Business Manager. Read [this guide](https://web.facebook.com/business/help/503306463479099?id=2190812977867143&_rdc=1&_rdr) to learn how to access the system user and create or copy one.
{% endhint %}
**Body**
| **Name** | **Type** | **Description** |
| ---------------------- | -------- | --------------------------------------------------------------------------------------------------------------------------------------- |
| `cc` | num |
Numerical country code for the phone number being registered.
note: Plus (+) sign is not needed for country code.
|
| `phone_number` | num | Phone number being migrated, without the country code or plus symbol (+). |
| `migrate_phone_number` | boolean | Set to true to migrate phone number. |
**Status**
| **Name** | **Description** |
| -------- | --------------- |
| 200 OK | Success. |
**Response**
```
{
"id": "phoneNumberId"
}
```
### **Step 2: Request for Code (PIN) to Verify Phone Ownership**
**Callback URL**
```
POST
```
| **Name** | **In** | **Required** | **Type** | **Description** |
| ------------- | ------ | ------------ | -------- | ------------------------------------------------------------------------------------------------------ |
| version | path | True | string | The API version. |
| phoneNumberId | path | True | string | This is the response returned in Step 1. Copy and Paste the number into the callback URL in this step. |
### **Parameters**
**Header**
`Authorization: Bearer {Access Token}`
**Body**
| **Name** | **Type** | **Description** |
| ------------- | -------- | ------------------------------------------------------------------------------------------------------------------------------------------------------------------------------------ |
| `code_method` | enum | Method of receiving the registration code. Supported values: SMS and Voice. |
| `language` | enum | Language in which you want to receive the registration code. See [language codes](https://developers.facebook.com/docs/whatsapp/api/messages/message-templates#supported-languages). |
**Status**
| **Name** | **Description** |
| -------- | --------------- |
| 200 OK | Success. |
**Response**
```
{
"success": true
}
```
{% hint style="success" %}
The code has been sent to the phone number that is being migrated via the selected method (SMS or Voice).
{% endhint %}
### **Step 3: Verify the Code**
**Callback URL**
```
POST:
```
{% hint style="info" %}
The code (6-digit pin) received in the phone number from step 2 will be used to verify the ownership.
{% endhint %}
### **Parameters**
**Header**
`Authorization: Bearer {Access Token}`
**Body**
| **Name** | **Type** | **Description** |
| -------- | -------- | ----------------------------------------------------------- |
| `code` | num | 6-digit registration code received after completing Step 2. |
**Status**
| **Name** | **Description** |
| -------- | --------------- |
| 200 OK | Success. |
**Response**
```
{
"success": true
}
```
{% hint style="success" %}
Confirms that the phone ownership is verified.
{% endhint %}
### **Step 4: Register Phone Number**
**Callback URL**
```
POST
```
**Parameters**
**Header**
`Authorization: Bearer {Access Token}`
**Body**
| **Name** | **Type** | **Description** |
| ------------------- | -------- | ----------------------------------------------------- |
| `messaging_product` | enum | Messaging service used. In this case, use "whatsapp". |
| `pin` | num | 6-digit registration code received after Step 2. |
**Status**
| **Name** | **Description** |
| -------- | --------------- |
| 200 OK | Success. |
**Response**
```
{
"success": true
}
```
{% hint style="success" %}
The phone number is successfully registered to the WhatsApp Cloud API WABA. You can now send messages to your destination WABA
{% endhint %}
{% hint style="warning" %}
WABA ID is not migrated. The newly migrated number will be associated with the WABA ID of the previously deleted number.
{% endhint %}
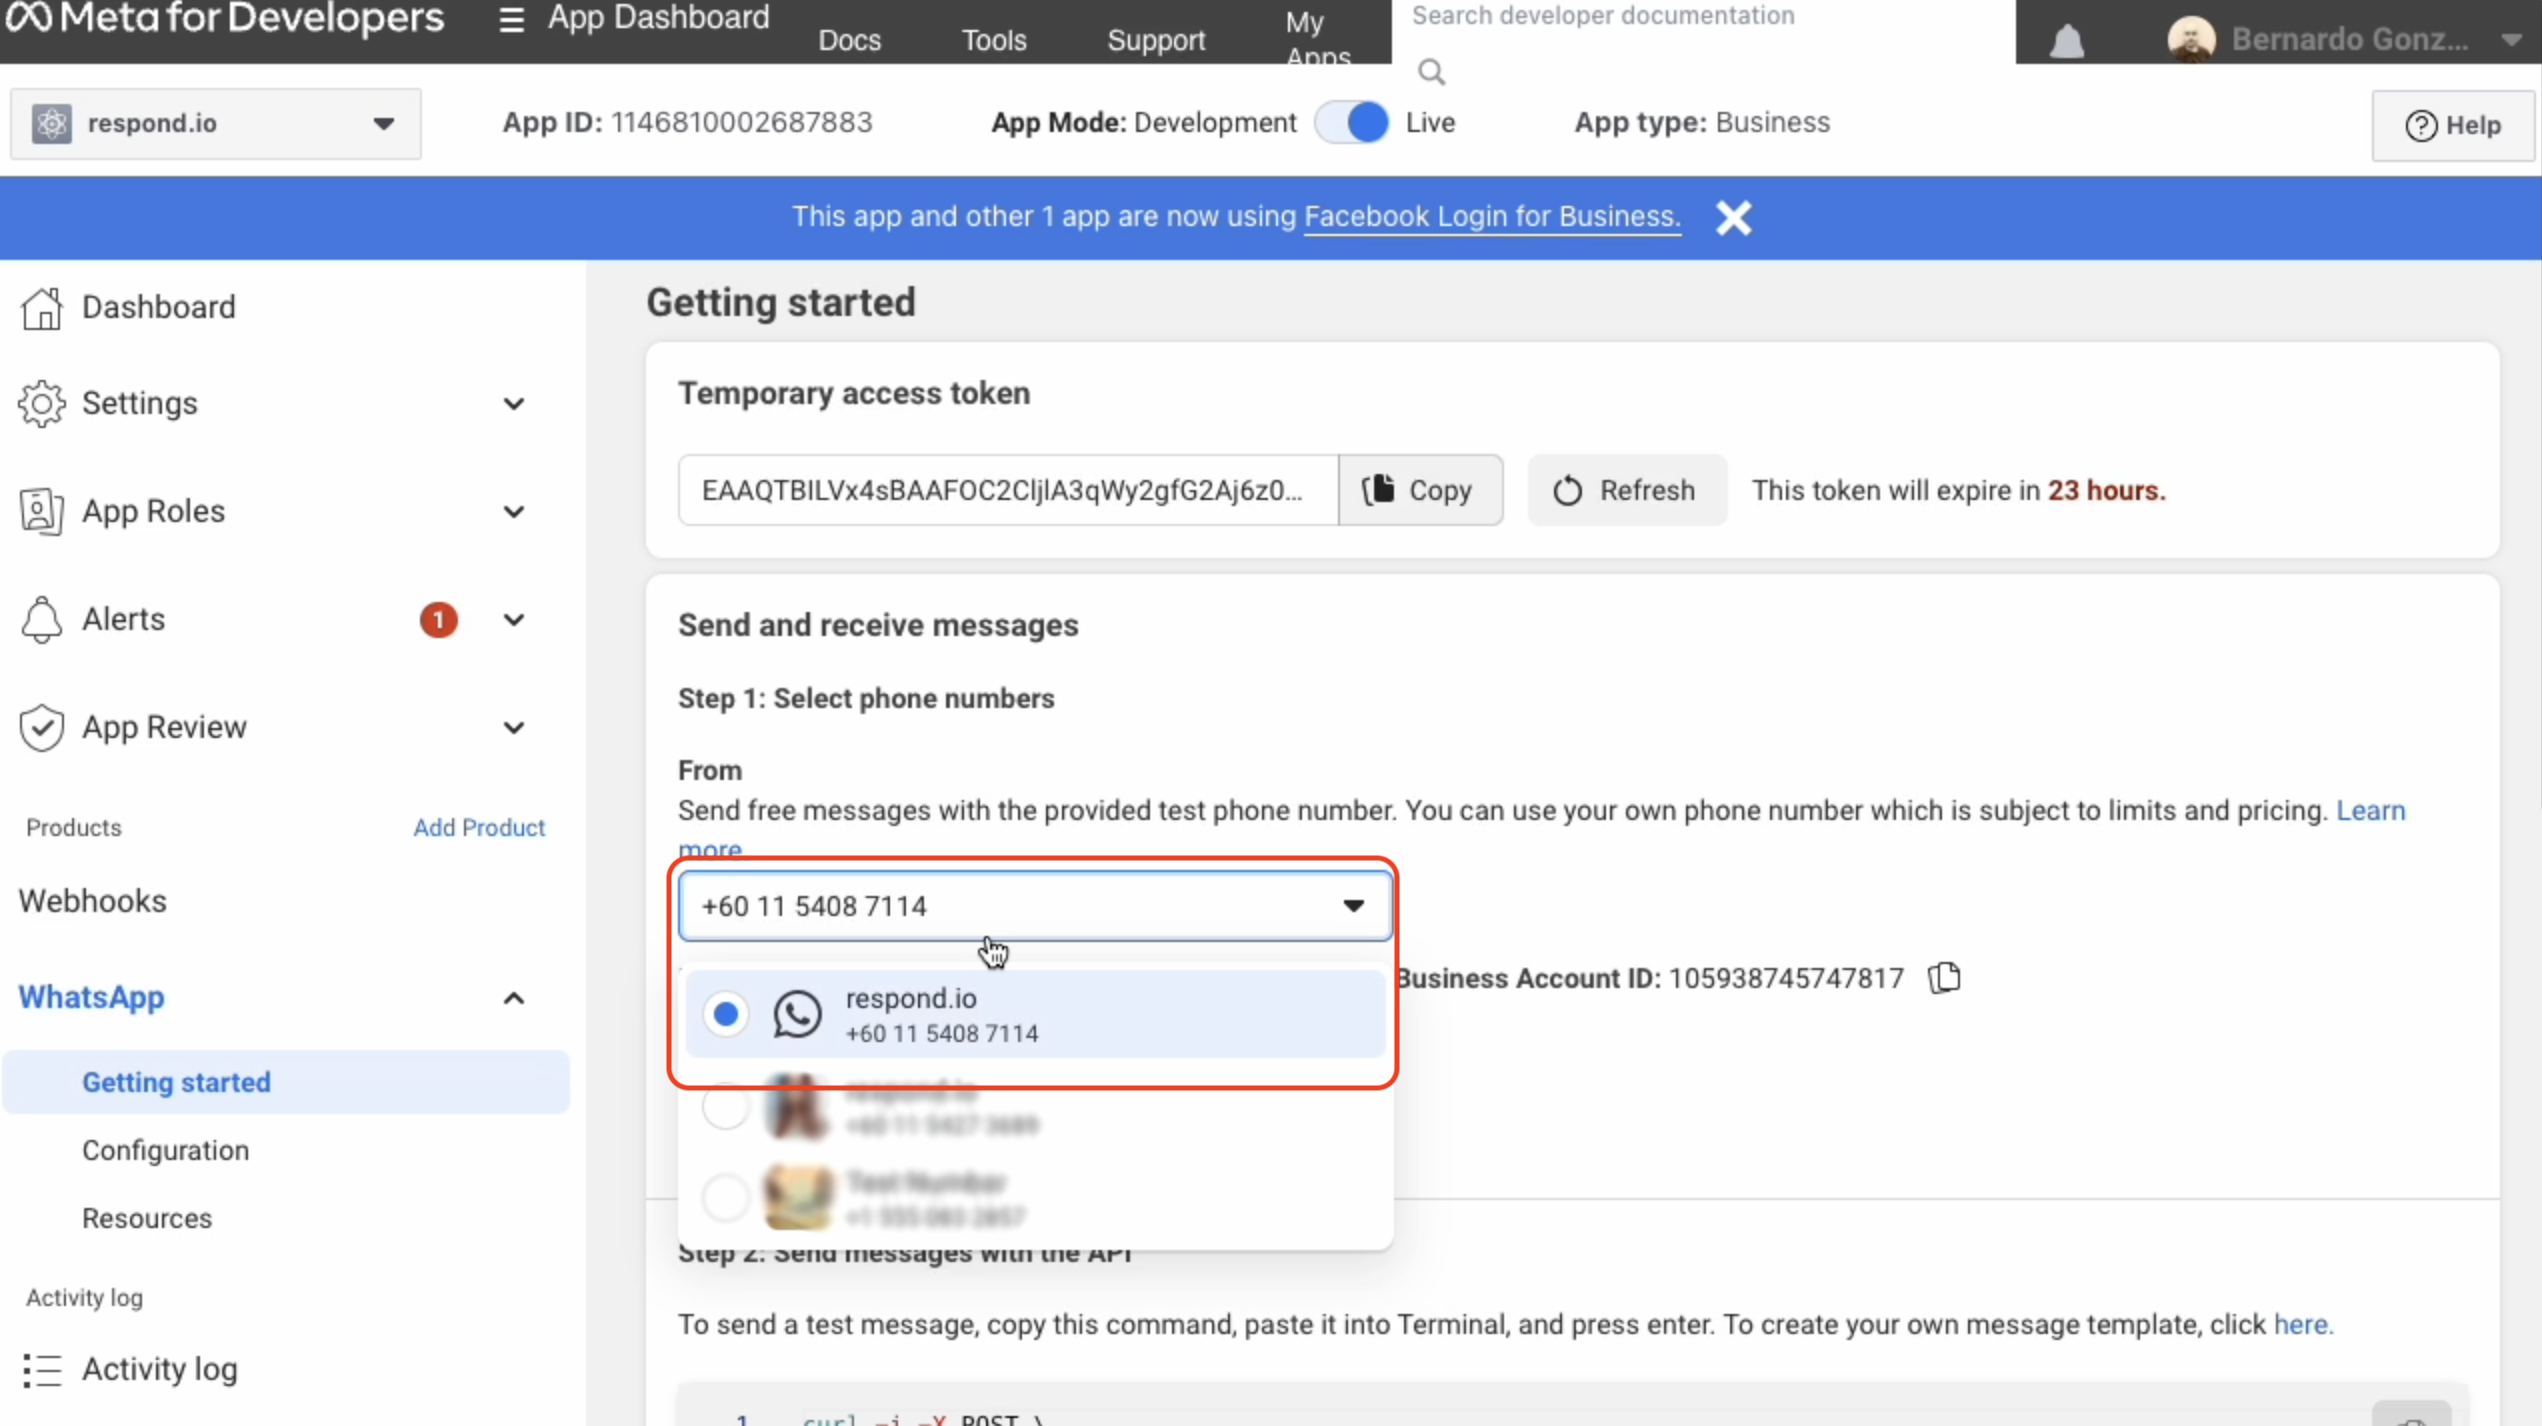
### **Step 5: Check the Migrated Phone Number in Meta Developer App**
A successful migration can be verified through the Meta Developer App. To do this, follow these steps:
1. Navigate to **WhatsApp** > **Getting Started**
2. In the phone number dropdown list, confirm that the number is present and accurately reflected.
---
# Agent Instructions: Querying This Documentation
If you need additional information that is not directly available in this page, you can query the documentation dynamically by asking a question.
Perform an HTTP GET request on the current page URL with the `ask` query parameter:
```
GET https://docs.is-messenger.com/ismessenger/messaging-channels/whatsapp/phone-number-migration-to-whatsapp-cloud-api.md?ask=
```
The question should be specific, self-contained, and written in natural language.
The response will contain a direct answer to the question and relevant excerpts and sources from the documentation.
Use this mechanism when the answer is not explicitly present in the current page, you need clarification or additional context, or you want to retrieve related documentation sections.