> For the complete documentation index, see [llms.txt](https://docs.is-messenger.com/ismessenger/llms.txt). Markdown versions of documentation pages are available by appending `.md` to page URLs; this page is available as [Markdown](https://docs.is-messenger.com/ismessenger/messaging-channels/whatsapp/vonage-whatsapp.md).
# Vonage WhatsApp
{% hint style="info" %}
To connect Vonage WhatsApp, a Vonage WhatsApp API account is required. Read this [guide](https://help.nexmo.com/hc/en-us/articles/360023923712-How-do-I-register-to-send-messages-using-WhatsApp-via-the-Messages-API-) to create a Vonage WhatsApp API account.
{% endhint %}

In addition to providing SMS services, Vonage is also an API provider that works directly with WhatsApp as an official partner. Vonage also provides other services such as phone number purchases and WhatsApp Official API account management.
By integrating Vonage WhatsApp API, the platform can enable you to respond to WhatsApp messages directly.
{% hint style="warning" %}
This channel has a limited 24-hour messaging window due to WhatsApp regulations. Find out more [here](/ismessenger/messaging-channels/whatsapp.md#messaging-window)!
{% endhint %}
## Connecting Vonage WhatsApp
**Step 1: Navigate to Channel Settings**\
From **Settings** Module, navigate to the menu item, **Channels**
**Step 2: Add Channel**\
Press **Add Channel** and choose **WhatsApp.** Select **Vonage** on the second step


**Step 3: Sign in to** [**Vonage**](https://dashboard.nexmo.com/sign-in)\
Sign in with your user credentials at Vonage
**Step 4: Locate the API Key & API Secret** \
Find the API Key and API Secret on the Dashboard and add it to the corresponding fields at ISMessenger platform.

**Step 5: Follow through the instructions**
**Step 6: Create an Application**
At Vonage, navigate to [Your Applications](https://dashboard.nexmo.com/applications) and create an application. Give the application a suitable name.
**Step 7: Enable Messages**
Enable **Messages** by enabling the toggle and selecting version **v1.0**.
**Step 8: Add the Generated URLs**
Add the generated URLs from IS-Messenger to the corresponding fields on Vonage platform.
**Step 9: Generate New Application**
Scroll down and click **Generate New Application**.
**Step 10: Link a Vonage WhatsApp Number**
Open the **Linked External Accounts** tab and click **Link** next to the Nexmo WhatsApp Number.
**Step 11: Follow through the instructions**
Follow through with the instructions by clicking **Next**.
**Step 12: Select the Enabled WhatsApp Number**
On the IS-Messenger platform, select the enabled WhatsApp number from the dropdown.
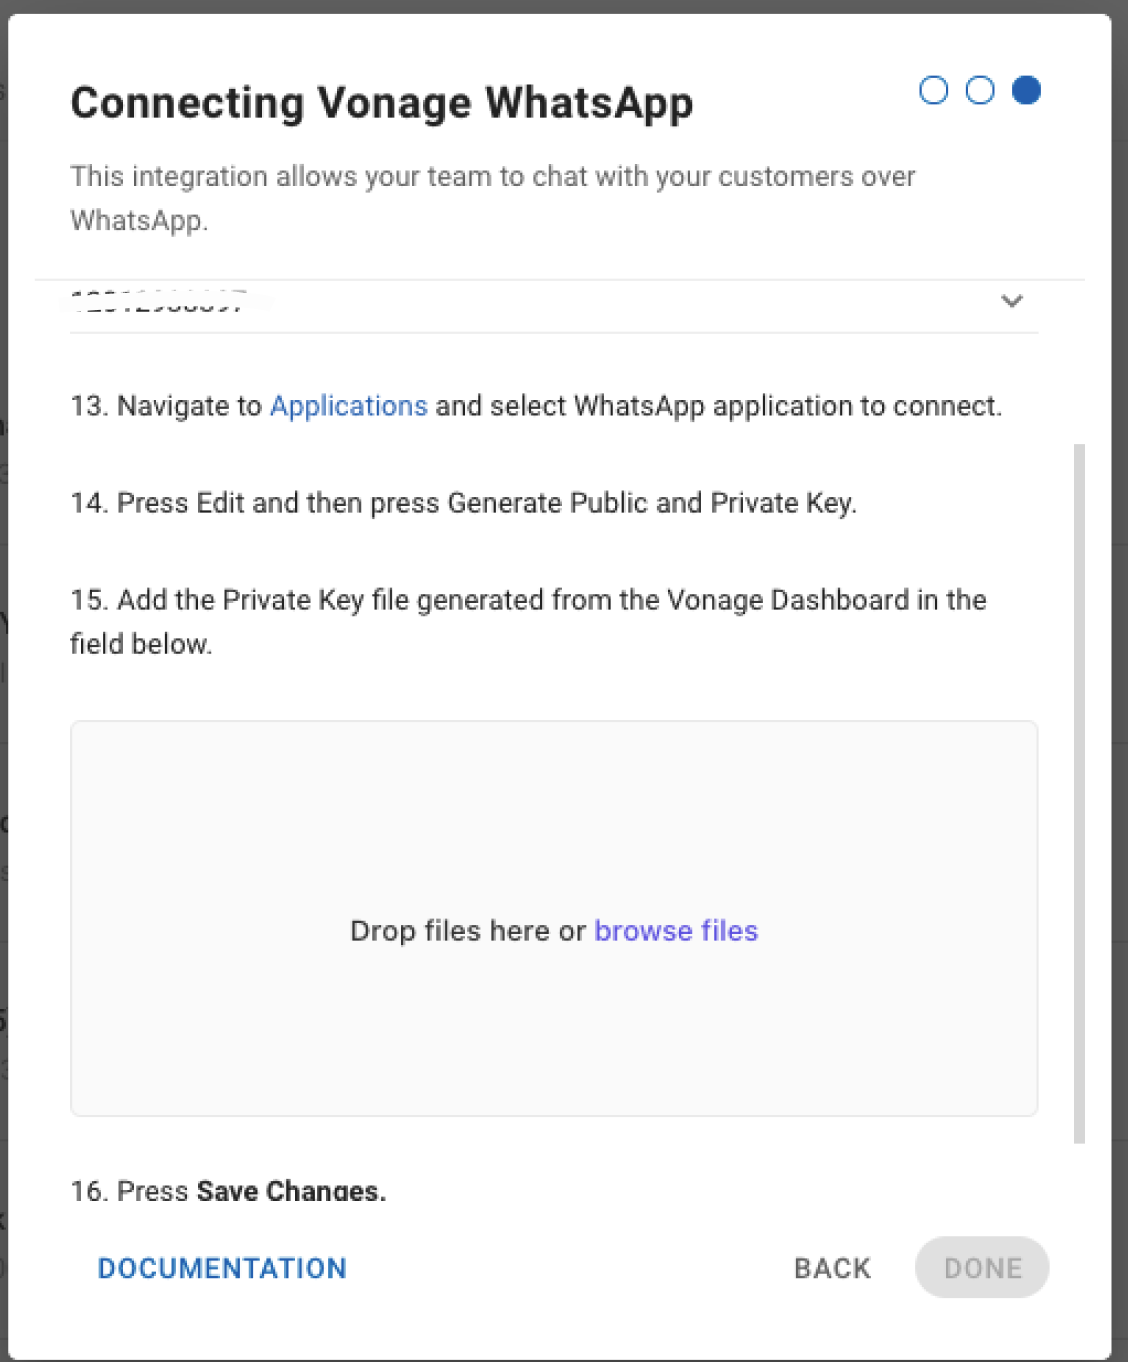
**Step 13:** On the Vonage platform, navigate to [Applications](https://dashboard.nexmo.com/applications) and select the WhatsApp application to connect.
**Step 14:** Click **Edit** and then click **Generate Public** and **Private Key**.
**Step 15:** Add the **Private Key** field to the corresponding field on the IS-Messenger platform.
**Step 16:** On the Vonage platform, save changes to the dashboard.
**Step 17:** Click **Save Changes** to complete the setup.
Click **Done** to complete the setup.
{% hint style="success" %}
Once you completed the setup, any messages sent to your Vonage WhatsApp Number will now be received in your Space.
{% endhint %}
## Channel Configuration
{% hint style="info" %}
Vonage WhatsApp channel can be configured with a unique channel name.
{% endhint %}
**SStep 1:** Navigate to **Workspace Settings** > Click **Channels**.
**Step 2:** Locate the Vonage WhatsApp Channel > Click **Manage > Configuration.**
**Step 3:** Make the necessary configuration for the following fields
* **Channel Name** - Name used internally to identify the account.
* **WhatsApp Business Account ID** - This is required to sync and submit Message Templates. Contact your Vonage Customer Solution Architect to get this credential.
* **User Access Token** - This is required to sync and submit Message Templates. Contact your Vonage Customer Solution Architect to get this credential.
{% hint style="warning" %}
Take extra caution when updating other credentials as changing these credentials may cause failure in receiving or sending messages from your Vonage WhatsApp account.
{% endhint %}
**Step 4:** Click **Save Changes** to update the Channel configuration.
### Metadata Received by Channel
Different channels provide different set of Contact’s metadata to IS-Messenger platform. Here’s the list of Contact’s data you’ll be able to obtain from this channel:
* Phone number
* Profile name
## Managing WhatsApp Message Templates
{% hint style="warning" %}
Before sending a Template Message to a Contact on the respond.io platform, ensure you did the following:
* Submitted the message template for approval
* Added the approved message template to the Space by syncing the message template
{% endhint %}
* Submitted the message template for approval
* Added the approved message template to space
### Submitting Message Template for Approval
{% hint style="info" %}
If you do not have an approved message template or would like to submit a new message template, please refer to the following guide.
{% endhint %}
**Step 1: Navigate to WhatsApp Manager**\
From [Facebook Business Manager](https://business.facebook.com/home/accounts?business_id=2290848174274168), open WhatsApp manager from the drop-down menu.
**Step 2: Create Message Template**\
Press on **Message Templates** tab and press **Create Message Template**
{% hint style="info" %}
Detailed instruction for submitting Template Messages for approval are available in the [Vonage Documentation](https://help.nexmo.com/hc/en-us/articles/360029517191).
{% endhint %}
### Adding the Approved WhatsApp Message Template to the Space
Once your Message Template has been approved on Vonage, you may proceed to add the message template on the ISMessenger platform.
**Step 1: Navigate to Channel Settings**\
From **Settings** Module, navigate to the menu item, **Channels**
**Step 2: Locate the Vonage WhatsApp channel**\
Once you have located the Vonage WhatsApp channel, press **Templates**
**Step 3: Fill in the required information**

| **Fields** | **Type** | **Description** |
| ---------------- | ------------- | ----------------------------------------------------------------------- |
| Template Name | Text | A name used to identify the template |
| Template Content | Text | The message template approved by WhatsApp and to be sent to the contact |
| Namespace | Text | The unique identifier provided by the WhatsApp Partner API |
| Category | Single select | In which category does this template belong to. |
| Language | Single select | In which language this template is written in |
**Step 4: Save changes**\
Review the information and press **SAVE** when it is ready.
**Step 5: Start building the message**
Build the message by filling in the necessary components, then review the message in the preview section.
| **Building Block** | **Description** |
| ------------------ | ----------------------------------------------------------------------------------------------------------------------------------------------------------------------------------------------------------------------------------------------------------------------------------------------------------------------------------------------------------------------------------------------------------------------------------------------------------------------------------------------------------------------------------- |
| Header |
The Header is optional and serves as the title or header of your template. It supports the following:
Text
Image
Video
Document
|
| Body |
The Body should contain the most important text of your template. Only text is supported.
You may use markdown to format the content of this block.
|
| Footer | The Footer only supports text and can be used to provide less relevant information in your template message. |
| Button |
The button adds interactivity to your templates. There are two main types.
Quick Reply Button
Used for getting quick answers from your client
Max 3 Quick Reply Buttons per Template
Each Quick Reply cannot have more than 20 characters
Call to Action Button
Used to send your client to a Website or call a Phone Number
Max one URL and Phone Number per Template
URL can have a parameter for personalization
|
**Step 6: Provide sample value**
This is only applicable if you have included any parameters in your message template content.
Providing sample values to the parameter in the message template will assist the review to understand the message you are trying to send to your contacts.
You may use [Dynamic Variables](/ismessenger/contact-and-messages/untitled.md) to fill in the message template parameter.
**Important Links**
* [Creating message templates](https://help.nexmo.com/hc/en-us/articles/360029517191)
* [Creating message templates by Meta](https://www.facebook.com/business/help/2055875911147364?id=2129163877102343)
* [Message guidelines by WhatsApp](https://developers.facebook.com/docs/whatsapp/message-templates/guidelines)
### **Syncing Message Templates**
{% hint style="warning" %}
Before syncing Template Message on the respond.io platform, ensure you did the following:\
\- Added **WhatsApp Business Account ID** and **User Access Token** in the channel configuration dialog.
{% endhint %}
**Step 1: Navigate to Channel Settings**
From **Settings** module, navigate to the menu item, **Channels**.
**Step 2: Locate the Vonage WhatsApp channel**
Once you've located the Vonage WhatsApp channel, click **Templates**.
**Step 3: Sync Templates**
Click **Sync Templates** to begin the syncing process.
**Step 4: Syncing Completed**
When the synchronization has been completed, the message templates will be listed with their corresponding status and the last synced date time will be updated. The rejection reason will be displayed underneath the rejected message template.
| **Status** | **Description** |
| ---------- | ------------------------------------------------------------- |
| Submitted | The message template is submitted and pending approval. |
| Approved | The message template is approved and can be sent to contacts. |
| Rejected | The message template is rejected and cannot be used. |
{% hint style="info" %}
You may use the search and filter at the top right corner of the listing to find your templates easier.
{% endhint %}
### Rate Limits
A rate limit is the number of API calls an app or user can make within a given time period defined by the channel. Learn more about the [rate limits for this channel here](https://developer.vonage.com/messages/concepts/whatsapp#:~:text=Around%2020%20messages%20per%20second%20by%20default%2C%20and%20this%20can%20be%20scaled%20on%20request).
### FAQ and Troubleshooting
**Inability to Send and Receive Messages**
If you're encountering issues sending and receiving messages, we recommend you to check the application version of your Vonage application.
Step 1: Navigate to [Vonage](https://dashboard.nexmo.com/sign-in) and sign in with your Vonage user credentials.
Step 2: Navigate to your Application and click on edit. Verify if you have selected v1 and Inbound proceed to update it and save changes.
**Message status is not updated**
If you're encountering issues with message status is not updated, we recommend you to check the **Status URL** of your Vonage application.
Step 1: Navigate to [Vonage](https://dashboard.nexmo.com/sign-in) and sign in with your Vonage user credentials.
Step 2: Navigate to your Application and click on edit.
### Troubleshooting
**Inability to Send and Receive Messages**
If you're encountering issues sending and receiving messages, we recommend you to check the application version of your Vonage application.
**Step 1: Navigate to** [**Vonage**](https://dashboard.nexmo.com/sign-in)
Sign in with your user credentials in Vonage.
**Step 2: Verify the Messages version**
---
# Agent Instructions
This documentation is published with GitBook. GitBook is the documentation platform designed so that both humans and AI agents can read, navigate, and reason over technical content effectively. Learn more at gitbook.com.
## Querying This Documentation
If you need additional information that is not directly available in this page, you can query the documentation dynamically by asking a question.
Perform an HTTP GET request on the current page URL with the `ask` query parameter:
```
GET https://docs.is-messenger.com/ismessenger/messaging-channels/whatsapp/vonage-whatsapp.md?ask=
```
The question should be specific, self-contained, and written in natural language.
The response will contain a direct answer to the question and relevant excerpts and sources from the documentation.
Use this mechanism when the answer is not explicitly present in the current page, you need clarification or additional context, or you want to retrieve related documentation sections.