# Other Email

Internet Message Access Protocol, IMAP, is a two-way incoming mail protocol that only downloads email headers instead of its entire content. The two communication allows the protocol to syncs whatever changes are made on the email client to the server. \
\
Simple Mail Transfer Protocol, SMTP, is an email protocol used to send emails from a local client to a recipient's address. SMTP uses a Mail Transfer Agent (MTA) to send your communication to the right computer and email inbox.
#### Before Connecting Other Email
If you wish to connect Gmail, Outlook and Yahoo, it will require an additional step for authorization. Please refer to the following guides on how to do so.
#### Connecting Gmail
**Step 1:** Navigate to **Workspace Settings** > Click **Add Channel**
**Step 2:** Locate the Gmail Channel > Click **Connect**

**Step 3:** Click **Connect** > Sign in with your email and app password
{% hint style="warning" %}
The app password is NOT the same as your login password. Learn how to [create and use your app password for Gmail here](https://support.google.com/accounts/answer/185833?sjid=18319566383069702152-AP).
{% endhint %}
### Connecting Outlook
**Step 1:** Navigate to **Workspace Settings** > Click **Add Channel**
**Step 2:** Locate the Other Email Channel > Click **Connect**

**Step 3:** Click **Connect** > Sign in with your email and login password
{% hint style="info" %}
Alternatively, you can also sign in with an app password. Learn how to [create and use your app password for Outlook here](https://support.microsoft.com/en-us/account-billing/manage-app-passwords-for-two-step-verification-d6dc8c6d-4bf7-4851-ad95-6d07799387e9).
{% endhint %}
### Connecting Yahoo
**Step 1:** Navigate to **Workspace Settings** > Click **Add Channel**
**Step 2:** Locate the Other Email Channel > Click **Connect**

**Step 3:** Click **Connect** > Enter your email and password credentials
{% hint style="warning" %}
The app password is NOT the same as your login password. Learn how to [create and use your app password for Yahoo here](https://help.yahoo.com/kb/SLN15241.html?guccounter=1\&guce_referrer=aHR0cHM6Ly93d3cuZ29vZ2xlLmNvbS8\&guce_referrer_sig=AQAAAMvbUx_nu4sWoYzwZGGXTJBPM6X0niJ-GS7rDkiUvb4Rt_YHnEACKhSxV8CWciYuGp5oIlF6Y45DM8CqhODrQAITJV5gaG8jfOB7mWWJZiJzwyx0djDaWp1OBBynTzwVEg_toNsmRISVbE29LgpI1xi1xn2nVt5rPx9ze0vWsksy)
{% endhint %}
{% hint style="success" %}
Upgrade to Yahoo paid account to access its email forwarding feature. Learn more about the Yahoo email forwarding feature [here.](/ismessenger/messaging-channels/email/other-email.md)
{% endhint %}
### Connecting Other Email
**Step 1:** Navigate to **Workspace Settings** > Click **Add Channel**
**Step 2:** Locate the Other Email Channel > Click **Connect**

**Step 3:** Click **Connect** > sign in with your credentials and set up the SMTP settings.
### Set up Email Forwarding
Once you've filled in the required information, click **Next**. A forwarding email address will be provided and it needs to be set up in the email inbox settings.
Refer to the following providers on how to set up the Email Forwarding rule
* [Microsoft Exchange 2007](http://technet.microsoft.com/en-us/magazine/dd547068.aspx)
* [Microsoft Exchange 2010](http://technet.microsoft.com/en-us/library/dd351134\(v=exchg.141\).aspx)
* [Microsoft Exchange 2013 or later](https://docs.microsoft.com/en-us/exchange/recipients/user-mailboxes/email-forwarding)
* [Microsoft Exchange Online](https://docs.microsoft.com/en-us/exchange/recipients-in-exchange-online/manage-user-mailboxes/configure-email-forwarding)
* [GoDaddy](https://www.godaddy.com/help/forwarding-options-for-my-email-address-23859)
* [Yahoo! Business](http://help.yahoo.com/l/us/yahoo/smallbusiness/bizmail/fwd/fwd-02.html)
* [Apple Mail](https://support.apple.com/kb/PH19148?locale=en_US)
* [iCloud](https://support.apple.com/kb/ph2642?locale=en_US)
* [Amazon WorkMail](https://docs.aws.amazon.com/workmail/latest/userguide/email-rules.html)
{% hint style="success" %}
Once you have completed the setup, all incoming emails can be received in your Workspace. Do note that emails sent directly from the email provider will not be reflected in the platform.
{% endhint %}
{% hint style="danger" %}
If you encounter errors when connecting to Gmail, please ensure that you have set up the Email Forwarding rule in your email inbox settings.
{% endhint %}
## Channel Configuration
{% hint style="info" %}
Email channel can be configured with a unique channel name
{% endhint %}
{% hint style="info" %}
In replies to email contacts, a default signature and branding will be included in the email. This can be hidden in the **Configure Other Email Providers** dialog. \
\
**Note:** The ability to hide the IS-Messenger branding is only available to organizations with subscriptions.
{% endhint %}
**Step 1:** Go to **Settings** > **Channels** > Locate your email Channel > click **Manage**
**Step 2:** Make the necessary configuration
You can configure the following:
* **Channel Name** - Name used internally to identify the account.
* **Sender Name** - The sender name is what your customers will see in their inbox as the sender of the email. By default, the sender name includes the name of the agent assigned to the conversation (using our variables) and the name of the company.
* **Workflow Sender Name** - The sender name is what your customers see in their inbox as the sender of the email when it is sent through the workflow. By default, the sender name is set as the name of the company.
* **Signature** - You have the option to create your own signature that will be automatically added to all your outgoing emails. If desired, you can choose to hide the signature by unchecking the checkbox. By default, the signature will be in the following format:\
\&#xNAN;*Regards*\
\&#xNAN;*The first and last name of the assigned agent (using our variables)*\
\&#xNAN;*Company name*
In addition, you have the ability to include an image and customize your signature using our rich text editor to create your desired format. By default, this signature will be applied to customers who are connecting a new email channel. For existing users, your previous settings will remain in effect until you modify your configurations.
* **Hide IS-Messenger branding in reply** - Option to hide the IS-Messenger branding in replies to your Gmail contacts (Available to organizations with subscriptions).
* **Default copied email address**: This option allows emails added here to be automatically copied in every outgoing email.
* **HTML Background**: This option enables or disables the HTML background in the emails that are sent out.
* **Additional Settings** - Email credentials and IMAP/SMTP settings are used to connect the inbox to receive and send emails to/from the platform.
**Step 3:** Click **Done** to update the Channel configuration.
### FAQ and Troubleshooting
**Messages Are Not Arriving**
**Step 1:** Check the email credentials and IMAP settings
If the emails are not received on the platform, there may be issues with the credentials used to set up. Be sure to cross-check all the information and if your mail server requires a secure connection, make sure to check the `This server requires a secure connection (TLS/SSL)` checkbox.
**Step 2:** Check the email forwarding rule set up in the email inbox
The forwarding email forwarding address is available in `Configure Other Email Providers` dialog. Check the email address is the same as the one you configured in the email settings.
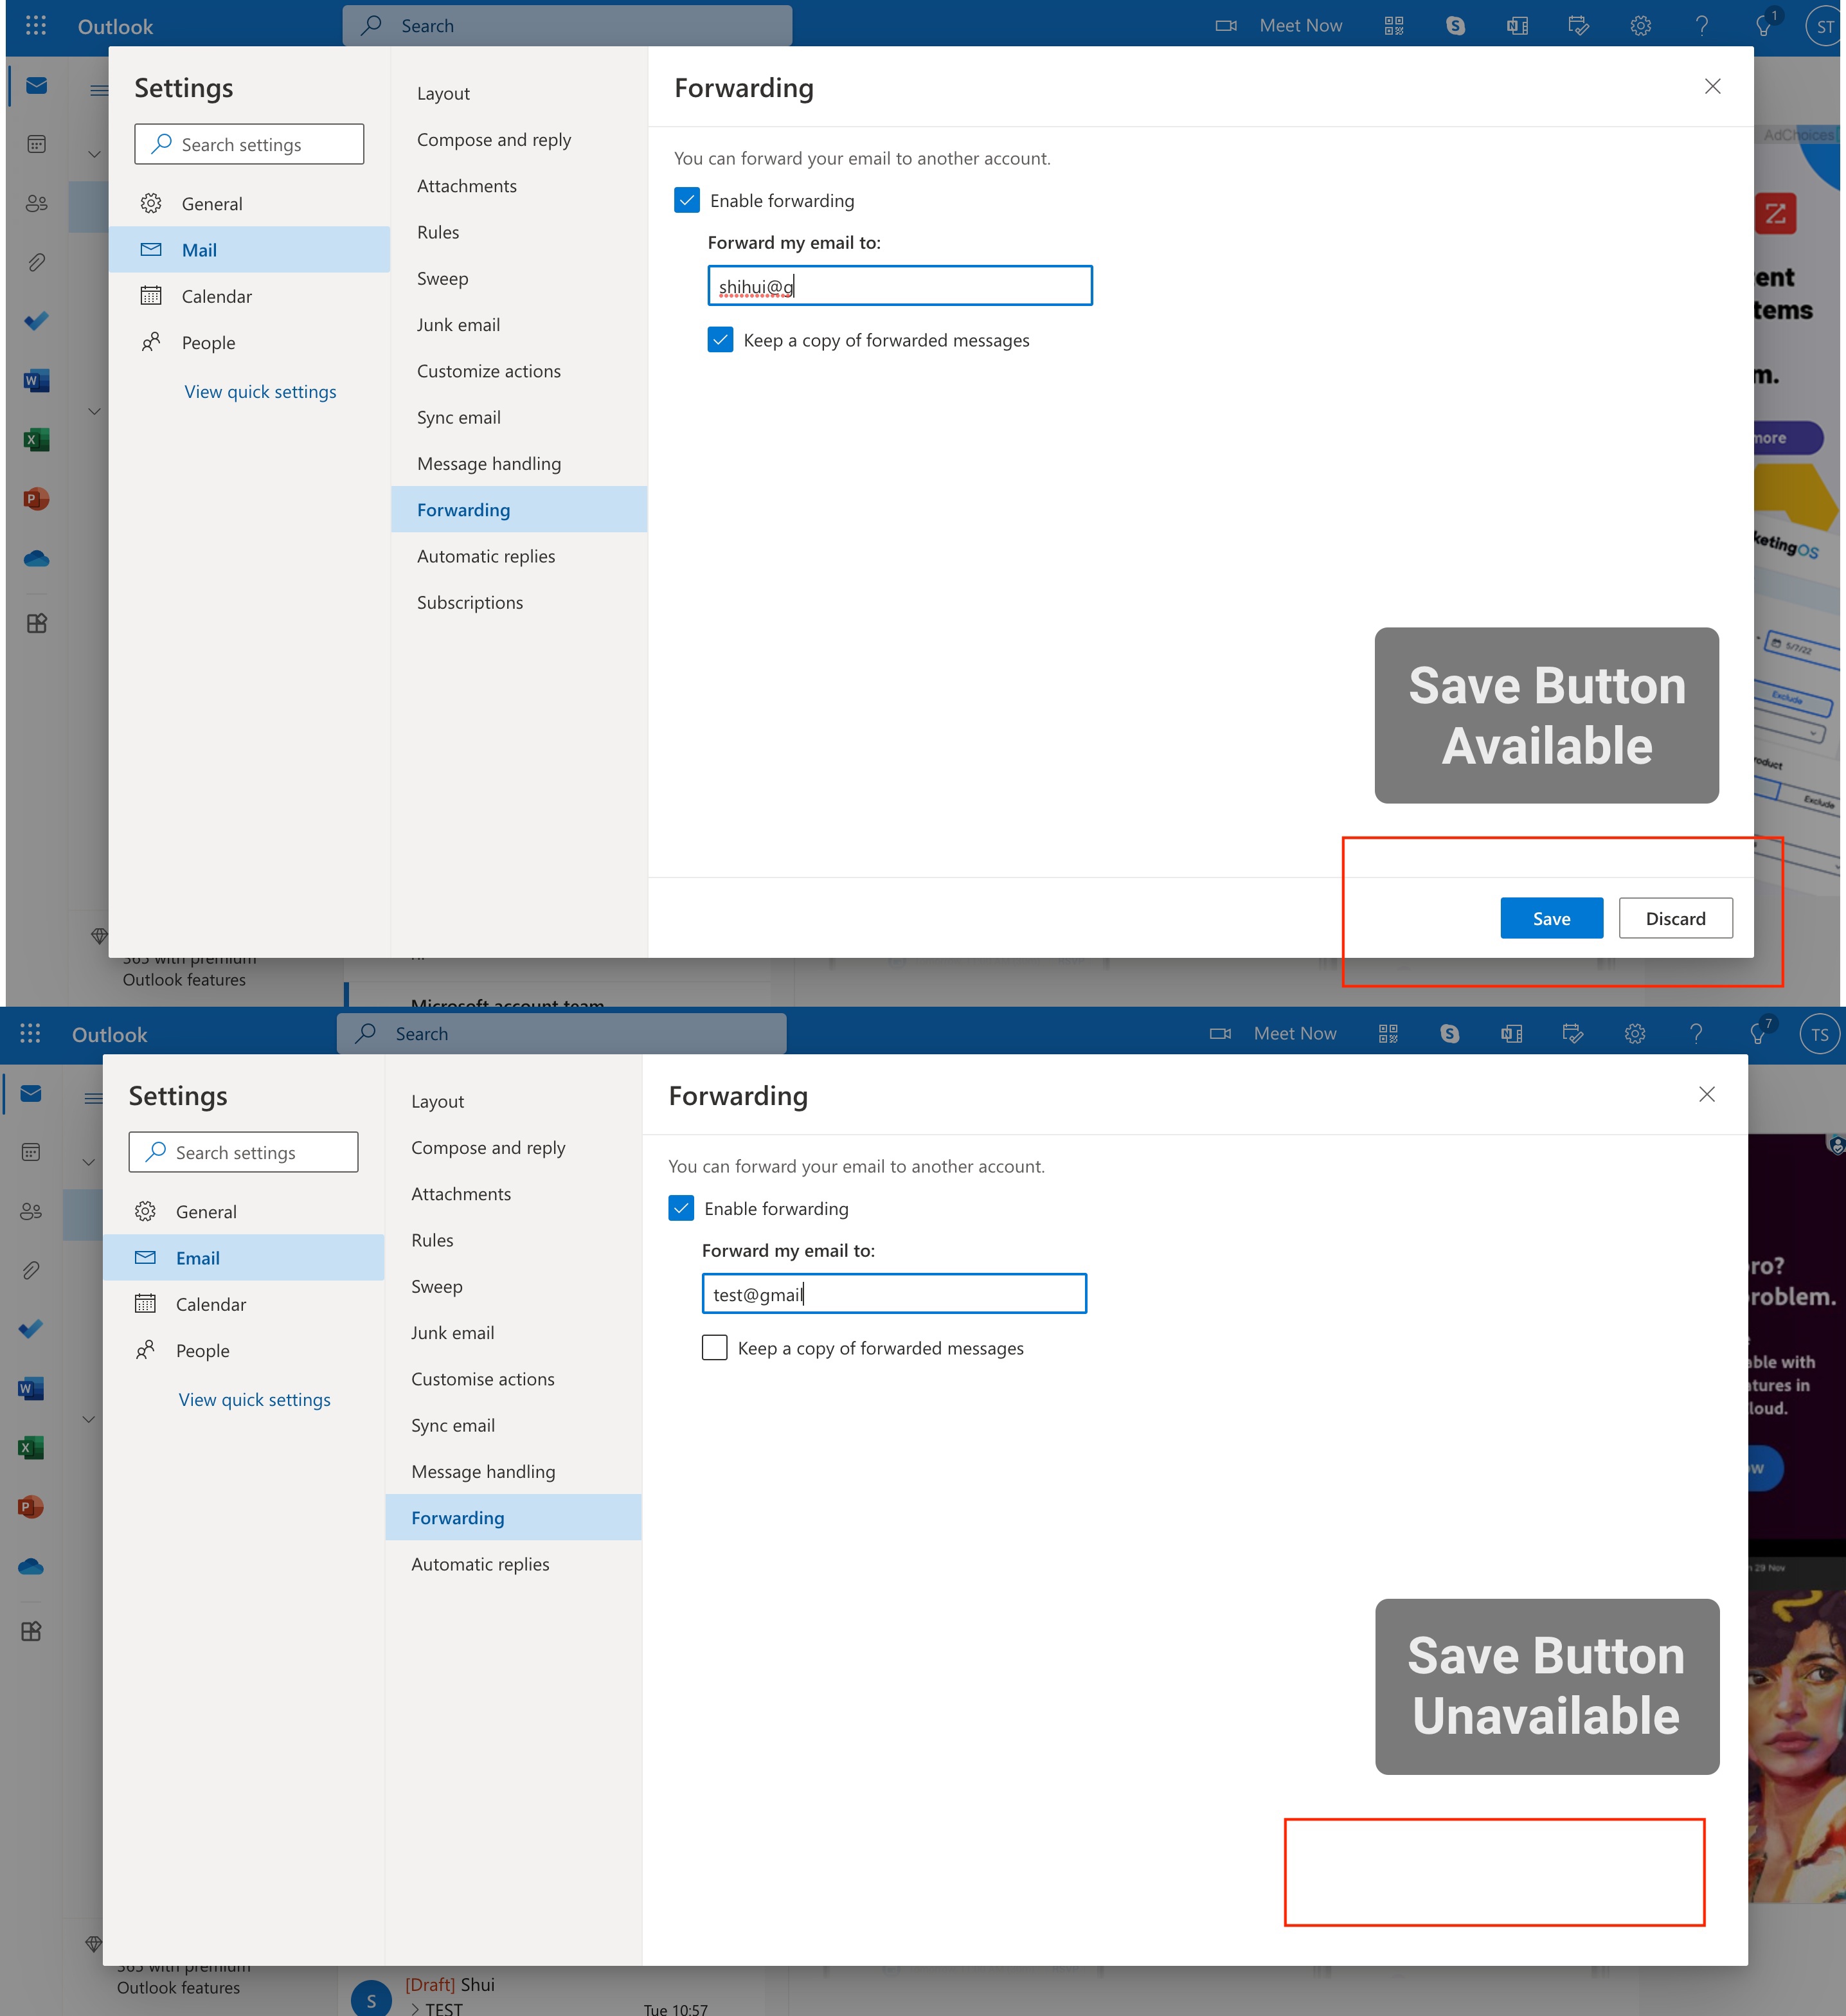
### **Save Button Unavailable When Setting Up Email Forwarding Rule (For Outlook Email Only)**
When setting up your email Forwarding Rule, if you encounter an issue where the Save button is missing from the dialog (sample image as below), you'll need to set up the Forwarding Rule using the Rules settings instead.
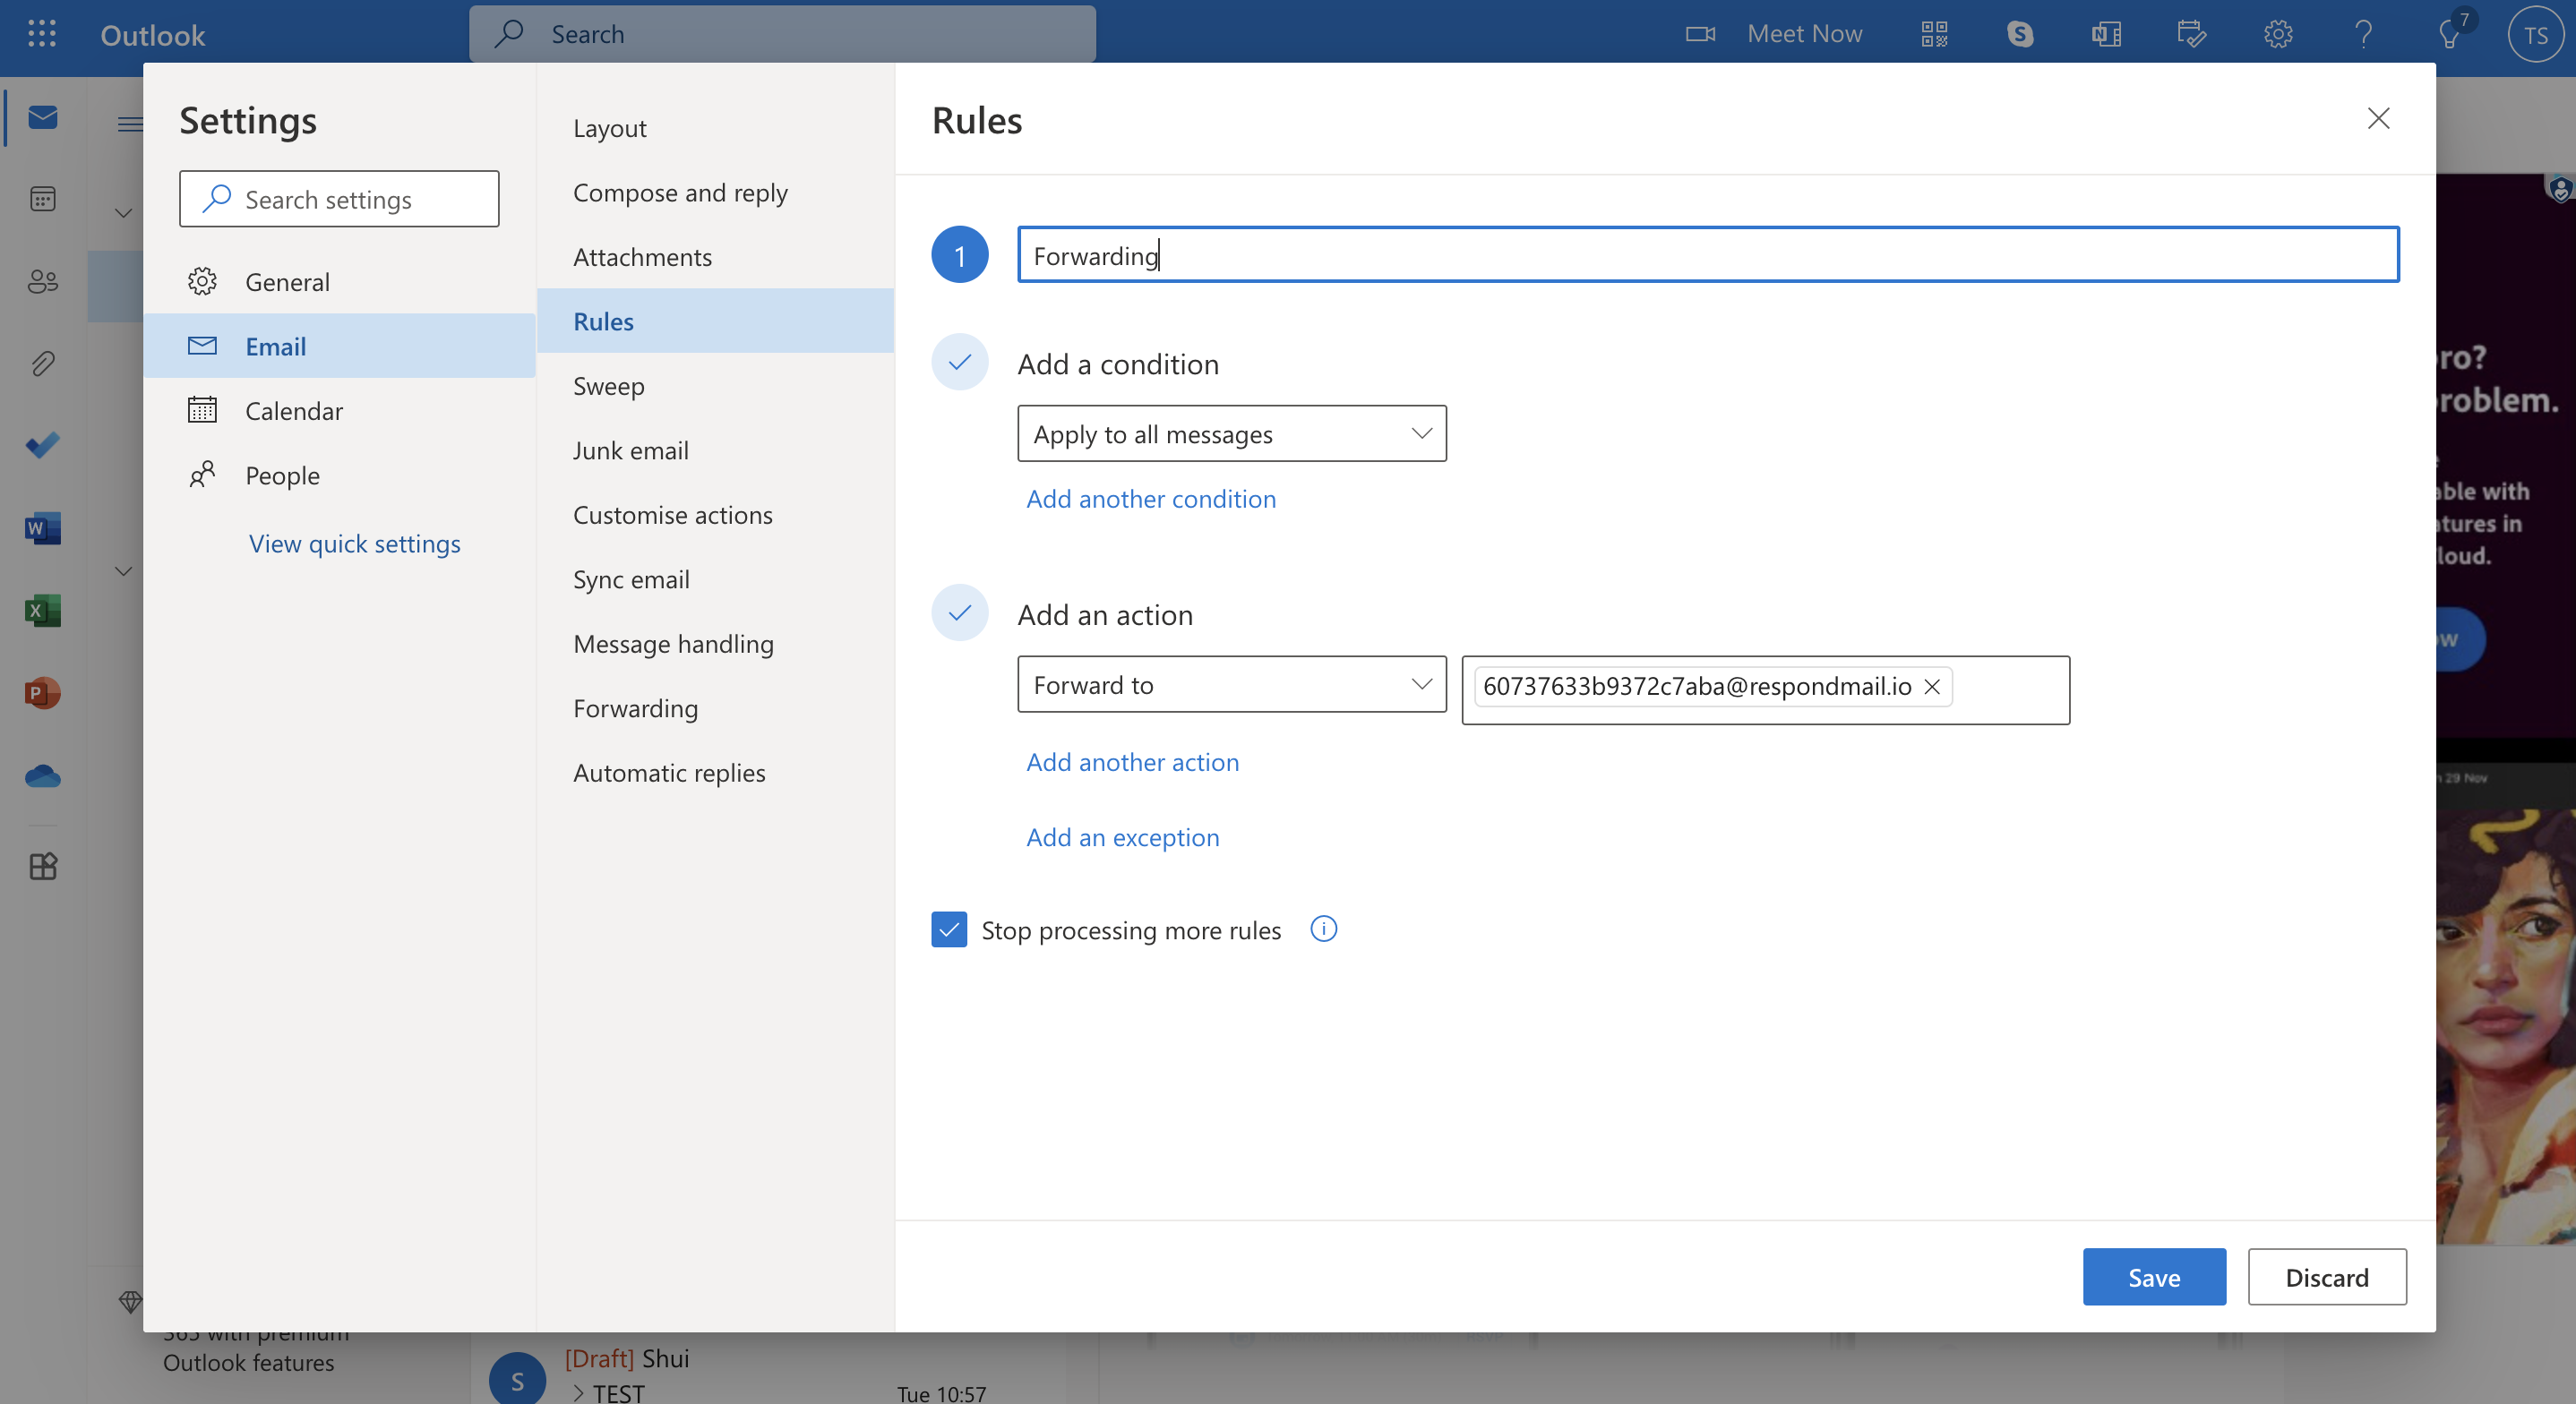
**Step 1:** Navigate to Rules
On the Outlook platform, go to **Settings** > **Email** > **Rules**.
**Step 2:** Create a Rule
Configure your rule as below:
* Subject line - provide a relevant name.
* Condition - select *Apply to all messages.*
* Action - select *Forward to* and add your forwarding email address. You can get your forwarding email address from the IS-Messenger [ channel configuration dialog](/ismessenger/messaging-channels/email/other-email.md).
* Stop processing more rules - enable. More info on the ["Stop processing more rules" option here](https://support.microsoft.com/en-us/office/stop-processing-more-rules-in-outlook-com-10dca09a-24c7-4c0d-abf3-9fa29fdc3230).
**Step 3:** Click **Save**
### **Email Contacts Are Not Receiving Replies**
**Step 1: Check the email credentials and IMAP settings**
If your Contacts are not receiving replies, there may be issues with the credentials used to set up. Be sure to cross-check all the information and if your mail server requires a secure connection, make sure to check the `This server requires a secure connection (TLS/SSL)` checkbox.
**Cannot access the email forwarding feature in Yahoo**
Automatic forwarding of emails in free Yahoo Mail accounts has been discontinued. [Read more](https://help.yahoo.com/kb/automatic-forwarding-emails-free-yahoo-mail-accounts-discontinued-sln35503.html) to understand the limitations of the email forwarding feature in free Yahoo mail.
You need to [upgrade to Yahoo Mail Plus](https://payments.mail.yahoo.com/?ncid=mbr_ympacqad00000003) or [subscribe to Access + Forwarding](https://checkout.yahoo.com/checkout/start/v1?sku=acc-yh-4e212013\&ncid=mbr_ryhacqlnk00000054) to use the email forwarding feature in your Settings
{% hint style="info" %}
Having trouble with the channel? Contact us [here](https://is-global.com/#contact-us)!
{% endhint %}
---
# Agent Instructions: Querying This Documentation
If you need additional information that is not directly available in this page, you can query the documentation dynamically by asking a question.
Perform an HTTP GET request on the current page URL with the `ask` query parameter:
```
GET https://docs.is-messenger.com/ismessenger/messaging-channels/email/other-email.md?ask=
```
The question should be specific, self-contained, and written in natural language.
The response will contain a direct answer to the question and relevant excerpts and sources from the documentation.
Use this mechanism when the answer is not explicitly present in the current page, you need clarification or additional context, or you want to retrieve related documentation sections.