UCal
  • Welcome
  • 🚀Getting Started
    • Quick Start
      • What is IS-Messenger?
      • Setting Up an Account
      • Connecting Channels
      • Inviting Your Teammates
      • Getting Contacts to Message You
      • Automated Welcome and Away Messages
      • Responding to Messages
      • Glossary of Terms
    • Connecting a Channel
    • Invite your teammates
    • Getting Contacts to Message You
    • Automated Welcome and Away Messages
    • Responding to messages
    • Glossary of Terms
    • Creating a Chatbot
  • ⚙️Workspace Modules
    • Dashboard
    • Inbox
      • Inbox Overview
      • Assignment and closing a conversations
      • Custom Inboxes
      • Interacting with Respond AI Prompts
      • Using AI Assist
    • Contacts
      • Contact Details
      • Contacts Overview
      • Merge Suggestions
      • Contact Activity
      • Contact Channels
      • Contact Import
      • Segments
    • Broadcast
      • Broadcast Overview
      • Managing Broadcasts
    • Workflow
      • Triggers
      • Workflow Step
        • Step: Send a Message
        • Step: Ask a Question
        • Step: Assign To
        • Step: Branch
        • Step: Update Contact Tag
        • Step: Update Contact Field
        • Step: Open Conversation
        • Step: Close Conversation
        • Step: Add Comment
        • Step: Jump To
        • Step: Wait
        • Step: Date & Time
        • Step: HTTP Request
        • Step: Trigger Another Workflow
        • Step: Add Google Sheets Row
        • Step: AI Agent
      • Workflow Templates
    • Reports
      • Reports: Conversations
      • Reports: Responses
      • Reports: Resolutions
      • Reports: Messages
      • Reports: Contacts
      • Reports: Assignments
      • Reports: Leaderboard
      • Reports: Users
      • Reports: Broadcasts
  • ⚙️Workspace Setting
    • Managing a Workspace
    • General
    • Users
      • Access Levels
    • Teams
    • Channels
      • Chat Menus
    • Contact Fields
    • Growth Widgets
      • Website Chat Widget Quick Start
      • Website Chat Widget Overview
      • Workspace Settings: Growth Widgets
      • Install Website Chat Widget on Squarespace
      • Install Website Chat Widget on Joomla
      • Install Website Chat Widget on Wix
      • Install Website Chat Widget on Shopify
      • Install Website Chat Widget on WordPress
      • How to Track Conversation Source from Multiple Websites
    • Respond AI
    • Integrations
      • Dialogflow
        • Dialogflow: Connecting to Dialogflow
        • Dialogflow: Creating a Chatbot
        • Dialogflow : Managing Intents
        • Dialogflow: Parameters
        • Dialogflow: Events
        • Dialogflow: Response Templates
        • Dialogflow: Custom Payloads
        • Dialogflow: Fulfillment Webhook Request
      • E-Commerce & CRM Integrations
        • E-Commerce Integration: Shopify
        • E-Commerce Integration: BigCommerce
        • E-Commerce Integration: WooCommerce
        • E-Commerce Integration: Magento
        • CRM Integration: HubSpot
        • CRM Integration: Salesforce
        • CRM Integration: Pipedrive
        • CRM Integration: ActiveCampaign
      • Zapier
      • Developer API
      • Webhooks
      • Make (formerly Integromat)
    • Closing Notes
    • Snippets
    • Files
    • Data Export
    • Data Import
  • ⚙️User Account
  • Profile
  • User Activity Status
  • Notifications
  • Resetting your Passwords
  • 👨‍👧‍👦CONTACT AND MESSAGES
    • Dynamic Variables
      • Dynamic Variables Overview
      • How to Use Dynamic Variables
    • Contact Search and Custom Inbox
    • Conversations
  • ⚙️MESSAGING CHANNELS
    • Channel Overview
    • Facebook Messenger
      • Facebook Messenger Quick Start
      • Facebook Chat Plugin
      • Private Replies
      • Message Tag
    • Instagram
      • Instagram Overview
      • Instagram Quick Start
    • WhatsApp
      • WhatsApp Business API Quick Start
      • Getting Ready for Inbound Conversations
      • Getting Ready for Promotional Messaging
      • WhatsApp Official Business Account (Green Tick)
      • Grow your WhatsApp Audience by Maximizing Entry Points
      • Get WhatsApp API Account for Government Agencies
      • Meta Business Verification
      • WhatsApp Message Templates
      • WhatsApp Pricing
      • WhatsApp Business Platform (API) Channel Configuration
      • WhatsApp Messaging Limits
      • Meta Product Catalog
      • Change Your WhatsApp Business Display Name
      • Phone Number Migration to IS-Messenger WhatsApp Business API
      • Turn-off WhatsApp Number Two-Step Verification
      • WhatsApp Cloud API
        • Migrating from On-Premises API to Cloud API
        • Migrating from Cloud API to On-Premises API
        • Set up the WhatsApp Echo Bot
        • Load Testing on Cloud API
        • Experiments
        • Webhooks Setup
      • 360Dialog WhatsApp
      • Twillio WhatsApp
      • MessageBird WhatsApp
      • Vonage WhatsApp
      • Phone Number Migration to WhatsApp Cloud API
    • Website Chat Widget
      • Install on WordPress
      • Install on Shopify
      • Install on Wix
      • Install on Squarespace
      • Install Website Chat Widget on Joomla
    • LINE
      • LINE Overview
      • LINE Quick Start
    • Telegram
      • Telegram Overview
      • Telegram Quick Start
    • Viber
      • Viber Overview
      • Viber Quick Start
    • SMS Overview
      • Twilio SMS Quick Start
        • Importing Contacts to Twilio SMS
      • MessageBird SMS Quick Start
      • Vonage SMS Quick Start
    • Twitter Overview
      • Twitter Quick Start
    • WeChat
      • WeChat Overview
      • WeChat Quick Start
    • Google Business Message
    • Email
      • Google Workspace Quick Start
      • Other Email
    • Custom Channel
      • Custom Channel Overview
      • Custom Channel Quick Start
  • New Release Update
  • Support Use Cases
    • How to Identify Contacts by Email and Phone NumberI
    • How to Enrich Customer Data from a CRM or other Business Software
    • How to Route Customers to the Right Team Automatically
    • How to Auto-Assign Customers to a Team or Dedicated Agent
    • How to Send Outbound Support Messages
    • Support: Closing Conversations
    • How to Supervise Your Support Agents
    • How to Analyze Reports for Support
    • How to Send CSAT to Customer and Save Data in Google Sheets or CRMs
  • Handling Inbound Conversations
    • Managing Spam
    • Create Automated Welcome and Away Messages
    • Get Contacts’ Consent for Personal Data Collection
    • Create Automated Chat Menus
    • Collect Contacts’ Emails and Phone Numbers
    • Route Contacts by Shifts
    • Route Contacts by Team Functions
    • Route New & Returning Contacts
    • Route VIP Contacts
    • Assignment Strategy: Automatic Contact Distribution & Load Balancing
    • Assignment Strategy: Unassign Agents after Conversations Closed
  • Capture Conversations
    • How to Streamline Meeting Scheduling via CTC Ads
    • How to Automate Product Info Sharing in Conversations Initiated via CTC Ads
    • How to Track Conversation Source from Multiple Websites
    • How to Route Contacts from CTC Ads to Agents
  • Automate Conversations
    • How to Maximize Customer Service Potential with AI Agent
    • How to Automate Contact Information Collection with AI
    • How to Route Contacts to Preferred AI Agent
    • How to Automatically Qualify Contacts Based on Budget Using AI Agent
    • How to Route Contacts by their Preferred Language
    • How to Create Automated Chat Menus
    • Assignment Strategy: How to Automate Contact Distribution & Load Balancing
    • Assignment Strategy: Unassign Agents after Conversations Closed
    • How to Create Automated Welcome and Away Messages
    • How to Block Contacts and Manage Spam
    • How to Route New and Returning Contacts
    • How to Collect Contacts’ Emails and Phone Numbers
    • How to Route New and Returning Contacts
    • How to Route Contacts by Team Functions
    • How to Route Contacts by Shifts
    • How to Get Contacts’ Consent for Personal Data Collection
    • How to Route VIP Contacts
  • How to Promptly Transfer Conversation Between Agents
  • How to Guide Customers from Exploration to Purchase with Engaging Menus
  • How to Optimize Customer Onboarding with Automated & Customized Welcome Messages
  • Converse with Customers
    • How to Get a Complete View of the Customers
    • How to Simplify Customer Escalation with Automation
    • How to Transfer Contacts to the Next Shift Automatically
    • How to Optimize Agents’ Productivity in the Messages Module
    • How to Align AI Conversations with Your Brand Voice
    • How to Draft Customer Replies with AI
    • How to Convert Image to Text Using AI
    • How Automate Calculations Using AI
  • Broadcasts Use Cases
    • How to Sending a Simple Broadcast
    • How to Start a Workflow Based on Broadcast Response
    • How to Import to Broadcast via WhatsApp
    • How to Troubleshoot a Failed Broadcast
  • Sales Use Cases
    • How to Collect Leads' Email and Phone Number
    • How to Enrich Contact Data and Qualify Leads
    • How to Route Leads
    • How to Auto-Assign Leads to Sales Agents
    • How to Send Outbound Sales Messages
    • How to Track Productivity by Closing Conversations
    • How to Supervise Sales Agents
    • How to Analyze Reports for Sales
  • Accessing Help Menu
Powered by GitBook
On this page
  • Benefits of Starting a Workflow Based on Broadcast Response
  • Methods for Starting a Workflow Based on Broadcast Response
  • Method 1: Send a broadcast message to make an announcement
  • Set up an announcement as a broadcast to the Contacts
  • Setting Branch options to check the message source and content
  • Automatically check if the message received is a response to a broadcast you sent
  • Method 2: Send a broadcast message with a multiple-choice question in the broadcast
  • Automatically check if the message received is the response to your broadcast
  • Setting up Workflow for automatic responses
  1. Broadcasts Use Cases

How to Start a Workflow Based on Broadcast Response

Business Goal: Send a broadcast with multiple choice questions and automatically handle Contacts’ responses.

PreviousHow to Sending a Simple BroadcastNextHow to Import to Broadcast via WhatsApp

Last updated 1 year ago

When you send out bulk messages, you may receive a massive influx of messages in response to an offer or survey. Workflows allow you to quickly respond to and segment these messages.

Benefits of Starting a Workflow Based on Broadcast Response

  • Separate broadcast responses from other messages

  • Segment contacts according to their responses

  • Easily handle a large response to broadcasts

Methods for Starting a Workflow Based on Broadcast Response

  • Method 1: Send a broadcast message to make an announcement and set up an automatic response.

  • Method 2: Send a broadcast message with a multiple-choice question and set up an automatic response based on replies.

Method 1: Send a broadcast message to make an announcement

Method Objectives

  • Set up an announcement as a broadcast to the Contacts.

  • Automatically check if the message received is a response to a broadcast.

Set up an announcement as a broadcast to the Contacts

Tip: Learn more about .

Step 1: Go to the Broadcast module and set up a broadcast. For message content, select Add Content > Text Message and provide an announcement that will be sent as a broadcast.

Step 2: Set up the Workflow with a Trigger condition and a Branch condition to filter responses.
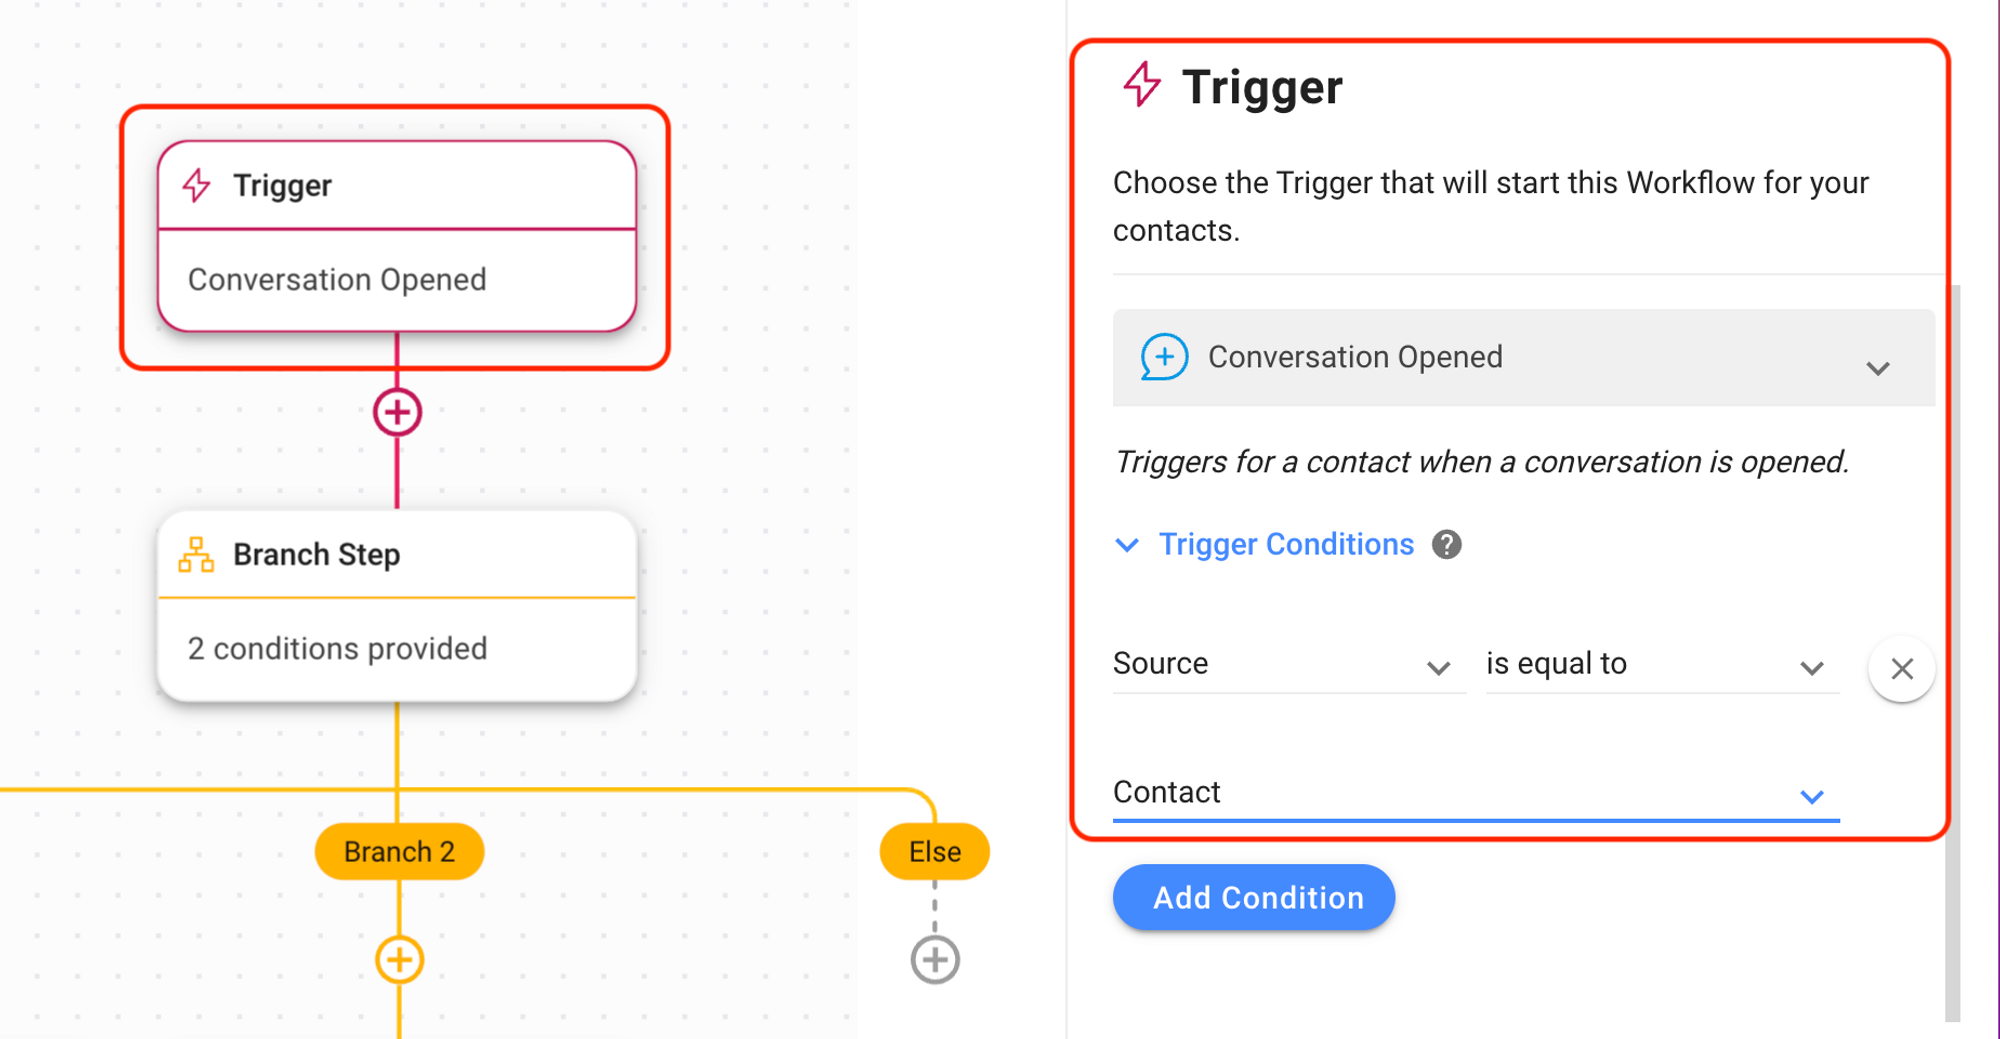
Setting Workflow Trigger for when a conversation is opened by Contact

  1. Select Source from the Trigger Conditions dropdown to start the Workflow with the Conversation Opened Trigger.

  2. Select is equal to from the Category dropdown list.

  3. Select Contact from the Operator dropdown list.

Setting Branch options to check the message source and content

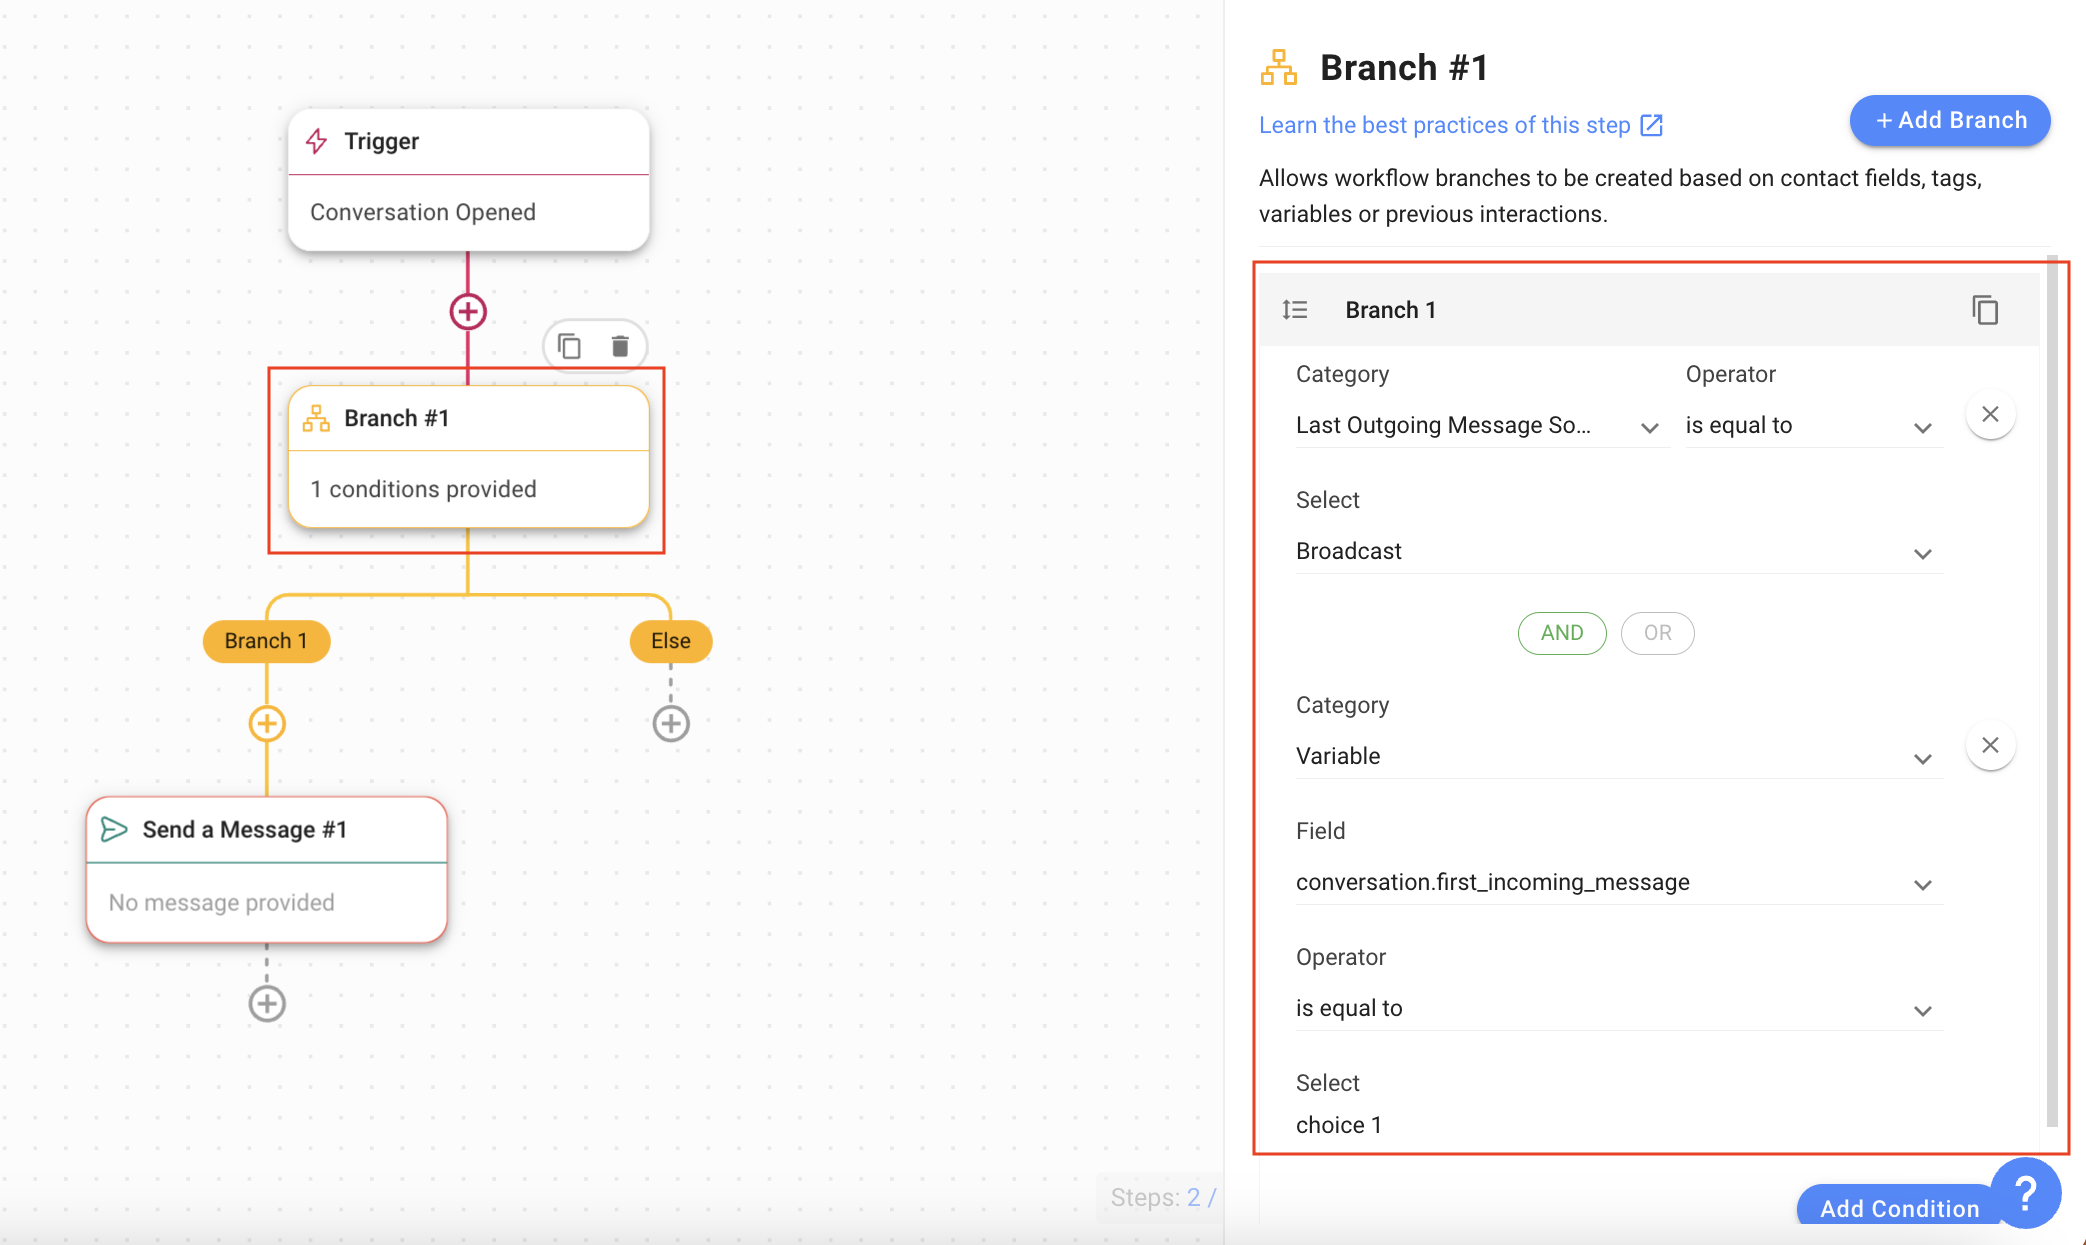
  1. Add a Branch to the workflow and select Last Outgoing Message Source from the Category dropdown list.

  2. Select is equal to from the Operator dropdown list.

  3. Select Broadcast from the Select dropdown list.

  4. Click Add Condition to add another condition.

  5. Click the And operator.

  6. Select Last Outgoing Message from the Category dropdown list.

  7. Select contains from the Operator dropdown list.

  8. Enter the message sent in the broadcast on the Select field to signify which broadcast message this response is for.

Automatically check if the message received is a response to a broadcast you sent

When a message is received from a Contact, this Workflow checks if the message is the response to a broadcast message sent by you; if yes, it checks what the broadcast message was. If the text of the broadcast message is the one you have set the response for, the Workflow will proceed, else it will end.

Method 2: Send a broadcast message with a multiple-choice question in the broadcast

Method Objectives

  • Send a multiple-choice question or question with limited responses as a broadcast to the Contacts.

  • Automatically check if the message received is the response to your broadcast.

Send a multiple-choice question or question with limited responses as a broadcast to the Contacts

Step 1: Go to the Broadcast module and set up a broadcast. Under Content, select Multiple Choice to ask a Multiple Choice question. You can also use Text Message to ask a simple yes or no question.

Step 2: Set up the Workflow with a Trigger condition and a Branch condition to check if the last sent message was a Broadcast.

Setting Workflow Trigger for when a conversation is opened by contact

  1. To start the workflow with the Conversation Opened Trigger, ensure that the Conversation Opened trigger is selected.

  2. Expand the Trigger Conditions menu and select Source from the Trigger Conditions dropdown.

  3. Select is equal to from the Category dropdown list.

  4. Select Contact from the Operator dropdown list.

Setting Branch options to check the message content

  1. Add a Branch to the workflow (for each choice) and select Last Outgoing Message Source from the Category dropdown list.

  2. Select is equal to from the Operator dropdown list.

  3. Select Broadcast from the Select dropdown list.

  4. Click Add Condition to add another condition.

  5. Click the And operator.

  6. Select Variable from the Category dropdown list.

  7. Select conversation.first_incoming_message from the Field dropdown list.

  8. Select is equal to from the Operator dropdown list.

  9. Enter the text of the first choice (of the multiple-choice question) in the Select field.

Once done, create a new branch for the next option until all choices have been handled.

Automatically check if the message received is the response to your broadcast

When a message is received from a Contact, this workflow checks if the message contains one of the options from the multiple-choice questions sent via broadcast message. If yes, then the workflow will proceed, else it will end.

Setting up Workflow for automatic responses

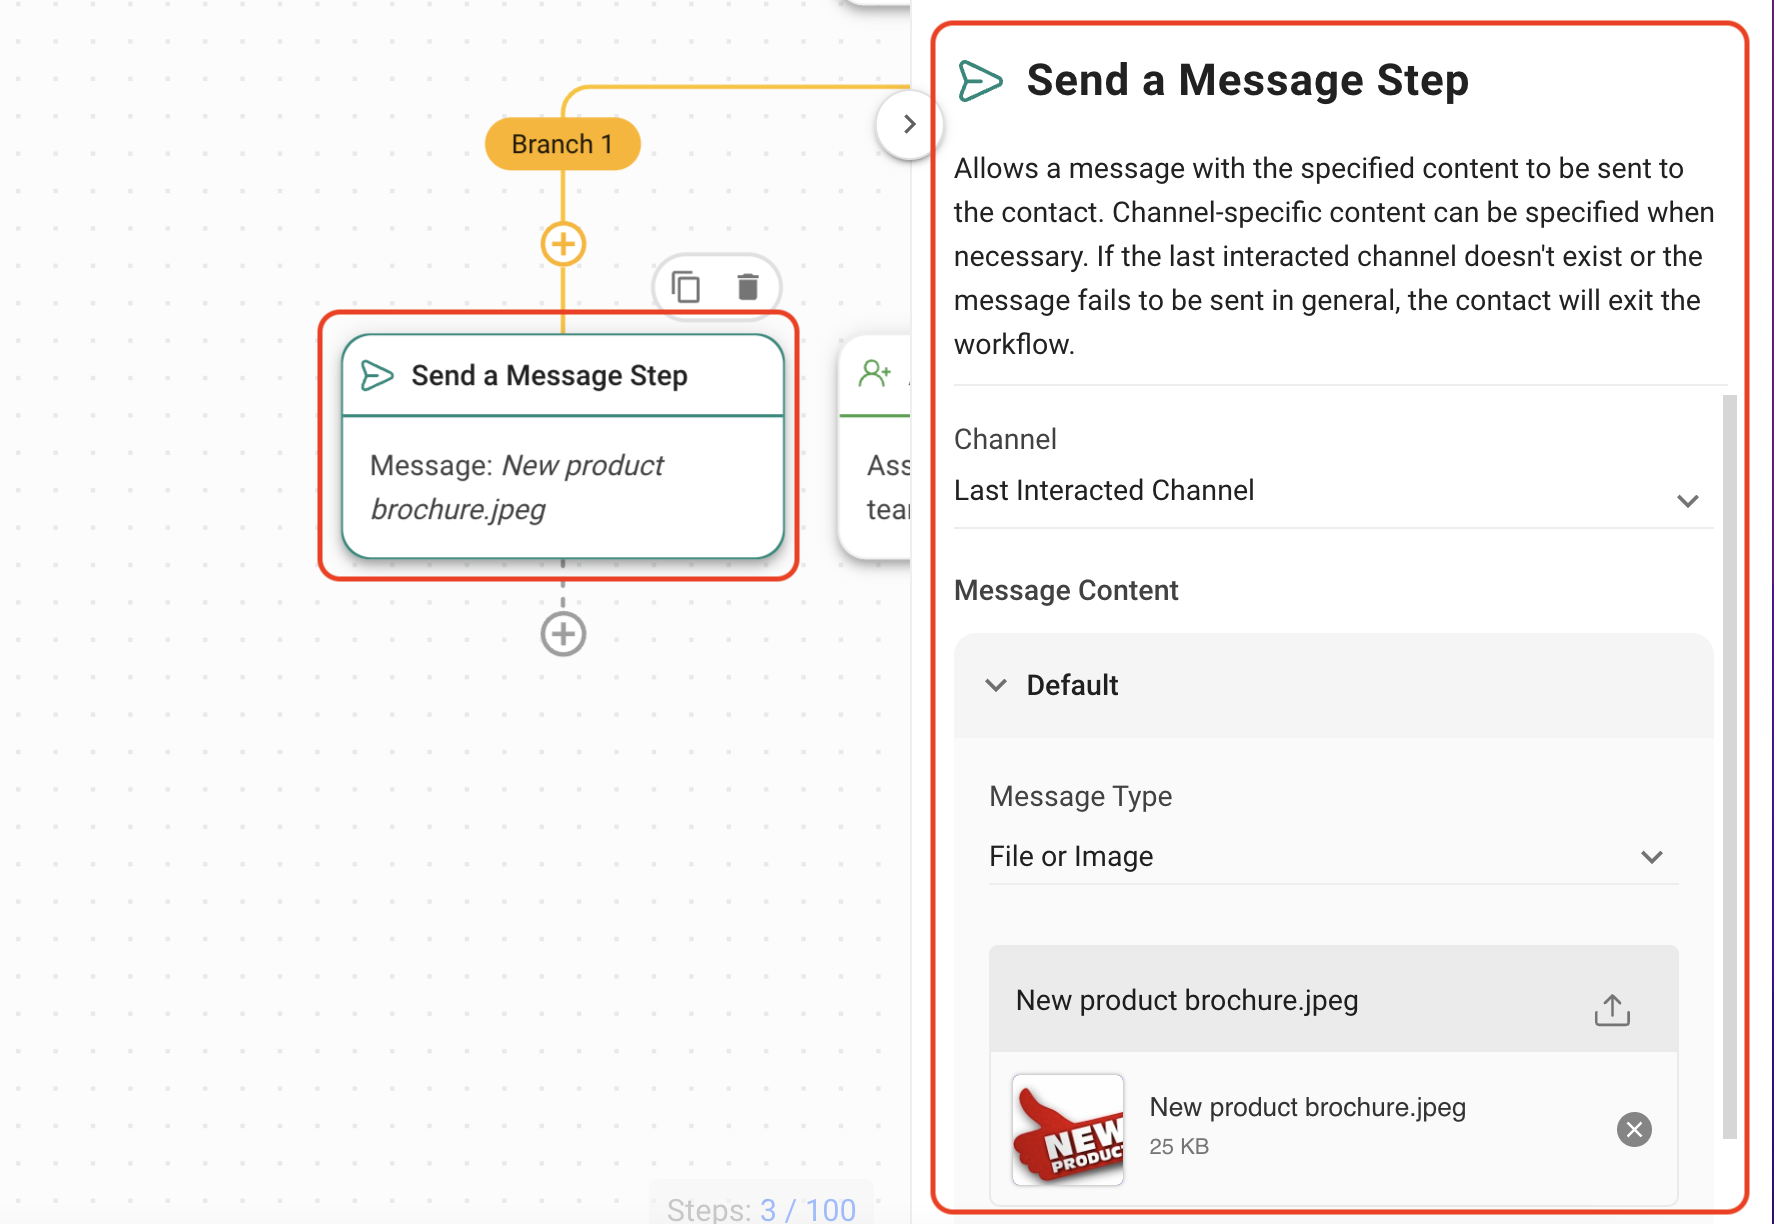
For this example, we will send a new product brochure to the Contact interested in our new product brochure.

  1. Add the Send a Message step to the relevant branch.

  2. Select File or Image from the Message Type dropdown list.

  3. Select a file or image.

Tip: Learn more about the Send a Message Step here.

Tip: Another option in response to certain replies is routing.

Tip: Learn more about .

Tip: Learn more about .

Tip: For WhatsApp template messages, .

Tip: Learn more about .

Tip: Learn more about .

Tip: Learn more about .

Tip: Learn more about the .

how to set up a broadcast here
Triggers here
how to set up a broadcast here
use Quick Replies
Triggers here
using the Branch Step here
Triggers here
Send a Message Step here
Branch options
Setting workflow trigger for conversation opened by contact
Conversation open trigger for workflow
screenshot of sending a message with attachment from a workflow
Setting Branch options to check the message content