# How to Route Customers to the Right Team Automatically
### Benefits of Routing
Use routing to:
* reduce response time by quickly routing customers to the right team with an automated process.
* reduce resolution time by automatically routing customers and [assigning](https://help.respond.io/support-use-case/auto-assign-customers) them to support agents familiar with their issues.
### Methods for Routing Customers
1. Route based on a customer’s answer when asked a question.
2. Route based on Contact profile.
3. Route based on business hours and shifts.
{% hint style="info" %}
**Tip**: Learn more routing methods that are more applicable for Sales
{% endhint %}
### **Route based on customer’s answer when asked a question**
{% hint style="success" %}
**Use this method** when you want to route customers based on their needs.
{% endhint %}
#### **Method Objectives**
* Ask customers about the issue they need assistance with.
* Route customers to the right support team to assist with the issue.
**Workflow Setup**
Here’s an example of how to set up a Workflow to route customers based on their needs. You can adapt this setup according to your business needs.
### **Ask customers about the issue they need assistance with**
{% hint style="info" %}
There are [best practices for the Ask a Question Step here](/ismessenger/modules/workflow.md).
{% endhint %}
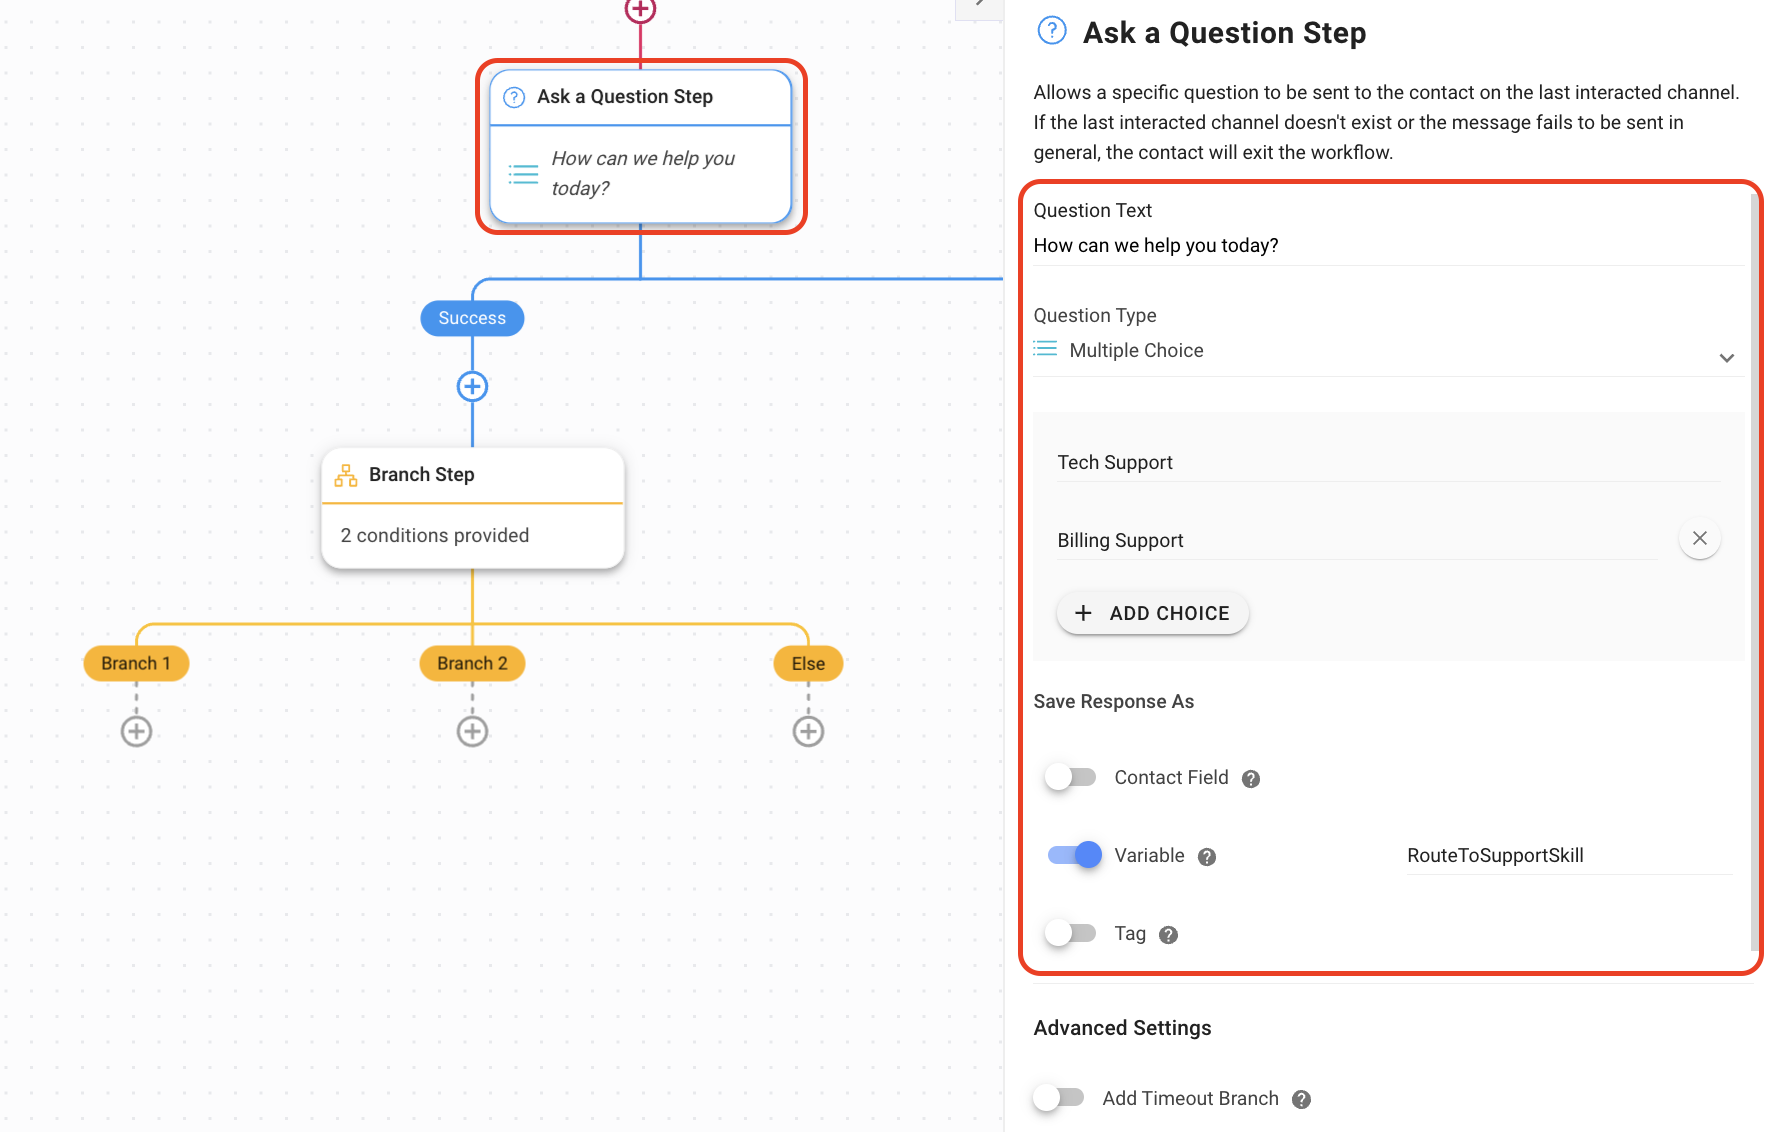
Use the Ask a Question Step to ask a customer what they need help with and save the answer as Variables. The [Variable](/ismessenger/contact-and-messages/untitled.md) will be used in this Workflow’s Branch Step for routing purposes.
Ask a Question Step with Multiple Choice Answer configuration
1\. Add the Ask a Question Step and fill in the Question Text field.\
2\. Select Multiple Choice in the Question Type dropdown.\
3\. Add and fill in the answer choices as needed, e.g., Team Skill answer choices could be Tech Support, Billing Team, Shipping Team, etc.\
4\. Enable Save Response As Variable and give the Variable a name.\
\
### **Route customer to the right support team to assist with the issue**
{% hint style="info" %}
There are [best practices for the Branch Step here](/ismessenger/modules/workflow.md).
{% endhint %}
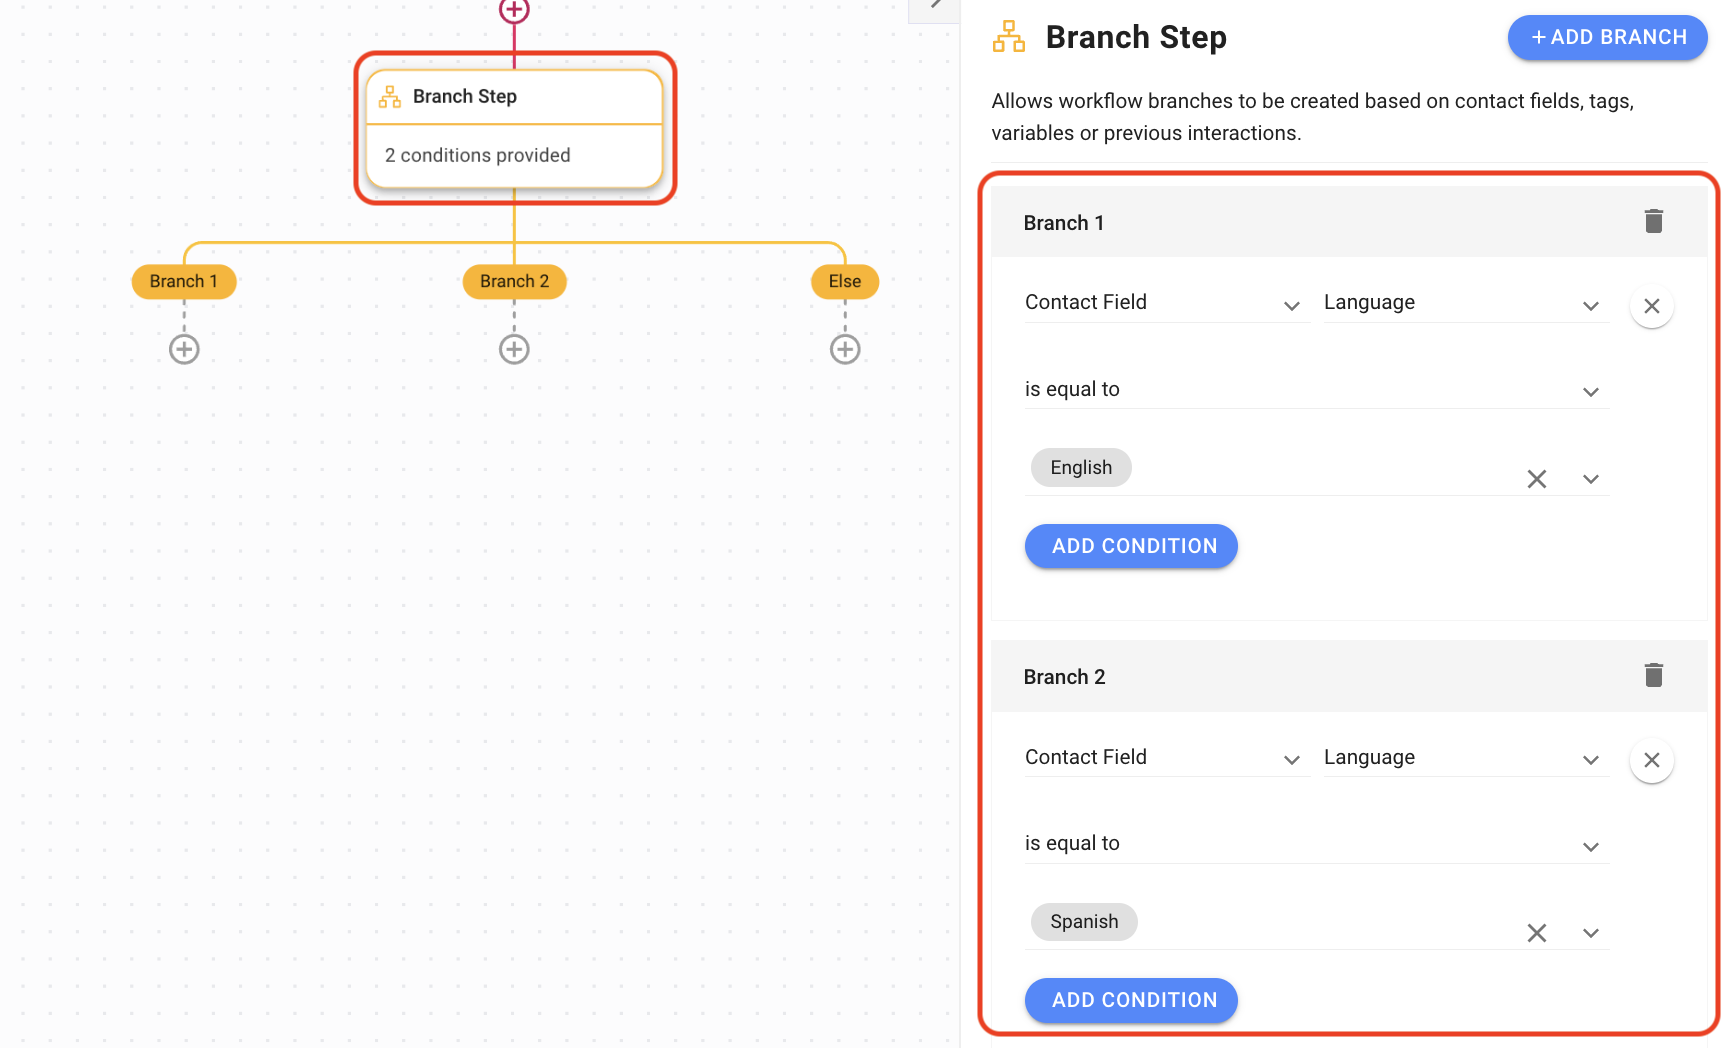
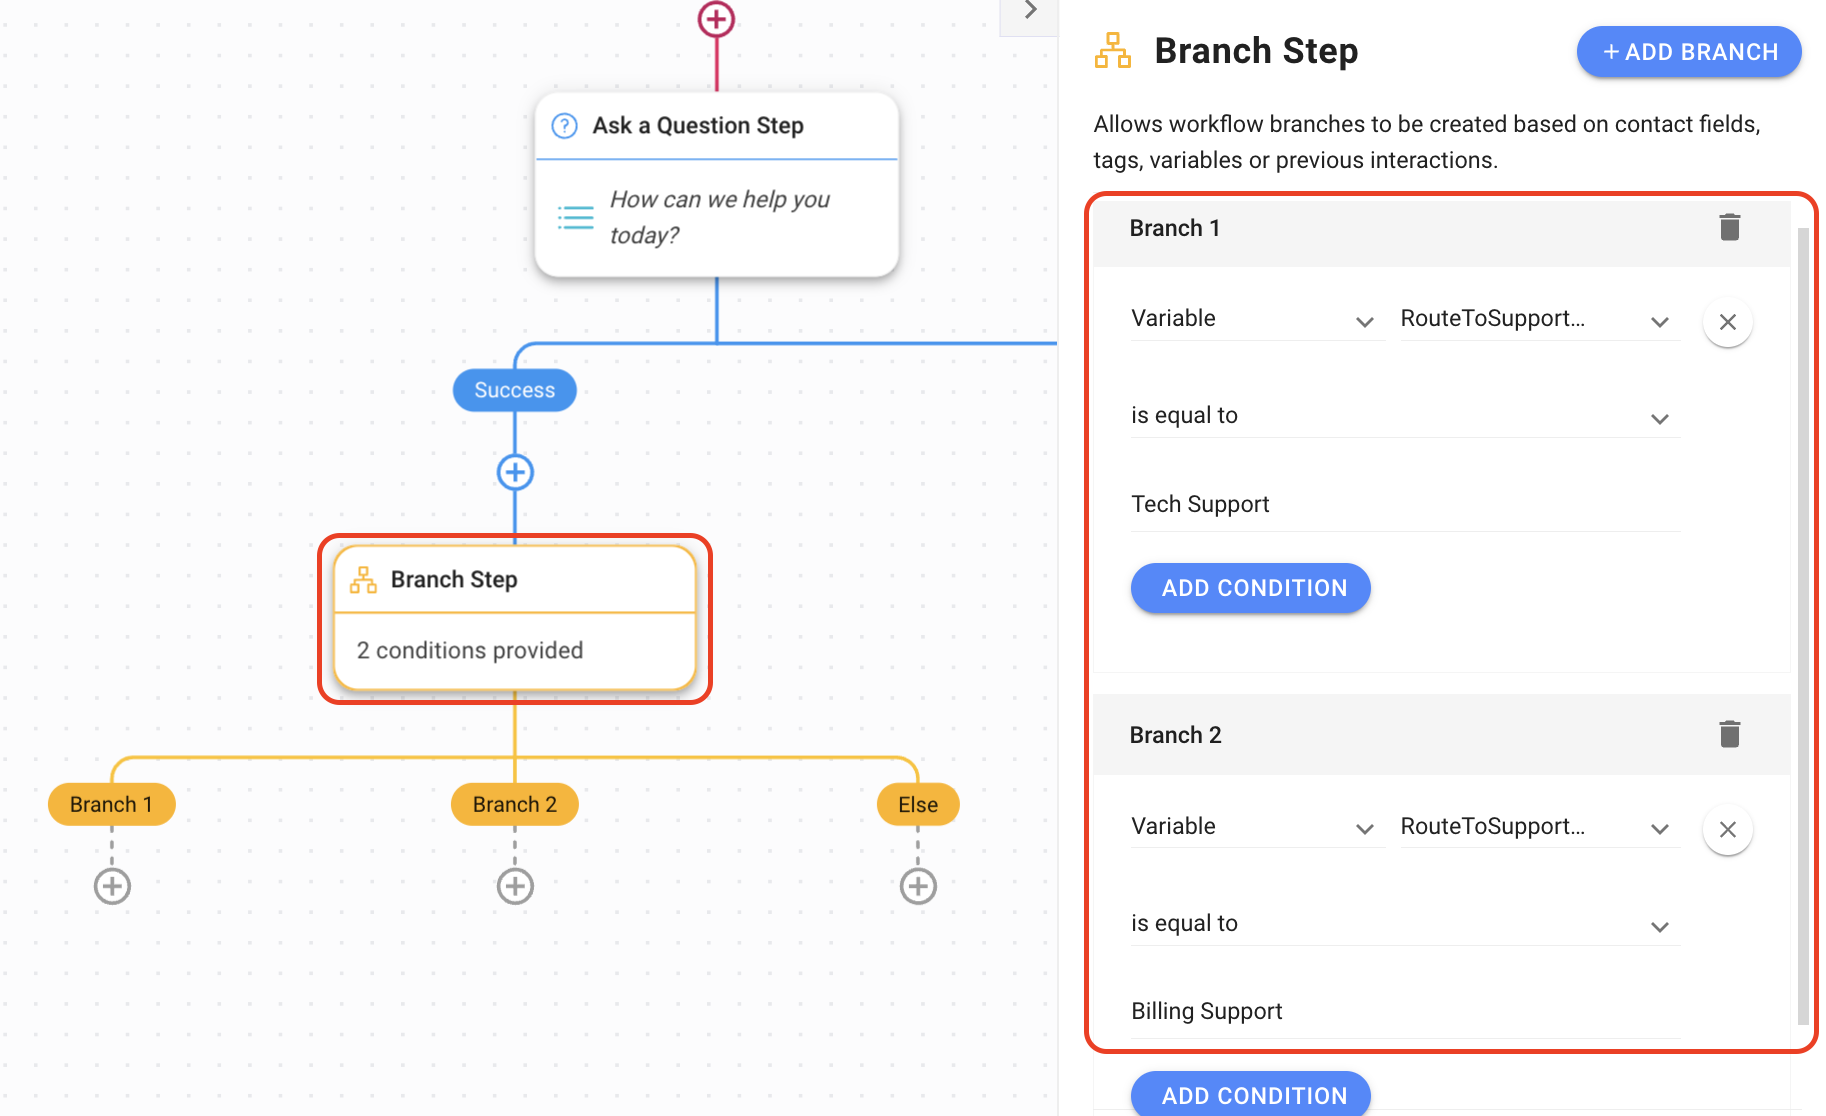
Use a Branch Step to route customers to the right Support team based on their needs.
Branch Step Routing configuration
1\. Under the Success branch, add a Branch Step.\
2\. In the configuration panel, select Variable and your Variable name, then is equal to from the Operator menu.\
3\. Fill in the value with an answer choice written in the Ask a Question Step.\
4\. Add a Branch and repeat this process until each of your answer choices has its own branch.\
\
{% hint style="info" %}
Consider [Auto-Assignment](/ismessenger/support-use-cases.md) as your next step to automatically assign customers to the right support agent.
{% endhint %}
### **Route based on Contact profile**
{% hint style="success" %}
**Use this method** when you want to route customers to the right support team based on existing Contact information.
{% endhint %}
Contact information such as language or country can be derived automatically from the Channel customers used to message your business or from the Contact's phone number if applicable. Data collected from [Contact enrichment](/ismessenger/support-use-cases.md) could also be used to make automated decisions about the next steps for the customer based on your business needs.
**Method Objectives**
* Route customers based on existing Contact information.
**Workflow Setup**
{% hint style="info" %}
**Tip**: Consider doing [customer data enrichment](/ismessenger/support-use-cases.md) earlier in this workflow.
{% endhint %}
{% hint style="info" %}
**Tip**: There are [best practices for the Branch Step here](/ismessenger/support-use-cases.md).
{% endhint %}
Here’s a setup example of the Branch Step to route customers based on existing Contact information. We’ll use the language Contact field as an example.
Add a Branch Step > select *Contact Field* and *Language* > select *is equal to* from the Operator menu > choose your desired language as value.
{% hint style="info" %}
**Tip**: Consider [Auto-Assignment](/ismessenger/support-use-cases.md) as your next step to automatically assign customers to the right Support agent
{% endhint %}
### **Route based on business hours and shifts**
{% hint style="success" %}
**Use this method** when you want to route customers to the right team on duty depending on the time and day.
{% endhint %}
The time and day can be defined in a Workflow to ensure customers are always routed to the support team that is currently on shift. This method is also useful to set business hours for companies without a 24-hour customer support system.
**Method Objectives**
* Define time and day, and route customers based on business hours or shift.
**Workflow Step Setup**
{% hint style="info" %}
**Tip**: There are [best practices for the Date and Time Step here](/ismessenger/modules/workflow.md).
{% endhint %}
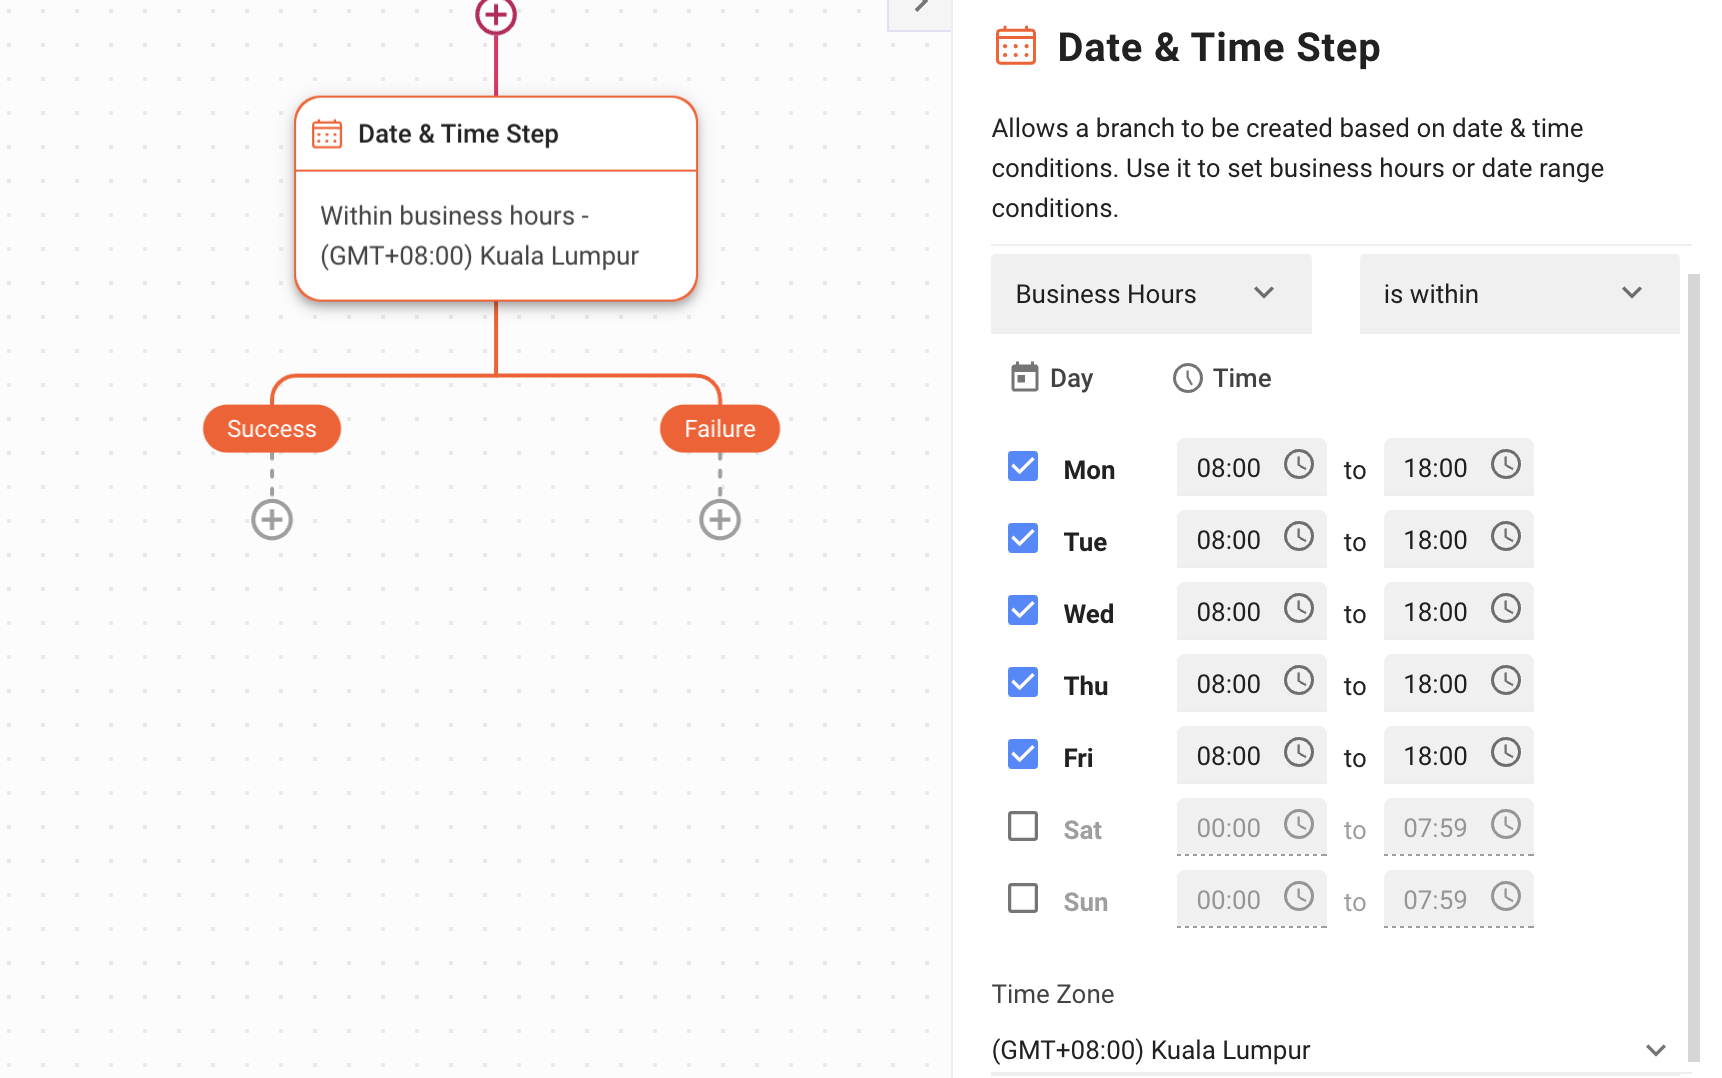
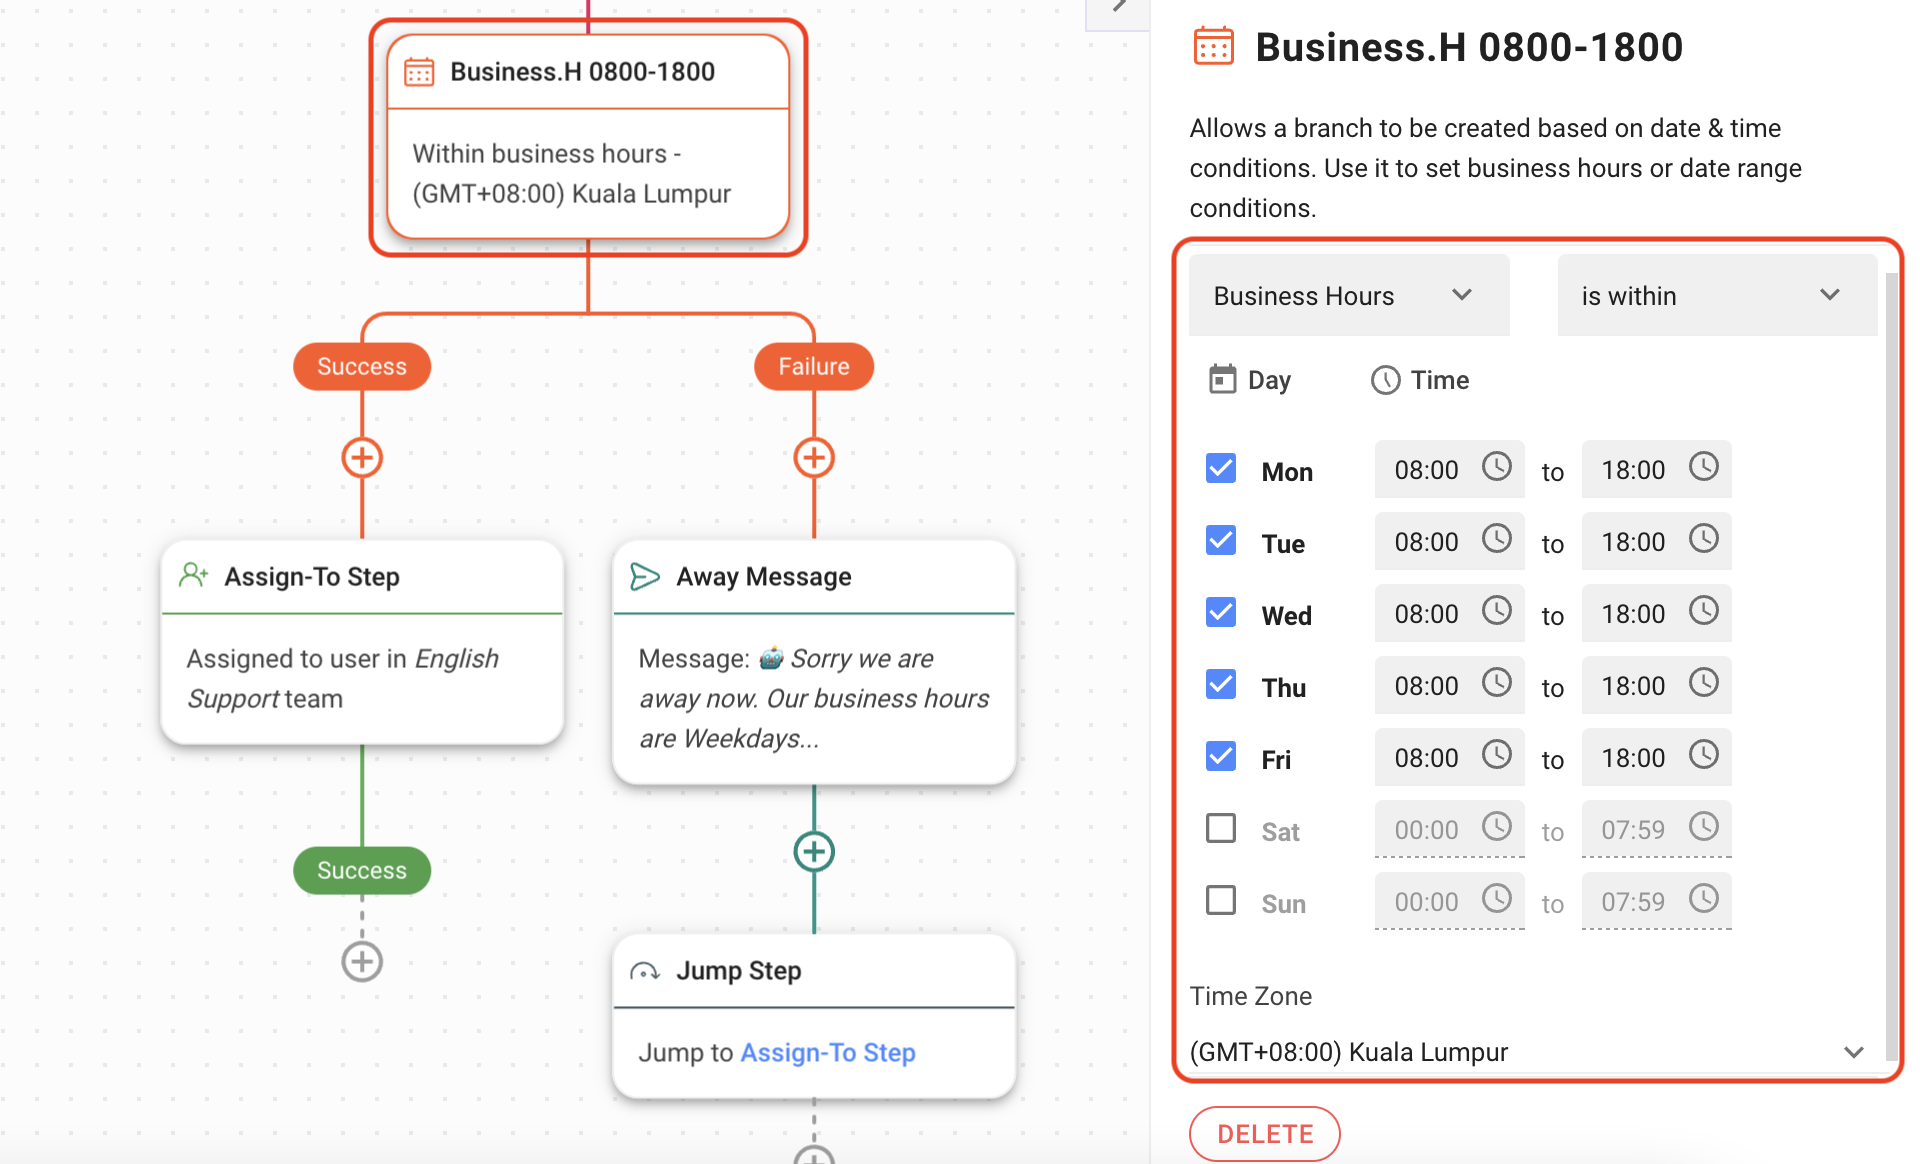
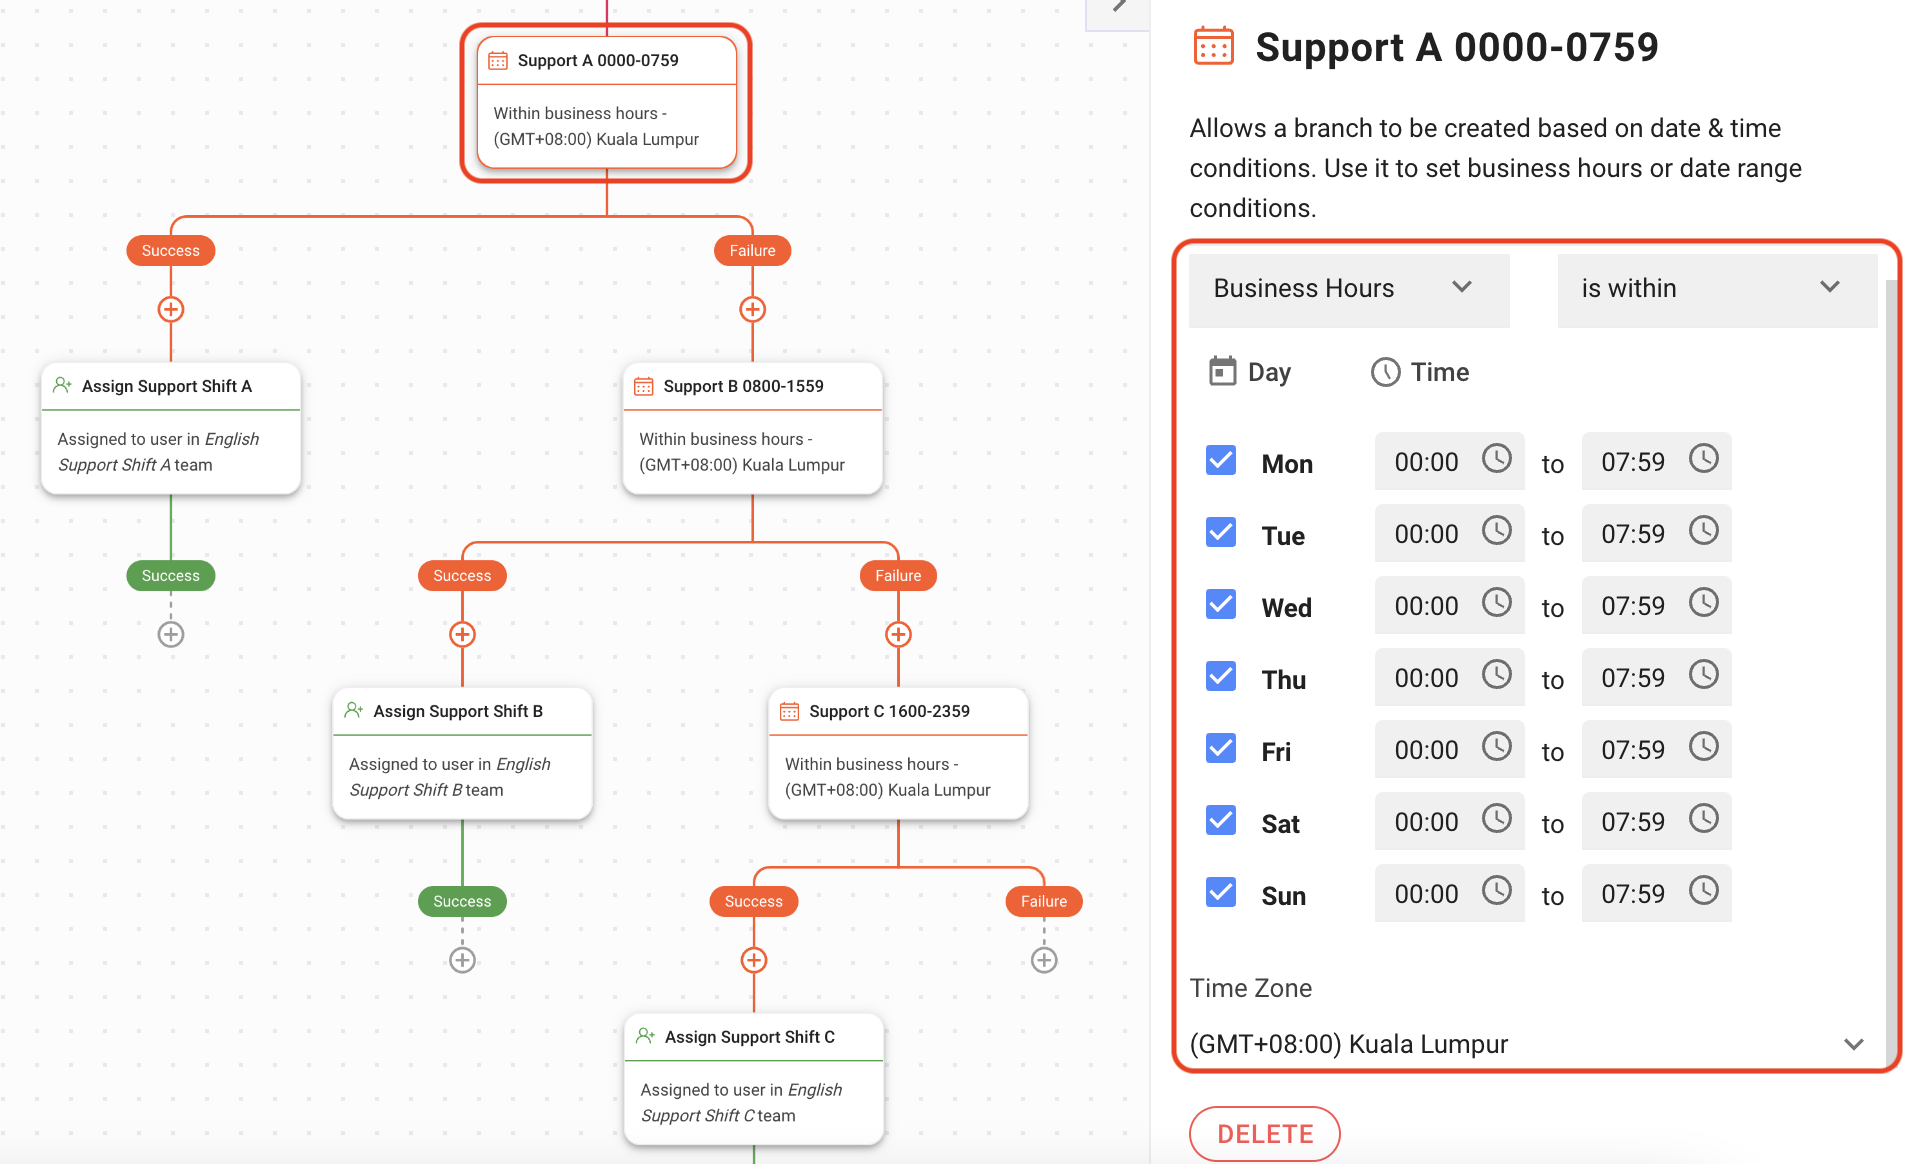
Here’s an example of how to configure the Date and Time Step to define the time and day to be used in the routing process in Workflows.
Add Date & Time Step > select Business Hours and is within in dropdown > set the day and time based on your business needs > select Time Zone based on your business location.
Routing setup example based on business hours for companies without 24-hour customer support system.
1\. In the Date and Time Step, configure the timing based on your company’s business hours.\
2\. Under the Success branch, add an auto-assignment Step to the support team.\
3\. Under the Failure branch, add an [Away Message](https://help.respond.io/quick-start/automated-welcome-and-away-messages) and a [Jump Step](https://help.respond.io/workflows/workflow-steps#step_jump_to).\
\
Routing setup example based on shifts for companies with 24-hour customer support across three teams.
1\. In the first Date and Time Step, configure the timing based on the first team’s shift working hours.\
2\. Under the Success branch, add an auto-assignment Step to the first team’s shift.\
3\. Repeat the steps above to complete your routing process.\
\
---
# Agent Instructions: Querying This Documentation
If you need additional information that is not directly available in this page, you can query the documentation dynamically by asking a question.
Perform an HTTP GET request on the current page URL with the `ask` query parameter:
```
GET https://docs.is-messenger.com/ismessenger/support-use-cases/how-to-route-customers-to-the-right-team-automatically.md?ask=
```
The question should be specific, self-contained, and written in natural language.
The response will contain a direct answer to the question and relevant excerpts and sources from the documentation.
Use this mechanism when the answer is not explicitly present in the current page, you need clarification or additional context, or you want to retrieve related documentation sections.