UCal
  • Welcome
  • ๐Ÿš€Getting Started
    • Quick Start
      • What is IS-Messenger?
      • Setting Up an Account
      • Connecting Channels
      • Inviting Your Teammates
      • Getting Contacts to Message You
      • Automated Welcome and Away Messages
      • Responding to Messages
      • Glossary of Terms
    • Connecting a Channel
    • Invite your teammates
    • Getting Contacts to Message You
    • Automated Welcome and Away Messages
    • Responding to messages
    • Glossary of Terms
    • Creating a Chatbot
  • โš™๏ธWorkspace Modules
    • Dashboard
    • Inbox
      • Inbox Overview
      • Assignment and closing a conversations
      • Custom Inboxes
      • Interacting with Respond AI Prompts
      • Using AI Assist
    • Contacts
      • Contact Details
      • Contacts Overview
      • Merge Suggestions
      • Contact Activity
      • Contact Channels
      • Contact Import
      • Segments
    • Broadcast
      • Broadcast Overview
      • Managing Broadcasts
    • Workflow
      • Triggers
      • Workflow Step
        • Step: Send a Message
        • Step: Ask a Question
        • Step: Assign To
        • Step: Branch
        • Step: Update Contact Tag
        • Step: Update Contact Field
        • Step: Open Conversation
        • Step: Close Conversation
        • Step: Add Comment
        • Step: Jump To
        • Step: Wait
        • Step: Date & Time
        • Step: HTTP Request
        • Step: Trigger Another Workflow
        • Step: Add Google Sheets Row
        • Step: AI Agent
      • Workflow Templates
    • Reports
      • Reports: Conversations
      • Reports: Responses
      • Reports: Resolutions
      • Reports: Messages
      • Reports: Contacts
      • Reports: Assignments
      • Reports: Leaderboard
      • Reports: Users
      • Reports: Broadcasts
  • โš™๏ธWorkspace Setting
    • Managing a Workspace
    • General
    • Users
      • Access Levels
    • Teams
    • Channels
      • Chat Menus
    • Contact Fields
    • Growth Widgets
      • Website Chat Widget Quick Start
      • Website Chat Widget Overview
      • Workspace Settings: Growth Widgets
      • Install Website Chat Widget on Squarespace
      • Install Website Chat Widget on Joomla
      • Install Website Chat Widget on Wix
      • Install Website Chat Widget on Shopify
      • Install Website Chat Widget on WordPress
      • How to Track Conversation Source from Multiple Websites
    • Respond AI
    • Integrations
      • Dialogflow
        • Dialogflow: Connecting to Dialogflow
        • Dialogflow: Creating a Chatbot
        • Dialogflow : Managing Intents
        • Dialogflow: Parameters
        • Dialogflow: Events
        • Dialogflow: Response Templates
        • Dialogflow: Custom Payloads
        • Dialogflow: Fulfillment Webhook Request
      • E-Commerce & CRM Integrations
        • E-Commerce Integration: Shopify
        • E-Commerce Integration: BigCommerce
        • E-Commerce Integration: WooCommerce
        • E-Commerce Integration: Magento
        • CRM Integration: HubSpot
        • CRM Integration: Salesforce
        • CRM Integration: Pipedrive
        • CRM Integration: ActiveCampaign
      • Zapier
      • Developer API
      • Webhooks
      • Make (formerly Integromat)
    • Closing Notes
    • Snippets
    • Files
    • Data Export
    • Data Import
  • โš™๏ธUser Account
  • Profile
  • User Activity Status
  • Notifications
  • Resetting your Passwords
  • ๐Ÿ‘จโ€๐Ÿ‘งโ€๐Ÿ‘ฆCONTACT AND MESSAGES
    • Dynamic Variables
      • Dynamic Variables Overview
      • How to Use Dynamic Variables
    • Contact Search and Custom Inbox
    • Conversations
  • โš™๏ธMESSAGING CHANNELS
    • Channel Overview
    • Facebook Messenger
      • Facebook Messenger Quick Start
      • Facebook Chat Plugin
      • Private Replies
      • Message Tag
    • Instagram
      • Instagram Overview
      • Instagram Quick Start
    • WhatsApp
      • WhatsApp Business API Quick Start
      • Getting Ready for Inbound Conversations
      • Getting Ready for Promotional Messaging
      • WhatsApp Official Business Account (Green Tick)
      • Grow your WhatsApp Audience by Maximizing Entry Points
      • Get WhatsApp API Account for Government Agencies
      • Meta Business Verification
      • WhatsApp Message Templates
      • WhatsApp Pricing
      • WhatsApp Business Platform (API) Channel Configuration
      • WhatsApp Messaging Limits
      • Meta Product Catalog
      • Change Your WhatsApp Business Display Name
      • Phone Number Migration to IS-Messenger WhatsApp Business API
      • Turn-off WhatsApp Number Two-Step Verification
      • WhatsApp Cloud API
        • Migrating from On-Premises API to Cloud API
        • Migrating from Cloud API to On-Premises API
        • Set up the WhatsApp Echo Bot
        • Load Testing on Cloud API
        • Experiments
        • Webhooks Setup
      • 360Dialog WhatsApp
      • Twillio WhatsApp
      • MessageBird WhatsApp
      • Vonage WhatsApp
      • Phone Number Migration to WhatsApp Cloud API
    • Website Chat Widget
      • Install on WordPress
      • Install on Shopify
      • Install on Wix
      • Install on Squarespace
      • Install Website Chat Widget on Joomla
    • LINE
      • LINE Overview
      • LINE Quick Start
    • Telegram
      • Telegram Overview
      • Telegram Quick Start
    • Viber
      • Viber Overview
      • Viber Quick Start
    • SMS Overview
      • Twilio SMS Quick Start
        • Importing Contacts to Twilio SMS
      • MessageBird SMS Quick Start
      • Vonage SMS Quick Start
    • Twitter Overview
      • Twitter Quick Start
    • WeChat
      • WeChat Overview
      • WeChat Quick Start
    • Google Business Message
    • Email
      • Google Workspace Quick Start
      • Other Email
    • Custom Channel
      • Custom Channel Overview
      • Custom Channel Quick Start
  • New Release Update
  • Support Use Cases
    • How to Identify Contacts by Email and Phone NumberI
    • How to Enrich Customer Data from a CRM or other Business Software
    • How to Route Customers to the Right Team Automatically
    • How to Auto-Assign Customers to a Team or Dedicated Agent
    • How to Send Outbound Support Messages
    • Support: Closing Conversations
    • How to Supervise Your Support Agents
    • How to Analyze Reports for Support
    • How to Send CSAT to Customer and Save Data in Google Sheets or CRMs
  • Handling Inbound Conversations
    • Managing Spam
    • Create Automated Welcome and Away Messages
    • Get Contactsโ€™ Consent for Personal Data Collection
    • Create Automated Chat Menus
    • Collect Contactsโ€™ Emails and Phone Numbers
    • Route Contacts by Shifts
    • Route Contacts by Team Functions
    • Route New & Returning Contacts
    • Route VIP Contacts
    • Assignment Strategy: Automatic Contact Distribution & Load Balancing
    • Assignment Strategy: Unassign Agents after Conversations Closed
  • Capture Conversations
    • How to Streamline Meeting Scheduling via CTC Ads
    • How to Automate Product Info Sharing in Conversations Initiated via CTC Ads
    • How to Track Conversation Source from Multiple Websites
    • How to Route Contacts from CTC Ads to Agents
  • Automate Conversations
    • How to Maximize Customer Service Potential with AI Agent
    • How to Automate Contact Information Collection with AI
    • How to Route Contacts to Preferred AI Agent
    • How to Automatically Qualify Contacts Based on Budget Using AI Agent
    • How to Route Contacts by their Preferred Language
    • How to Create Automated Chat Menus
    • Assignment Strategy: How to Automate Contact Distribution & Load Balancing
    • Assignment Strategy: Unassign Agents after Conversations Closed
    • How to Create Automated Welcome and Away Messages
    • How to Block Contacts and Manage Spam
    • How to Route New and Returning Contacts
    • How to Collect Contactsโ€™ Emails and Phone Numbers
    • How to Route New and Returning Contacts
    • How to Route Contacts by Team Functions
    • How to Route Contacts by Shifts
    • How to Get Contactsโ€™ Consent for Personal Data Collection
    • How to Route VIP Contacts
  • How to Promptly Transfer Conversation Between Agents
  • How to Guide Customers from Exploration to Purchase with Engaging Menus
  • How to Optimize Customer Onboarding with Automated & Customized Welcome Messages
  • Converse with Customers
    • How to Get a Complete View of the Customers
    • How to Simplify Customer Escalation with Automation
    • How to Transfer Contacts to the Next Shift Automatically
    • How to Optimize Agentsโ€™ Productivity in the Messages Module
    • How to Align AI Conversations with Your Brand Voice
    • How to Draft Customer Replies with AI
    • How to Convert Image to Text Using AI
    • How Automate Calculations Using AI
  • Broadcasts Use Cases
    • How to Sending a Simple Broadcast
    • How to Start a Workflow Based on Broadcast Response
    • How to Import to Broadcast via WhatsApp
    • How to Troubleshoot a Failed Broadcast
  • Sales Use Cases
    • How to Collect Leads' Email and Phone Number
    • How to Enrich Contact Data and Qualify Leads
    • How to Route Leads
    • How to Auto-Assign Leads to Sales Agents
    • How to Send Outbound Sales Messages
    • How to Track Productivity by Closing Conversations
    • How to Supervise Sales Agents
    • How to Analyze Reports for Sales
  • Accessing Help Menu
Powered by GitBook
On this page
  1. Converse with Customers

How to Draft Customer Replies with AI

PreviousHow to Align AI Conversations with Your Brand VoiceNextHow to Convert Image to Text Using AI

Last updated 1 year ago

In this article, you'll discover how agents can use AI to draft the optimal or best replies to customersโ€™ inquiries

Optimal replies refer to answers that are relevant to the customersโ€™ needs or inquiries, where information is accurate and without grammatical errors or typos, and that match your businessโ€™ brand voice.

Methods

  • .

  • .

  • .

You can apply these methods concurrently to ensure you cover all areas to enhance the capabilities of your AI Assist.

Method 1: Draft accurate replies with a single click using AI Assist

For AI Assist to draft accurate replies to customer queries, you have to first provide information (known as Knowledge Source on the platform) that can be used to draft those replies. The information sources can be from existing documentation and self-help material, business website links, product FAQs, Snippets and/or the internet. You can review and edit the drafted replies before sending to the customers.

There are 3 options to enrich the Knowledge Source. You can apply these options simultaneously depending on your needs.

Prerequisite: Only Workspace Managers and Owners have the rights to access and modify the AI Assist settings.

Option 1: AI-drafted replies based on existing documentation or webpage links

, such as a link to your business or product FAQ, for AI Assist to reference when drafting customer replies. This option comes in handy for businesses that already have existing information ready for upload.

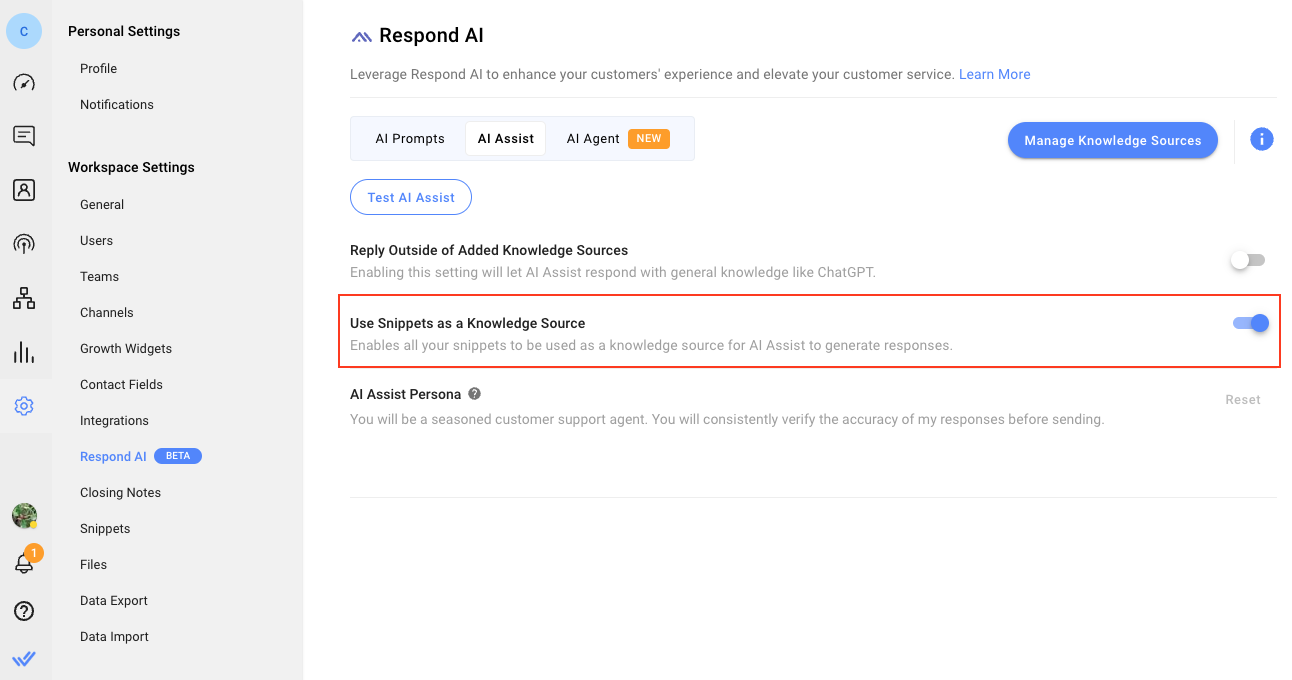
Option 2: AI-drafted replies based on existing Snippets

Turn this toggle off if your business does not use Snippets.

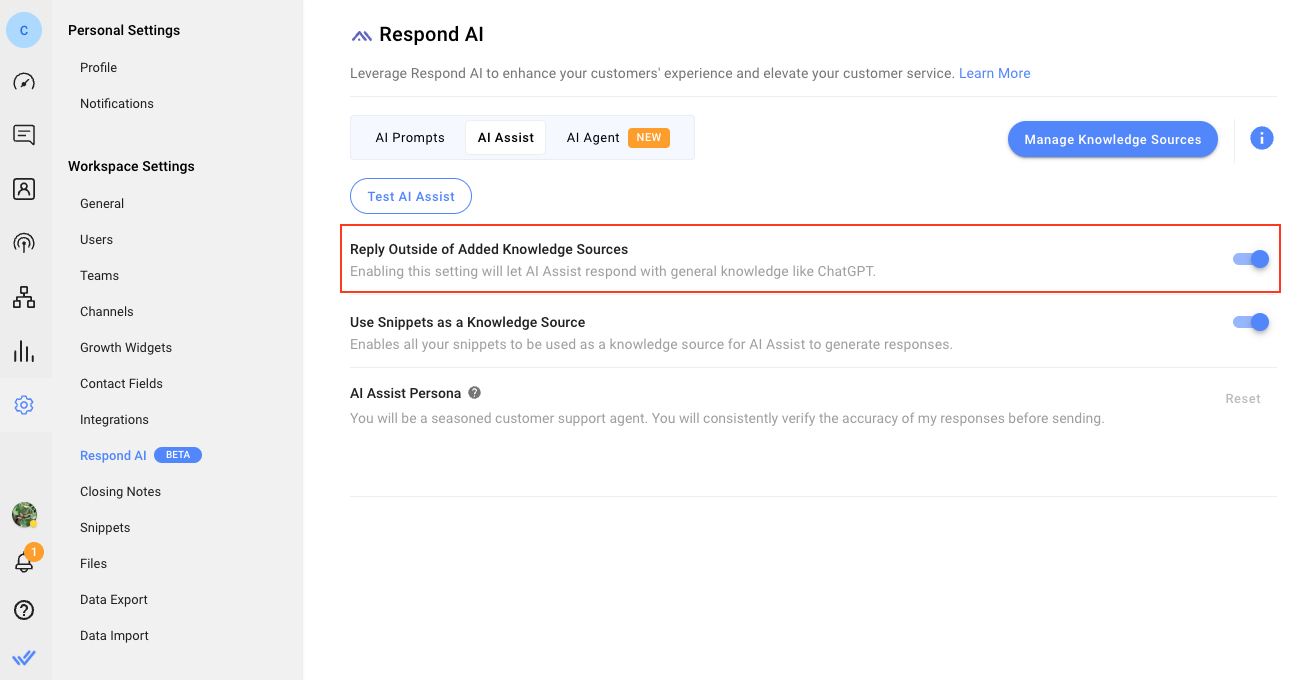
Option 3: AI-drafted replies based on external sources

This benefits businesses in fields like legal services, consulting or education, where customers often seek generic information about specific laws or career prospects in various courses of study.

Turn this toggle off if your business demands precise replies or aims to prevent AI Assist from mentioning competitor brands or products.

Please be aware that enabling the Reply Outside of Added Knowledge Sources toggle may result in information from external sources that could be inaccurate or irrelevant. It is crucial to review the replies before sending them to customers.

Method 2: Draft replies that match AI Assist Persona with your brand voice

In addition, you can have AI Assist to draft goal-oriented replies. For example, it can intelligently suggest scheduling an appointment with your sales team.

Method 3: Optimize replies with AI Prompts

Customized prompts are designed for more specific needs. For an example, if your business mainly deals with customers in Mexico, add an AI Prompt that allows your agents to conveniently translate replies to Mexican Spanish before sending them to customers. Example of the AI Prompt is as follows:

Best Practices

  1. Establish an internal feedback system for agents to report inaccuracies and suggest improvements to AI-drafted replies. This contributes to an ongoing learning process for both your agents and AI Assist in an effort to deliver the best replies to your customers.

Example of a Use Case:
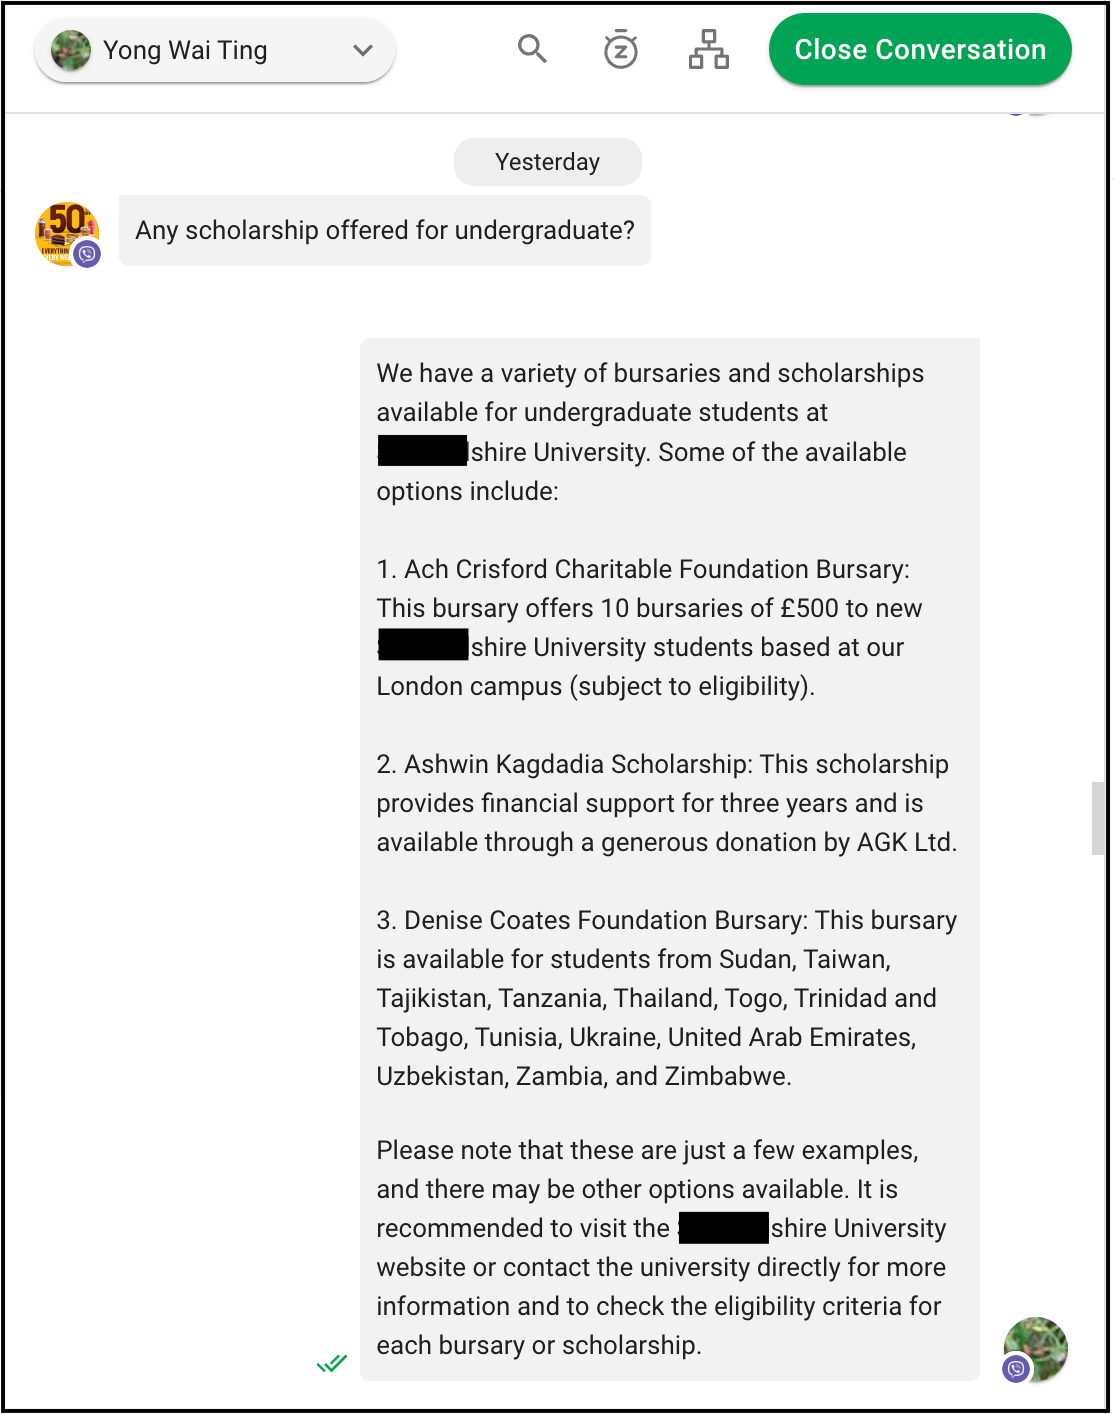
Improve Studentsโ€™ Onboarding Experience

  • When students start their journey at an educational institution, they often share common questions revolving around topics like orientation session dates, tuition fees, financial aid availability, dormitory arrangements and more. With AI Assist, support professionals can effortlessly draft accurate replies to these common questions. This streamlined approach ensures that students experience a smoother onboarding process and receive tailored support that precisely addresses their needs.

If your agents rely heavily on existing on the platform to converse with customers, then turn the toggle on. AI Assist will automatically refer to the Snippets for answering queries, eliminating the need for agents to memorize all the Snippets and manually select them.

If your business primarily handles general inquiries and sees value in incorporating replies from external sources like the internet, consider turning the toggle on.

You can , specify the role or purpose it has in a conversation and shape its personality or skillset to govern its behavior, ensuring that the drafted replies align more closely with your brand voice.

Refer for examples on how to craft your AI Assist persona.

Conversations with customers can be greatly improved by enhancing the quality of each message using AI Prompts. There are 4 available on the platform. For an example, agents can use the Fix spelling & grammar prompt to correct typos and errors in replies. This ensures a high level of professionalism and clarity in their communication with customers.

Learn how to add AI Prompts .

Ensure to avoid AI Assist referencing to outdated or incorrect information.

With updated Knowledge Sources, test your AI Assist to ensure you are satisfied with the replies drafted. Learn how to do it .

Snippets
Use Snippets as a Knowledge Source
Reply Outside of Added Knowledge Sources
define the persona of AI Assist
here
default prompts
here
Knowledge Sources are always updated
here
Method 1: Draft accurate replies with a single click using AI Assist
Method 2: Draft replies that match AI Assist Persona with your brand voice
Method 3: Optimize replies with AI Prompts
Upload information
Reply Outside of Added Knowledge Sources toggle
Use Snippets as a Knowledge Source toggle
Translate the text to Mexican Spanish dialect
Example of use case
Add Knowledge Sources