# Dialogflow: Parameters
IS Messenger uses custom Dialogflow parameters to enhance the application's functions to cater to multiple use cases.
In Dialogflow, parameters are generally used to connect words and phrases in a User’s response to entities. So if someone says "My birthday is on March 13," the phrase "March 13" will be automatically detected and treated as a date entity. You can read more about parameters in [Dialogflow on their documentation page](https://cloud.google.com/dialogflow/es/docs/intents-actions-parameters).
With the IS-Messenger platform, you can use parameters to cover more use cases. You can use them to save and collect information provided by your Contacts, for example by [assigning dynamic tags](/ismessenger/workspace-setting/integrations/dialogflow/dialogflow-parameters.md), [setting custom fields](/ismessenger/workspace-setting/integrations/dialogflow/dialogflow-parameters.md). You can even [notify support representatives](/ismessenger/workspace-setting/integrations/dialogflow/dialogflow-parameters.md) when a contact requires assistance. You can also use the IS-Messenger platform to [store and easily manage your intent responses](/ismessenger/workspace-setting/integrations/dialogflow/dialogflow-managing-intents.md).
There is a lot that can be achieved when you use the IS-Messenger platform in conjunction with Dialogflow Intent parameters.
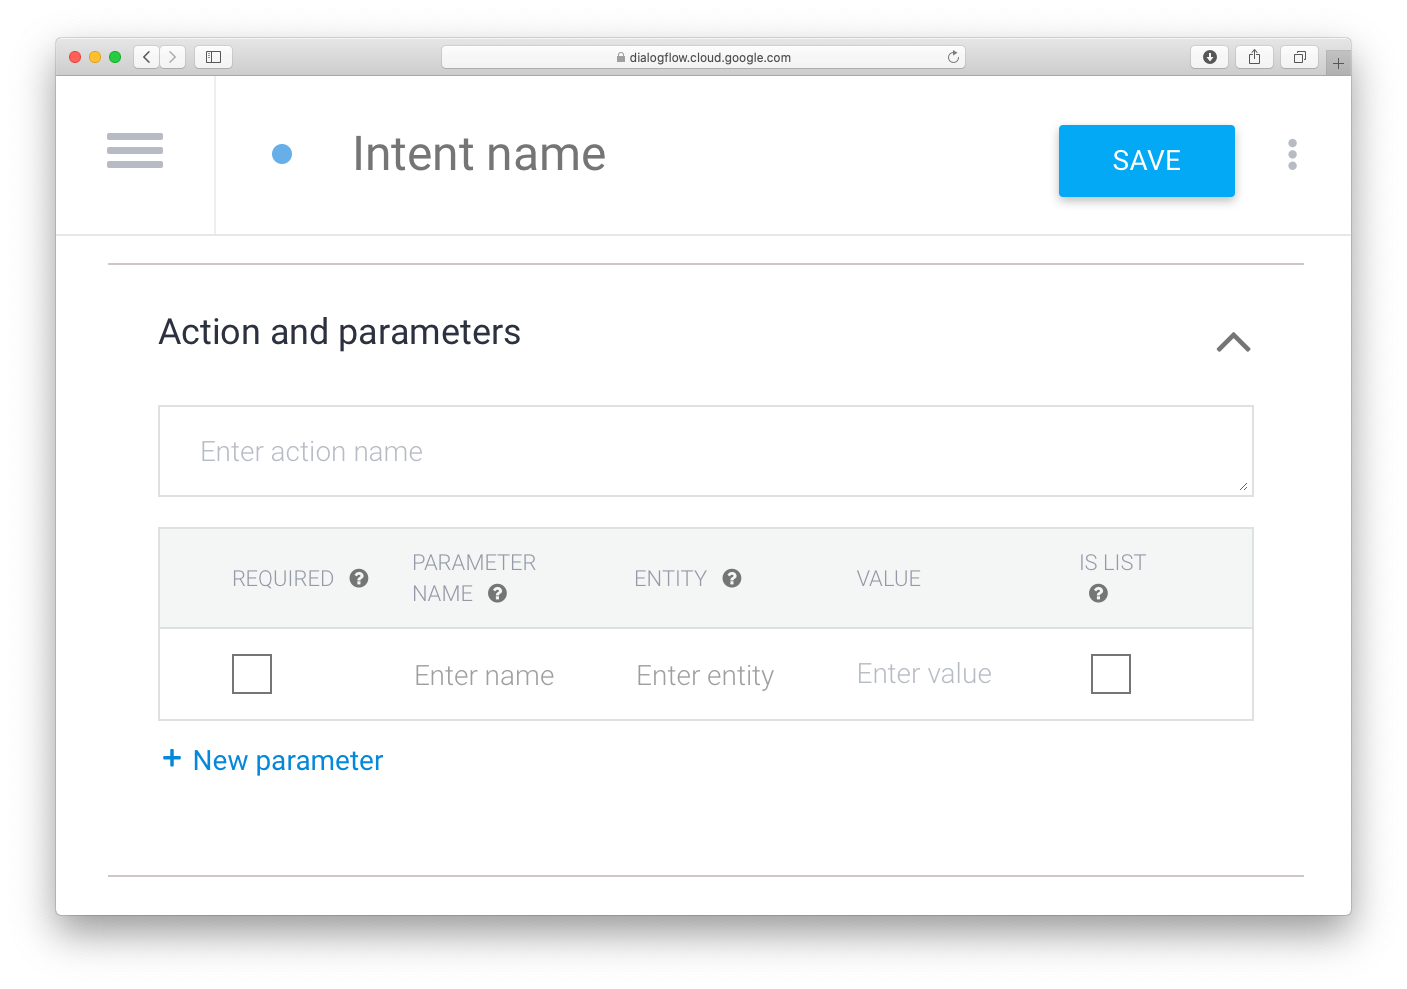
### Parameter Reference
The list of parameters you can use on Dialogflow to communicate with the IS-Messenger platform.
| **Parameter Name** | **Value** | **Description** |
| ------------------------------------------------------------------------------------------------------------- | ----------------------- | ------------------------------------------------------------------------------------------------------------------------------------------------------------------------------------------------------------------------- |
| [RB\_ADDTAGS](https://help.respond.io/dialogflow/dialogflow-parameters#using_tag_parameters) | `tag1, [tag2, ...]` | Adds the specified tag(s) to the Contact profile on the IS-Messenger platform |
| [RB\_REMOVETAGS](https://help.respond.io/dialogflow/dialogflow-parameters#removing_tags) | `tag1, [tag2, ...]` | Removes the specified tag(s) from the Contact profile on the IS-Messenger platform |
| [RB\_BOTSTATUS](https://help.respond.io/dialogflow/dialogflow-parameters#using_the_bot_status_parameter) | `false` | Turns the bot off for the specific contact. This is useful in cases were you want to pass the conversation from the bot to a human. |
| [RB\_MARKDONE](https://help.respond.io/dialogflow/dialogflow-parameters#using_the_marked_done_parameter) | `true/false` | Opens or closes a conversation for a Contact. This is useful for support. Opens a conversation for Contacts who are still expecting something, while closing a conversation signifies Contacts who have been attended to. |
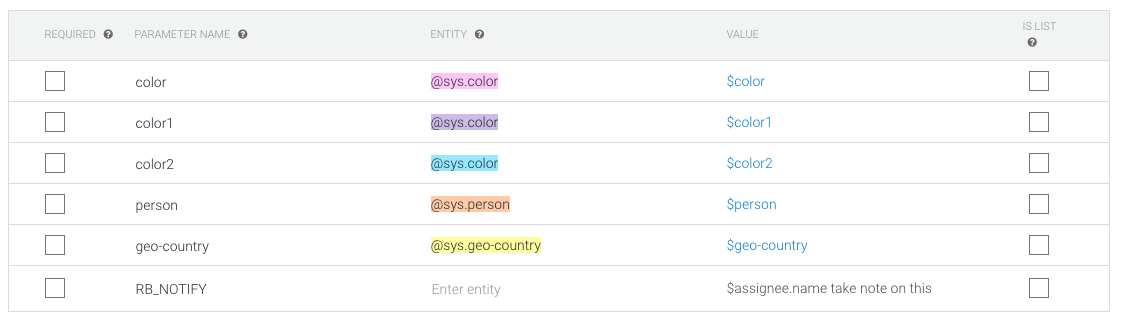
| [RB\_NOTIFY](https://help.respond.io/dialogflow/dialogflow-parameters#using_the_notification_parameter) | `notification_message` | Sends a notification to the humans on the IS-Messenger platform, accompanied by a notification message |
| [RB\_SUBSCRIBE](https://help.respond.io/dialogflow/dialogflow-parameters#using_the_subscription_parameter) | `true/false` | Subscribes or unsubscribes a Contact. Unsubscribed Contacts will not receive broadcast messages. |
| [RB\_FIELD\_FIRSTNAME](https://help.respond.io/dialogflow/dialogflow-parameters#using_field_parameters) | `value` | Fills the First Name field of the Contact profile with the specified value |
| [RB\_FIELD\_LASTNAME](https://help.respond.io/dialogflow/dialogflow-parameters#using_field_parameters) | `value` | Fills the Last Name field of the Contact profile with the specified value |
| [RB\_FIELD\_FULLNAME](https://help.respond.io/dialogflow/dialogflow-parameters#using_field_parameters) | `value` | Fills the Full Name field of the Contact profile with the specified value |
| [RB\_FIELD\_EMAIL](https://help.respond.io/dialogflow/dialogflow-parameters#using_field_parameters) | `value` | Fills the Email Address field of the Contact profile with the specified value |
| [RB\_FIELD\_PHONE](https://help.respond.io/dialogflow/dialogflow-parameters#using_field_parameters) | `value` | Fills the Phone Number field of the Contact profile with the specified value |
| [RB\_FIELD\_LANGUAGE](https://help.respond.io/dialogflow/dialogflow-parameters#using_field_parameters) | `value` | Fills the Language field of the Contact profile with the specified value, e.g., en-us |
| [RB\_FIELD\_\[NAME\]](https://help.respond.io/dialogflow/dialogflow-parameters#using_field_parameters) | `value` | Adds a custom field onto the Contact's profile with the specified value. This is best used for non-dynamic information, such as email, birthday, etc. |
| [RB\_REMOVEFIELDS](https://help.respond.io/dialogflow/dialogflow-parameters#clearing_fields) | `field1, [field2, ...]` | Removes the specified custom field(s) from the Contacts on the platform |
| [RB\_USER\_ASSIGN](https://help.respond.io/dialogflow/dialogflow-parameters#using_the_assignment_parameter) | `value` | Assigns the Contact to one User in your team |
| [RB\_SNIPPET](https://help.respond.io/dialogflow/dialogflow-parameters#using_the_snippet_parameter) | `snippet_id` | Sends the specified Snippet to the Contact |
| [RB\_FILE](https://help.respond.io/dialogflow/dialogflow-parameters#using_the_file_parameter) | `file_id` | Sends the specified file stored on the platform to the Contact |
### Tagging
Contacts' information can be stored in the form of tags. Tags can be manually added/removed in the [Contacts Module](/ismessenger/modules/contacts.md) or [Messages Module](/ismessenger/modules/inbox/messages.md), programmatically added/removed using [Workflows](/ismessenger/modules/workflow.md), and added/removed using parameters in Dialogflow intents.
{% hint style="info" %}
**Important:** Tags are used for audience segmentation in broadcasts. Keep that in mind when adding/removing tags using Dialogflow intents.
{% endhint %}
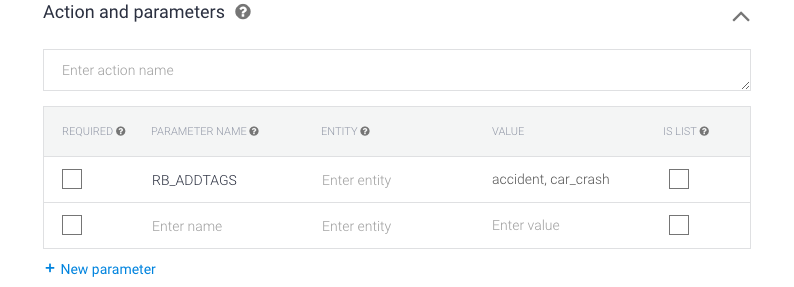
### **Using Tag Parameters**
**Adding Tags**
Using the `RB_ADDTAGS` parameter, you can assign a tag to a contact. Tags will be added to the contact based on the value of the parameter. You have the option to add multiple tags by separating them with commas.
{% hint style="warning" %}
Note that tag names cannot contain spaces. You may want to use underscores instead.
{% endhint %}
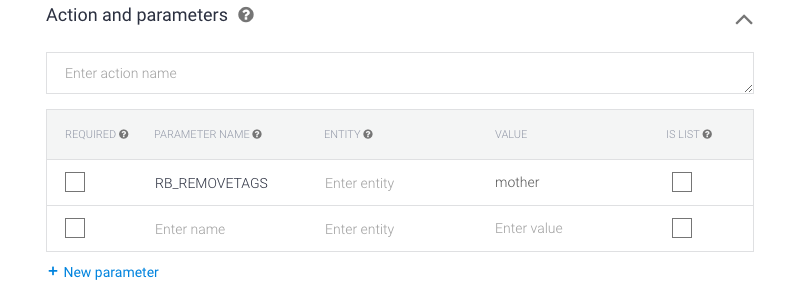
### **Removing Tags**
Using the `RB_REMOVETAGS` parameter, you can remove a tag from a contact. Tags will be added to the contact based on the value of the parameter. You have the option to remove multiple tags by separating them with commas.
### **Best Practices**
When creating new tags, it is a good idea to define short but meaningful names that are easily identifiable. Ideally, you would want other people to be able to understand the tags associated with a user.
With slot filling using entities, you have an option of dynamically creating new tags. However, this is not advised as it will quickly lead to tag pollution.
To reduce tag pollution, try not to be too specific or too generous with the tagging in order the keep the number of tags to a minimum.
When using tags to keep track of a user’s topic interest, you can use the same tag in several intents that have the same topic. This can identify that the user has a specific interest or concern while reducing tag pollution.
### Turning the Bot Off
A Dialogflow agent can be turned on/off manually in the [Messages Module](/ismessenger/modules/inbox/messages.md). In addition to that, a bot can be turned off using parameters in Dialogflow intents.
Using a Dialogflow intent to turn a contact's Bot Status off can be used in order to create a human handoff in your bot workflow. Check out the way to turn off your Dialogflow Bot automatically from [Workflows](/ismessenger/modules/workflow.md).
When Bot is disabled for a contact, no messages are passed to Dialogflow. Contacts with Bot disabled will appear on the platform under [Unassigned section in Dashboard](/ismessenger/modules/untitled.md).
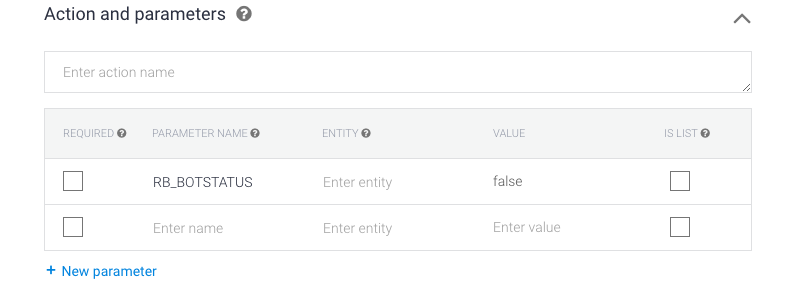
### **Using the Bot Status Parameter**
With `RB_BOTSTATUS`, you can turn the bot off for the specific user by setting the value to `false`.
### **Best Practices**
The Fallback intent does not include a place to add parameters. When turning off the bot from Dialogflow, you should create a quick reply in your Fallback intent asking the Contact if they want to talk to a human. If the Contact responds with the *yes* quick reply, that should take them to the intent with the `RB_BOTSTATUS` parameter.
When using this parameter to disable the bot, you may also want to update the User status on the platform with `RB_MARKDONE` and send a notification on the platform with the `RB_NOTIFY` parameter within a single intent.
### Closing a Conversation
The [Assignment and Closing a Conversation system](/ismessenger/modules/inbox/messages.md) open a new conversation for all new Contacts and all Contacts with new messages. This ensures that all Contacts who require assistance show up in the [unassigned list](/ismessenger/modules/inbox/messages.md).
By default, the platform will open a new conversation for all new Contacts and Contacts who send a new message.
A conversation can be opened or closed for a Contact manually in the [Contacts Module](/ismessenger/modules/contacts.md) or [Messages Module](/ismessenger/modules/inbox/messages.md), opened or closed programmatically using [Workflows](/ismessenger/modules/workflow.md), and closed using parameters in Dialogflow intents.
To close a conversation of a Contact from Dialogflow, use the `RB_MARKDONE` parameter in your Dialogflow Intent(s).
### **Using The Marked Done Parameter**
To close a conversation of a Contact, use the `RB_MARKDONE` parameter in your Dialogflow intent and set the value to `true`.
Any Contact who triggers an intent using the `RB_MARKDONE` parameter with value `true` will have their conversation closed on the IS-Messenger platform.
### **Best Practices**
By default, all new Contacts and Contacts with new messages will open a new conversation. You'll want to set add `RB_MARKDONE` as `true` for intents that do not require a human agent when triggered.
You may want to think about using this intent in tandem with [`RB_NOTIFY`](/ismessenger/workspace-setting/integrations/dialogflow/dialogflow-parameters.md) to trigger a notification when a conversation is opened for a Contact. The notification message can be used to pass on information on what needs to be done for the specific Contact.
### Assigning
To assign a Contact to a User from Dialogflow, use the `RB_USER_ASSIGN` parameter in your Dialogflow Intent(s).
### **Using The Assignment Parameter**
To assign a Contact to a User, use the `RB_USER_ASSIGN` parameter in your Dialogflow intent and set the value as the email of the platform User you wish to assign to.
Any Contact who triggers an intent using the `RB_USER_ASSIGN` parameter with a valid User email in Value is assigned to that User on the IS-Messenger platform.
#### Sending Custom Notifications
By default, the [Notification System](/ismessenger/notifications.md) will send notifications to platform Users when a Contact sends a new message. Additional notifications can be created and sent to platform Users using parameters in Dialogflow Intents.
To send a notification to platform Users use the `RB_NOTIFY` parameter in your Dialogflow Intent(s).
### **Using the Notification Parameter**
A notification can be sent to the platform using the `RB_NOTIFY` as the Parameter Name. The value of the parameter will be sent as the notification.
**Tip:** You may use [a dynamic variable](/ismessenger/contact-and-messages/untitled.md) in the value of the parameter by typing $dynamic.variable.
### **Best Practices**
Use the $contact.name dynamic variable in order to let the platform User know which Contact needs attention.
Use `RB_NOTIFY` together with [`RB_BOTSTATUS`](/ismessenger/workspace-setting/integrations/dialogflow/dialogflow-parameters.md) and [`RB_MARKDONE`](/ismessenger/workspace-setting/integrations/dialogflow/dialogflow-parameters.md) to ensure the Contact gets the attention they need.
{% hint style="info" %}
**Tip:** Learn more about [how notifications work on the platform here](/ismessenger/notifications.md).
{% endhint %}
### Unsubscribing
Every now and then you will have a Contact text you "STOP". This is likely because they no longer want to receive [broadcasts](/ismessenger/modules/broadcast/broadcast.md). Setting `RB_SUBSCRIBE` as `false` in Dialogflow will unsubscribe Contacts from all future broadcasts.
{% hint style="success" %}
Bot responses and direct messages will not be affected.
{% endhint %}
### **Using the Subscription Parameter**
With `RB_SUBSCRIBE`, you can subscribe or unsubscribe a Contact to the bot by setting the value to `true` or `false` respectively. Unsubscribed Contacts are excluded from future platform broadcasts.
### **Best Practices**
If you are using the `RB_SUBSCRIBE` parameter to manage broadcast permissions you should create a custom field in IS-Messenger to display a Contact's subscription status. This can be done by using the [`RB_FIELD_[NAME]`](/ismessenger/workspace-setting/integrations/dialogflow/dialogflow-parameters.md) parameter together with `RB_SUBSCRIBE`.
### Contact Fields and Values
Contacts' information can be stored in the form of values in Contact Fields.
In addition to the default fields, [custom fields](/ismessenger/modules/workflow.md) can be added & removed in the Settings Module. New custom fields can also be created from Dialogflow.
{% hint style="success" %}
If you use a field parameter in Dialogflow and the corresponding custom field does not exist in the platform, a new custom field will be created.
{% endhint %}
Contact field values can be manually changed in the [Contacts Module](/ismessenger/modules/contacts.md) or [Messages Module](/ismessenger/modules/inbox/messages.md), programmatically changed using [Workflows](/ismessenger/modules/workflow.md), or changed using parameters in Dialogflow intents.
### **Using Field Parameters**
**Setting Field Values**
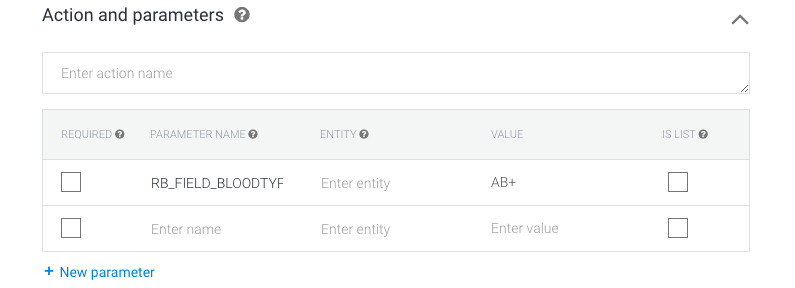
You can edit a Contact's custom field value with `RB_FIELD_[FIELD_ID]` where “\[FIELD\_ID]” is replaced with the ID of the custom field. The custom field ID is generated as name of the custom field in SNAKE\_CASING. The value of the custom field would be set as the value in the parameter. For example, if you are collecting the blood types of Contacts and a Contact has blood type AB positive, you would send the parameter `RB_FIELD_BLOODTYPE` with the value of AB+.
{% hint style="info" %}
**Tip:** You can use custom field values as [dynamic variables](/ismessenger/contact-and-messages/untitled.md).
{% endhint %}
### **Default Fields**
The same can be done for any of the default Contact fields. For example, the parameter `RB_FIELD_PHONE` can be used to update the value of a Contact's phone number.
By default, Contacts on IS-Messenger have the following Contact fields:
| **Field Name** | **ID** | **Description** |
| -------------- | --------- | ---------------------------------------------------------- |
| First Name | FIRSTNAME | The first name of the Contact |
| Last Name | LASTNAME | The last name of the Contact |
| Full Name | FULLNAME | The full name of the Contact, i.e., First Name + Last Name |
| Email Address | EMAIL | The email address of the Contact |
| Phone Number | PHONE | The phone number of the Contact |
| Language | LANGUAGE | The language of the Contact |
{% hint style="success" %}
These default fields are automatically filled using available information provided by the channel when the Contact is first created.
{% endhint %}
### **Clearing Fields**
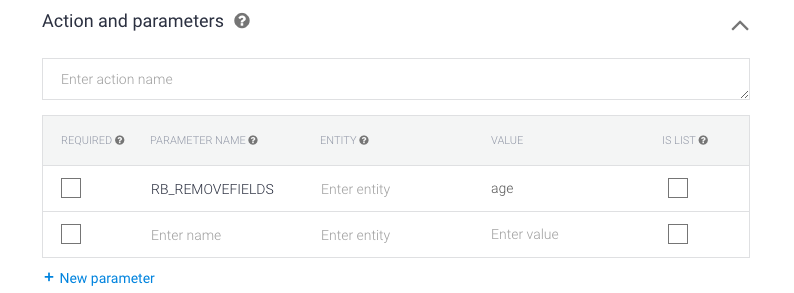
To clear a field value for a contact, you can use the parameter `RB_REMOVEFIELDS`. The value would be the names of the fields you want to remove. You have the option of clearing several fields at once by separating them with commas.
### Snippets
The [Snippets](/ismessenger/modules/workflow.md) system is used to store the content of commonly used responses on the IS-Messenger platform.
Snippets can be sent out manually in the [Messages Module](/ismessenger/modules/inbox/messages.md) to reduce typing or sent using parameters in Dialogflow Intents.
By sending Snippets in your Dialogflow Agent, you are able to store the content of your Intent responses on the IS-Messenger platform where they can be easily managed and edited.
Multiple intents can also use the same Snippet. In this case, editing the Snippet will update the content of the response across all of the Intents.
To send a Snippet using Dialogflow Intents, use the `RB_SNIPPET` parameter. The triggering Intent will respond with the Snippet content.
### **Using the Snippet Parameter**
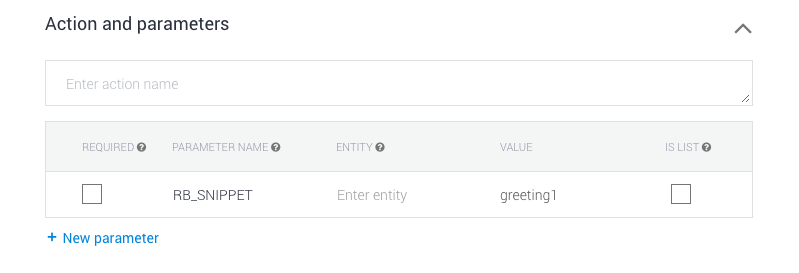
With `RB_SNIPPET`, you can send a Snippet as the response. Set the value of the parameter to the [Snippet ID](/ismessenger/modules/workflow.md) that you wish to send.
{% hint style="success" %}
Updating or changing the name or content of a Snippet will preserve the existing Snippet ID.
{% endhint %}
### Sending Files
Files can be sent manually in the [Messages Module](/ismessenger/modules/inbox/messages.md) or sent using parameters in Dialogflow Intents.
Using the `RB_FILE` parameter, you can send files stored in the [File Manager](/ismessenger/modules/workflow.md) to Contacts who trigger a Dialogflow Intent.
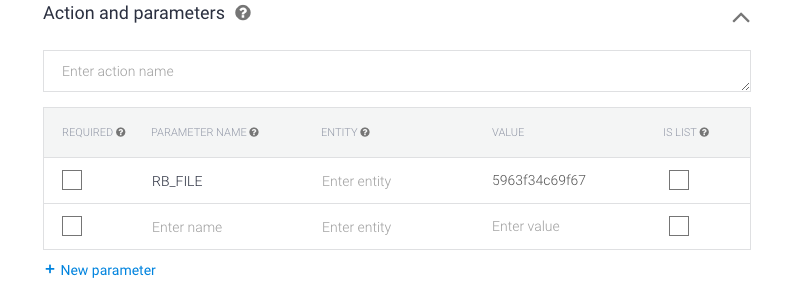
### **Using the File Parameter**
Before you can send a file, you must upload the file(s) to the IS-Messenger [File Manager](/ismessenger/modules/workflow.md). Then use the `RB_FILE` parameter with the [file ID](/ismessenger/modules/workflow.md) as the value to send a file to a Contact.
{% hint style="success" %}
Only Files uploaded to the space connected to Dialogflow will be sent. Files uploaded to other spaces will not be sent to the Contact.
{% endhint %}
---
# Agent Instructions: Querying This Documentation
If you need additional information that is not directly available in this page, you can query the documentation dynamically by asking a question.
Perform an HTTP GET request on the current page URL with the `ask` query parameter:
```
GET https://docs.is-messenger.com/ismessenger/workspace-setting/integrations/dialogflow/dialogflow-parameters.md?ask=
```
The question should be specific, self-contained, and written in natural language.
The response will contain a direct answer to the question and relevant excerpts and sources from the documentation.
Use this mechanism when the answer is not explicitly present in the current page, you need clarification or additional context, or you want to retrieve related documentation sections.