UCal
  • Welcome
  • 🚀Getting Started
    • Quick Start
      • What is IS-Messenger?
      • Setting Up an Account
      • Connecting Channels
      • Inviting Your Teammates
      • Getting Contacts to Message You
      • Automated Welcome and Away Messages
      • Responding to Messages
      • Glossary of Terms
    • Connecting a Channel
    • Invite your teammates
    • Getting Contacts to Message You
    • Automated Welcome and Away Messages
    • Responding to messages
    • Glossary of Terms
    • Creating a Chatbot
  • ⚙️Workspace Modules
    • Dashboard
    • Inbox
      • Inbox Overview
      • Assignment and closing a conversations
      • Custom Inboxes
      • Interacting with Respond AI Prompts
      • Using AI Assist
    • Contacts
      • Contact Details
      • Contacts Overview
      • Merge Suggestions
      • Contact Activity
      • Contact Channels
      • Contact Import
      • Segments
    • Broadcast
      • Broadcast Overview
      • Managing Broadcasts
    • Workflow
      • Triggers
      • Workflow Step
        • Step: Send a Message
        • Step: Ask a Question
        • Step: Assign To
        • Step: Branch
        • Step: Update Contact Tag
        • Step: Update Contact Field
        • Step: Open Conversation
        • Step: Close Conversation
        • Step: Add Comment
        • Step: Jump To
        • Step: Wait
        • Step: Date & Time
        • Step: HTTP Request
        • Step: Trigger Another Workflow
        • Step: Add Google Sheets Row
        • Step: AI Agent
      • Workflow Templates
    • Reports
      • Reports: Conversations
      • Reports: Responses
      • Reports: Resolutions
      • Reports: Messages
      • Reports: Contacts
      • Reports: Assignments
      • Reports: Leaderboard
      • Reports: Users
      • Reports: Broadcasts
  • ⚙️Workspace Setting
    • Managing a Workspace
    • General
    • Users
      • Access Levels
    • Teams
    • Channels
      • Chat Menus
    • Contact Fields
    • Growth Widgets
      • Website Chat Widget Quick Start
      • Website Chat Widget Overview
      • Workspace Settings: Growth Widgets
      • Install Website Chat Widget on Squarespace
      • Install Website Chat Widget on Joomla
      • Install Website Chat Widget on Wix
      • Install Website Chat Widget on Shopify
      • Install Website Chat Widget on WordPress
      • How to Track Conversation Source from Multiple Websites
    • Respond AI
    • Integrations
      • Dialogflow
        • Dialogflow: Connecting to Dialogflow
        • Dialogflow: Creating a Chatbot
        • Dialogflow : Managing Intents
        • Dialogflow: Parameters
        • Dialogflow: Events
        • Dialogflow: Response Templates
        • Dialogflow: Custom Payloads
        • Dialogflow: Fulfillment Webhook Request
      • E-Commerce & CRM Integrations
        • E-Commerce Integration: Shopify
        • E-Commerce Integration: BigCommerce
        • E-Commerce Integration: WooCommerce
        • E-Commerce Integration: Magento
        • CRM Integration: HubSpot
        • CRM Integration: Salesforce
        • CRM Integration: Pipedrive
        • CRM Integration: ActiveCampaign
      • Zapier
      • Developer API
      • Webhooks
      • Make (formerly Integromat)
    • Closing Notes
    • Snippets
    • Files
    • Data Export
    • Data Import
  • ⚙️User Account
  • Profile
  • User Activity Status
  • Notifications
  • Resetting your Passwords
  • 👨‍👧‍👦CONTACT AND MESSAGES
    • Dynamic Variables
      • Dynamic Variables Overview
      • How to Use Dynamic Variables
    • Contact Search and Custom Inbox
    • Conversations
  • ⚙️MESSAGING CHANNELS
    • Channel Overview
    • Facebook Messenger
      • Facebook Messenger Quick Start
      • Facebook Chat Plugin
      • Private Replies
      • Message Tag
    • Instagram
      • Instagram Overview
      • Instagram Quick Start
    • WhatsApp
      • WhatsApp Business API Quick Start
      • Getting Ready for Inbound Conversations
      • Getting Ready for Promotional Messaging
      • WhatsApp Official Business Account (Green Tick)
      • Grow your WhatsApp Audience by Maximizing Entry Points
      • Get WhatsApp API Account for Government Agencies
      • Meta Business Verification
      • WhatsApp Message Templates
      • WhatsApp Pricing
      • WhatsApp Business Platform (API) Channel Configuration
      • WhatsApp Messaging Limits
      • Meta Product Catalog
      • Change Your WhatsApp Business Display Name
      • Phone Number Migration to IS-Messenger WhatsApp Business API
      • Turn-off WhatsApp Number Two-Step Verification
      • WhatsApp Cloud API
        • Migrating from On-Premises API to Cloud API
        • Migrating from Cloud API to On-Premises API
        • Set up the WhatsApp Echo Bot
        • Load Testing on Cloud API
        • Experiments
        • Webhooks Setup
      • 360Dialog WhatsApp
      • Twillio WhatsApp
      • MessageBird WhatsApp
      • Vonage WhatsApp
      • Phone Number Migration to WhatsApp Cloud API
    • Website Chat Widget
      • Install on WordPress
      • Install on Shopify
      • Install on Wix
      • Install on Squarespace
      • Install Website Chat Widget on Joomla
    • LINE
      • LINE Overview
      • LINE Quick Start
    • Telegram
      • Telegram Overview
      • Telegram Quick Start
    • Viber
      • Viber Overview
      • Viber Quick Start
    • SMS Overview
      • Twilio SMS Quick Start
        • Importing Contacts to Twilio SMS
      • MessageBird SMS Quick Start
      • Vonage SMS Quick Start
    • Twitter Overview
      • Twitter Quick Start
    • WeChat
      • WeChat Overview
      • WeChat Quick Start
    • Google Business Message
    • Email
      • Google Workspace Quick Start
      • Other Email
    • Custom Channel
      • Custom Channel Overview
      • Custom Channel Quick Start
  • New Release Update
  • Support Use Cases
    • How to Identify Contacts by Email and Phone NumberI
    • How to Enrich Customer Data from a CRM or other Business Software
    • How to Route Customers to the Right Team Automatically
    • How to Auto-Assign Customers to a Team or Dedicated Agent
    • How to Send Outbound Support Messages
    • Support: Closing Conversations
    • How to Supervise Your Support Agents
    • How to Analyze Reports for Support
    • How to Send CSAT to Customer and Save Data in Google Sheets or CRMs
  • Handling Inbound Conversations
    • Managing Spam
    • Create Automated Welcome and Away Messages
    • Get Contacts’ Consent for Personal Data Collection
    • Create Automated Chat Menus
    • Collect Contacts’ Emails and Phone Numbers
    • Route Contacts by Shifts
    • Route Contacts by Team Functions
    • Route New & Returning Contacts
    • Route VIP Contacts
    • Assignment Strategy: Automatic Contact Distribution & Load Balancing
    • Assignment Strategy: Unassign Agents after Conversations Closed
  • Capture Conversations
    • How to Streamline Meeting Scheduling via CTC Ads
    • How to Automate Product Info Sharing in Conversations Initiated via CTC Ads
    • How to Track Conversation Source from Multiple Websites
    • How to Route Contacts from CTC Ads to Agents
  • Automate Conversations
    • How to Maximize Customer Service Potential with AI Agent
    • How to Automate Contact Information Collection with AI
    • How to Route Contacts to Preferred AI Agent
    • How to Automatically Qualify Contacts Based on Budget Using AI Agent
    • How to Route Contacts by their Preferred Language
    • How to Create Automated Chat Menus
    • Assignment Strategy: How to Automate Contact Distribution & Load Balancing
    • Assignment Strategy: Unassign Agents after Conversations Closed
    • How to Create Automated Welcome and Away Messages
    • How to Block Contacts and Manage Spam
    • How to Route New and Returning Contacts
    • How to Collect Contacts’ Emails and Phone Numbers
    • How to Route New and Returning Contacts
    • How to Route Contacts by Team Functions
    • How to Route Contacts by Shifts
    • How to Get Contacts’ Consent for Personal Data Collection
    • How to Route VIP Contacts
  • How to Promptly Transfer Conversation Between Agents
  • How to Guide Customers from Exploration to Purchase with Engaging Menus
  • How to Optimize Customer Onboarding with Automated & Customized Welcome Messages
  • Converse with Customers
    • How to Get a Complete View of the Customers
    • How to Simplify Customer Escalation with Automation
    • How to Transfer Contacts to the Next Shift Automatically
    • How to Optimize Agents’ Productivity in the Messages Module
    • How to Align AI Conversations with Your Brand Voice
    • How to Draft Customer Replies with AI
    • How to Convert Image to Text Using AI
    • How Automate Calculations Using AI
  • Broadcasts Use Cases
    • How to Sending a Simple Broadcast
    • How to Start a Workflow Based on Broadcast Response
    • How to Import to Broadcast via WhatsApp
    • How to Troubleshoot a Failed Broadcast
  • Sales Use Cases
    • How to Collect Leads' Email and Phone Number
    • How to Enrich Contact Data and Qualify Leads
    • How to Route Leads
    • How to Auto-Assign Leads to Sales Agents
    • How to Send Outbound Sales Messages
    • How to Track Productivity by Closing Conversations
    • How to Supervise Sales Agents
    • How to Analyze Reports for Sales
  • Accessing Help Menu
Powered by GitBook
On this page
  • Benefits of Routing Leads
  • Methods for Routing Leads
  • Route leads automatically based on input
  • Use the Ask a Question Step to ask a multiple choice question
  • Route leads to the appropriate agent
  • Route based on existing lead data
  1. Sales Use Cases

How to Route Leads

Business Goal: Route leads to the right sales agent automatically.

PreviousHow to Enrich Contact Data and Qualify LeadsNextHow to Auto-Assign Leads to Sales Agents

Last updated 1 year ago

When a message comes in from a new lead, you’ll want to send it to the right sales agent, for example, in the correct region or specializing in the right product line. You can automatically do this using information collected from the lead.

Benefits of Routing Leads

Use routing to:

  • Streamline sales process by automatically sending qualified leads to sales agents.

  • Help sales agents get relevant leads faster.

Methods for Routing Leads

  1. Route leads automatically based on input.

  2. Route leads automatically based on existing lead data.

Tip: Learn about other .

Route leads automatically based on input

Use this method when you need additional input from leads for qualification.

Method Objectives

  • Ask leads a multiple choice question to get the information you need.

  • Route leads to an agent specializing in that category.

Workflow Setup

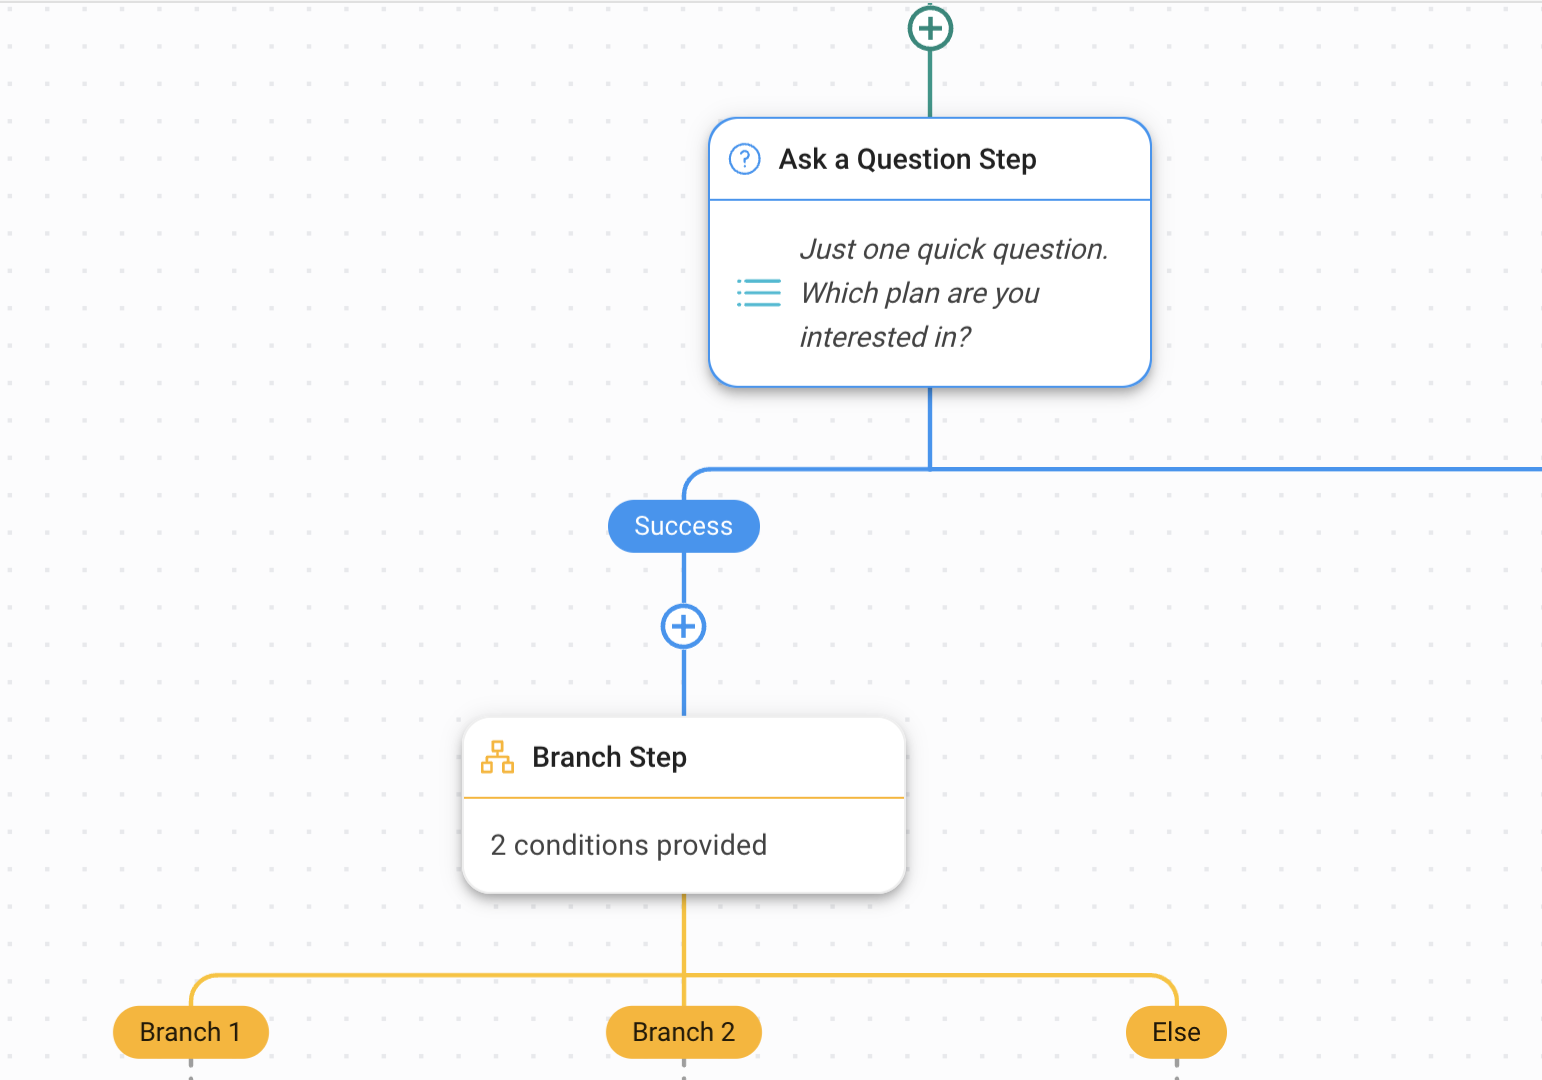
Here’s an example of how to use a Workflow to route leads to sales agents. You can adapt it according to your business needs.

In this example, we’ll show how to route a lead based on what plan they’re interested in. Other types of questions you might ask include Which country are you in? What is your budget? Which product line are you interested in?

Use the Ask a Question Step to ask a multiple choice question

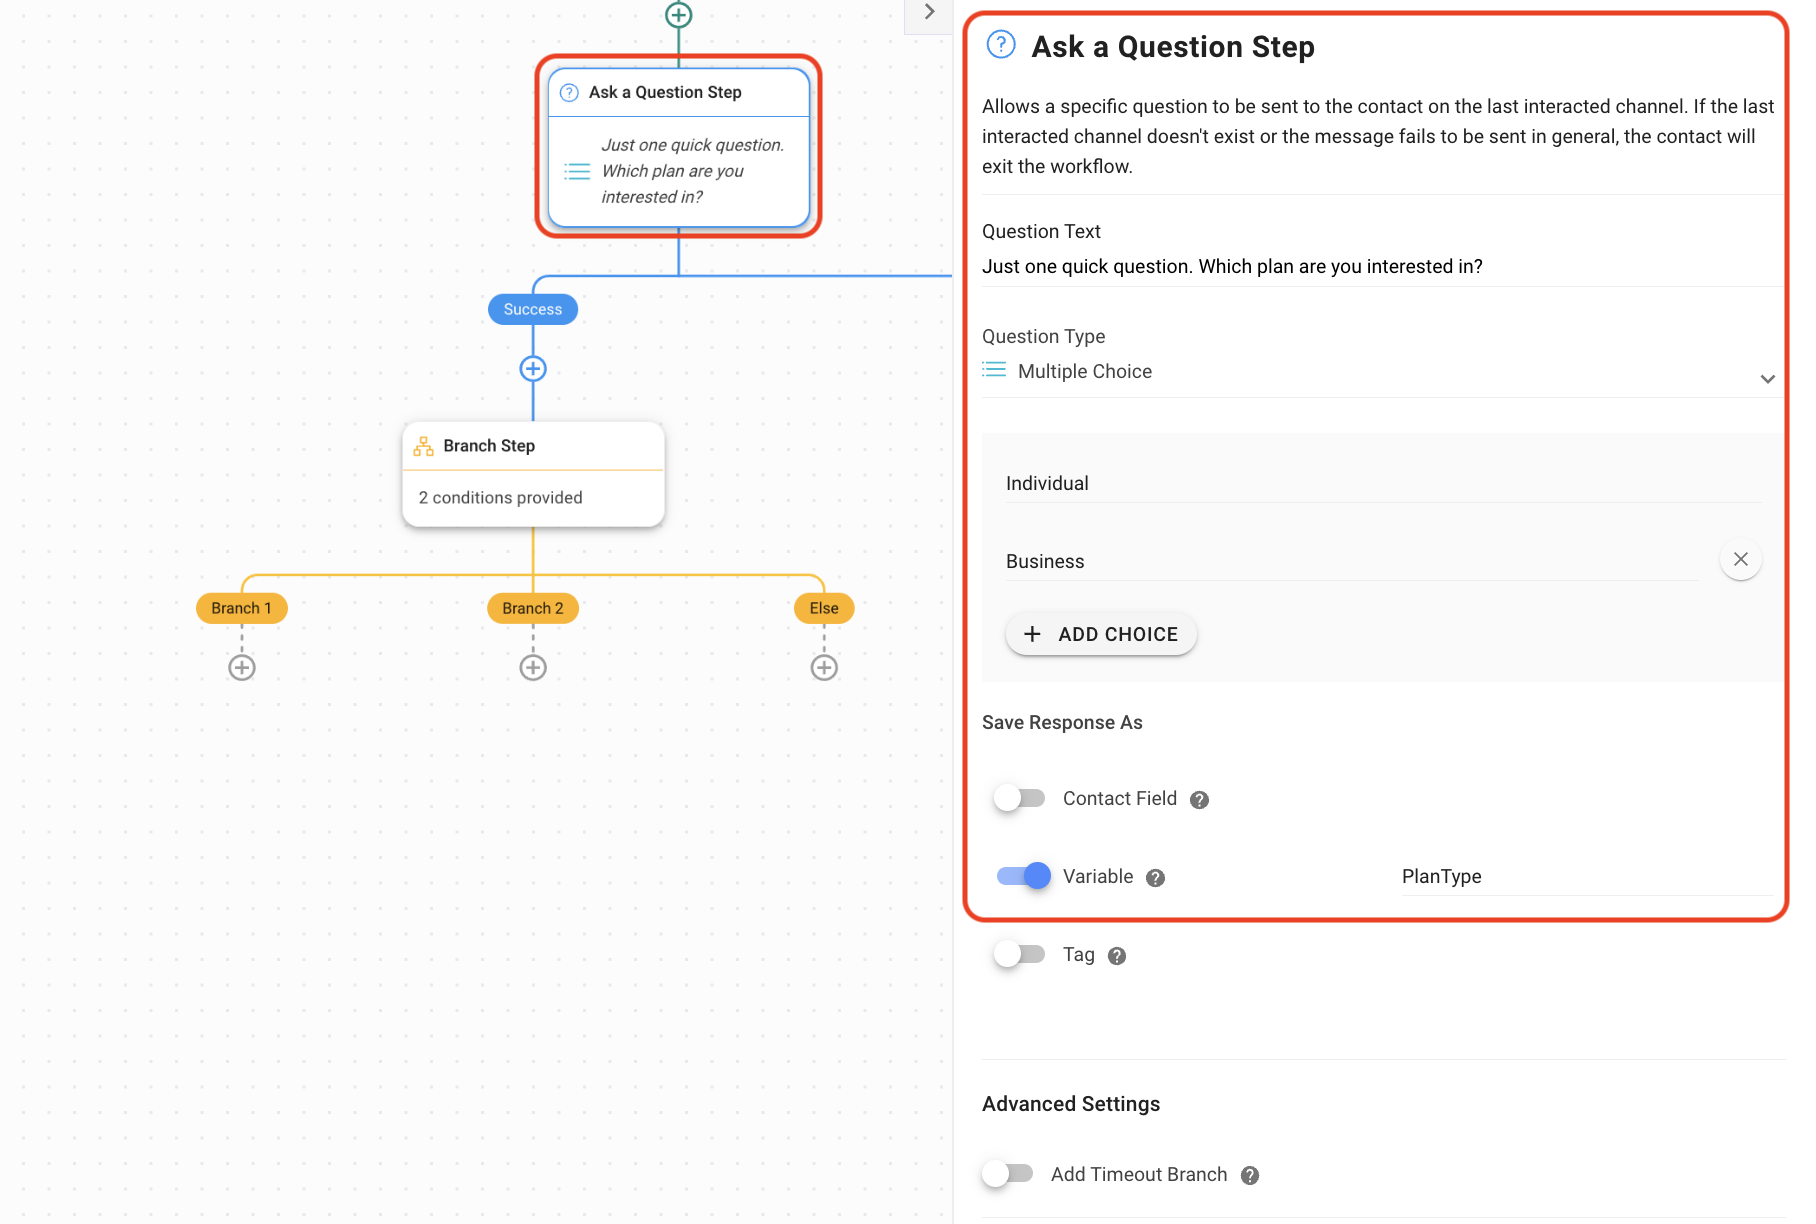
Ask a Question Step configuration for multiple choice questions

Route leads to the appropriate agent

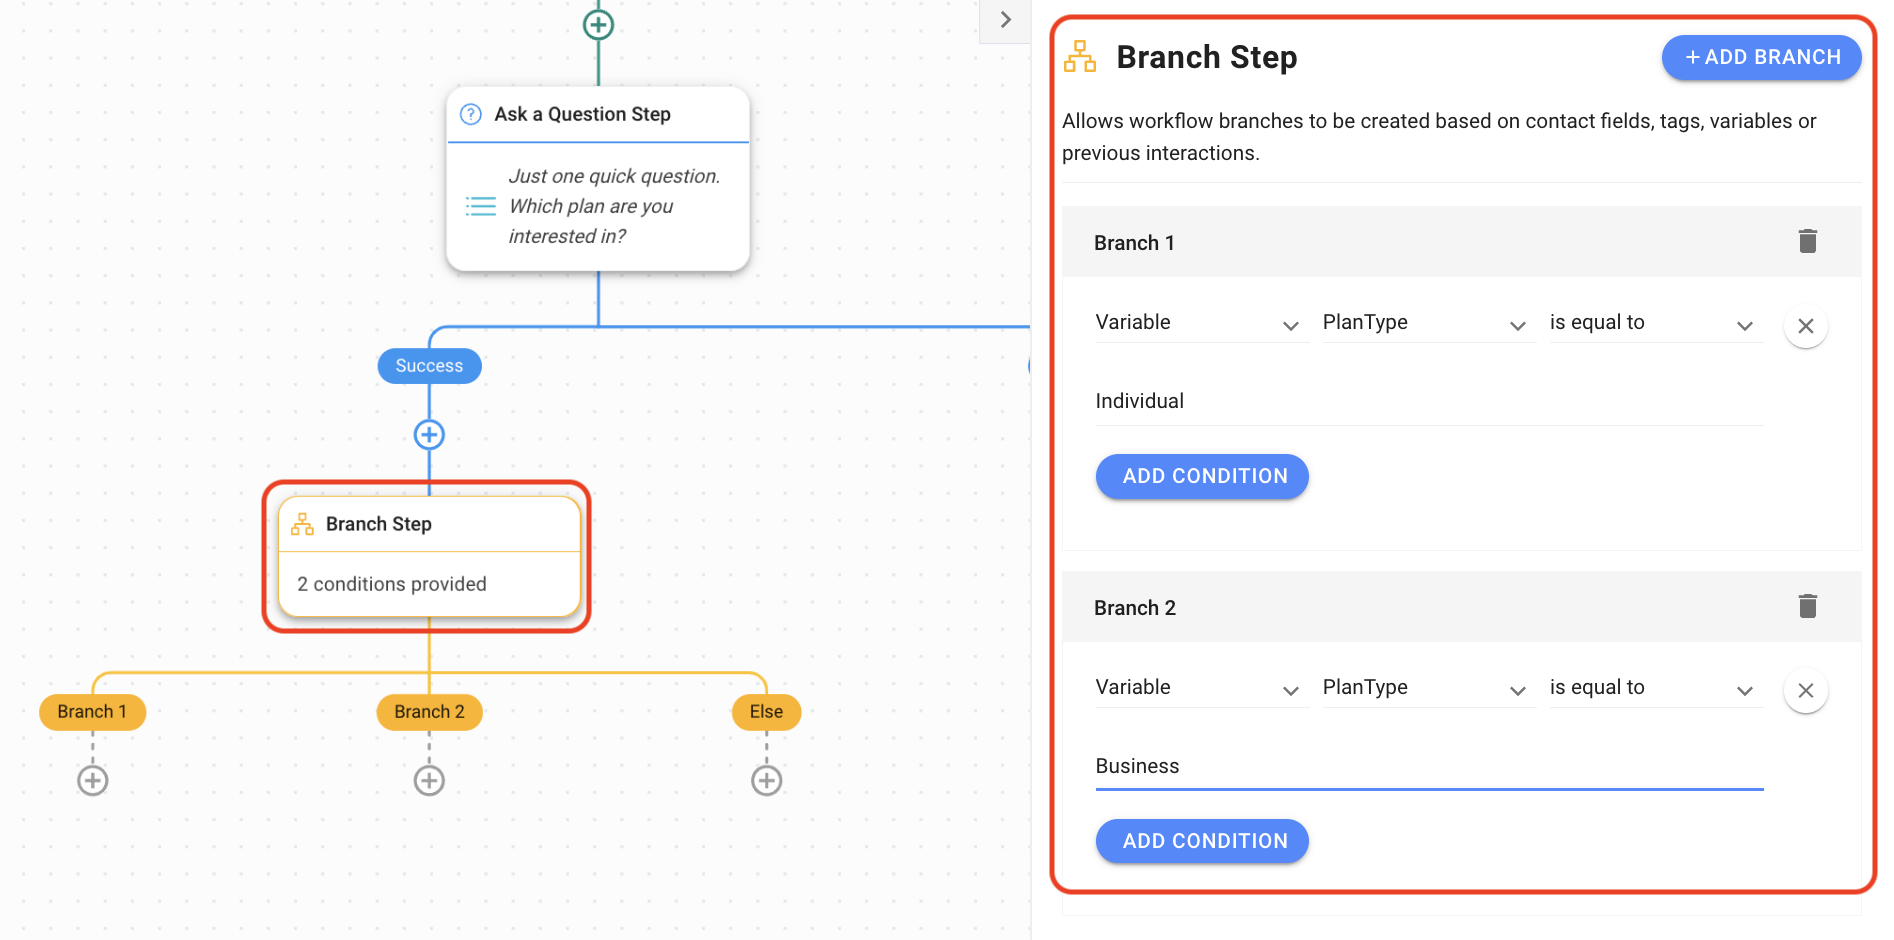
Use a Branch Step to route leads to the right team or agent based on their answers. Since we saved the above example Variable as PlanType and we have two plans, Individual and Business, we’re adding a branch for each answer.

Branch Step configuration for routing

Route based on existing lead data

Use this method when you want to route leads to the right sales agent based on existing Contact information.

Method Objective

  • Route leads based on existing Contact information.

Workflow Setup

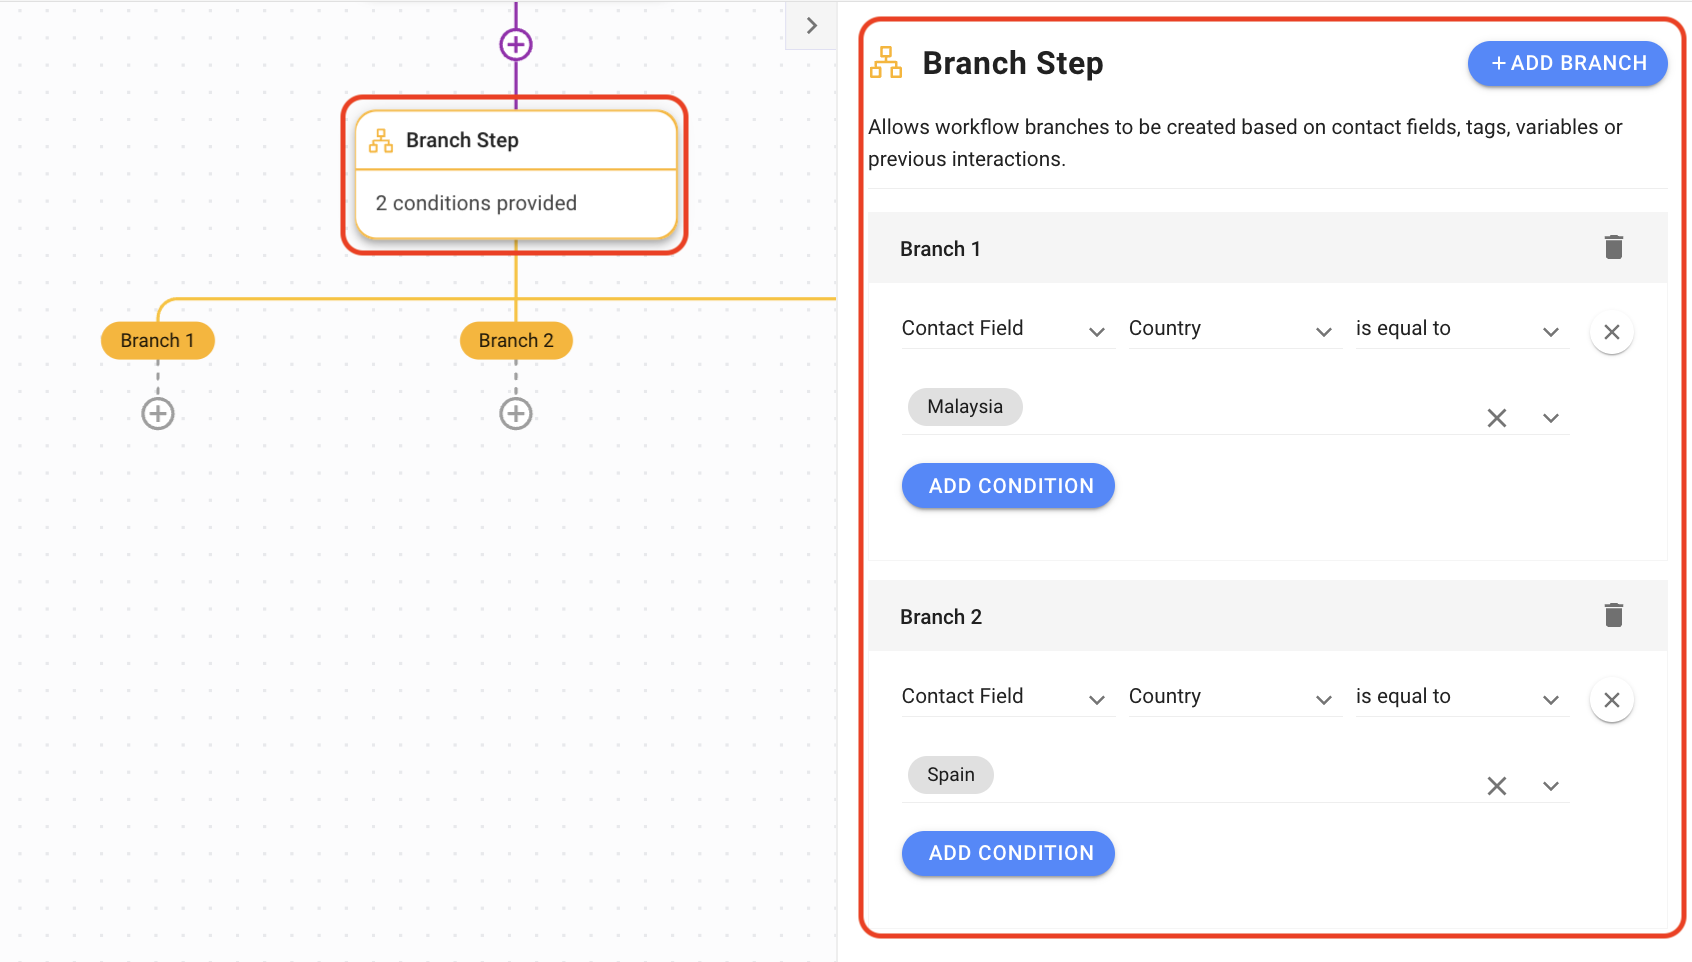
Here’s a setup example of the Branch Step to route leads based on existing Contact information. For this example, we’re using the country field.

Add a Branch Step > select Contact Field and Country > select is equal to from the Operator menu > choose your desired country as the Value.

Tip: Consider using a earlier in the Workflow.

Tip: Learn more about .

Use the Ask a Question Step to ask leads for input and save their answers as . The Variables will be used in this Workflow’s Branch Step for routing purposes.

1. Select the Ask a Question Step and fill in the Question Text field. 2. Select Multiple Choice in the Question Type dropdown. 3. Add and fill in the answer choices as needed: for example, for a plan type, Individual, Business. 4. Enable Save Response As Variable and give the variable a name.

Tip: There are best practices for the .

1. A Contact answering the question leads to the Success branch. Here, add a Branch Step. 2. In the configuration panel, select your Variable name, then is equal to from the Operator menu. 3. Fill in the Value with one of the answer choices from the Ask a Question Step. 4. Select Add Branch and repeat this process until you have a branch for each answer choice. 5. Now you can add steps in each of the branches to decide what happens next.

Tip: Consider as your next step to automatically assign leads to the right sales agent.

Data collected from can be used to make automated decisions about the next steps for the lead based on your business needs. You can also use any data that you gain from enrichment, e.g., budget, job title, company size. Contact information such as country or language can be derived automatically from some Channels leads used to message your business.

Tip: Consider doing earlier in this workflow.

Tip: There are best practices for the .

Tip: Consider as your next step to automatically assign customers to the right sales agent.

routing methods that are more applicable for support here
Welcome or Away message
question types here
Variables
Branch Step here
Auto-Assignment
lead enrichment
lead data enrichment
Branch Step here
Auto-Assignment
screenshot of workflow showing how to add a branch to route contacts by country
screenshot of a workflow to route leads to agents