# How to Route Contacts by their Preferred Language
{% hint style="success" %}
In this article, you’ll discover how to automatically route contacts to Agents based on the Contact’s language preferences.
{% endhint %}
Businesses that have a number of international customers want to route their Contacts to an Agent who can communicate in the Contact’s preferred language. Such businesses can use our platform to achieve this goal by using the following two Workflow Templates:
* Contact Routing: By Language
* Contact Routing: Ask Language Preference
### Benefits of Routing Contacts by Language
Route Contacts by language to:
* Improve customer experience by communicating in their native language.
* Increase agent productivity by eliminating the language barrier and directing the right customer to the right agent.
#### Workflow Setup
To use the **Contact Routing: By Language** workflow template, download the template JSON file.
[JSON File](https://drive.google.com/file/d/145FRjQKZkRLV1RrN5IxYZAXBbl-ab0bc/view?usp=drive_link)
Workflow Steps and their functions:
1. **Trigger:** The Workflow starts whenever a Contact opens a conversation.
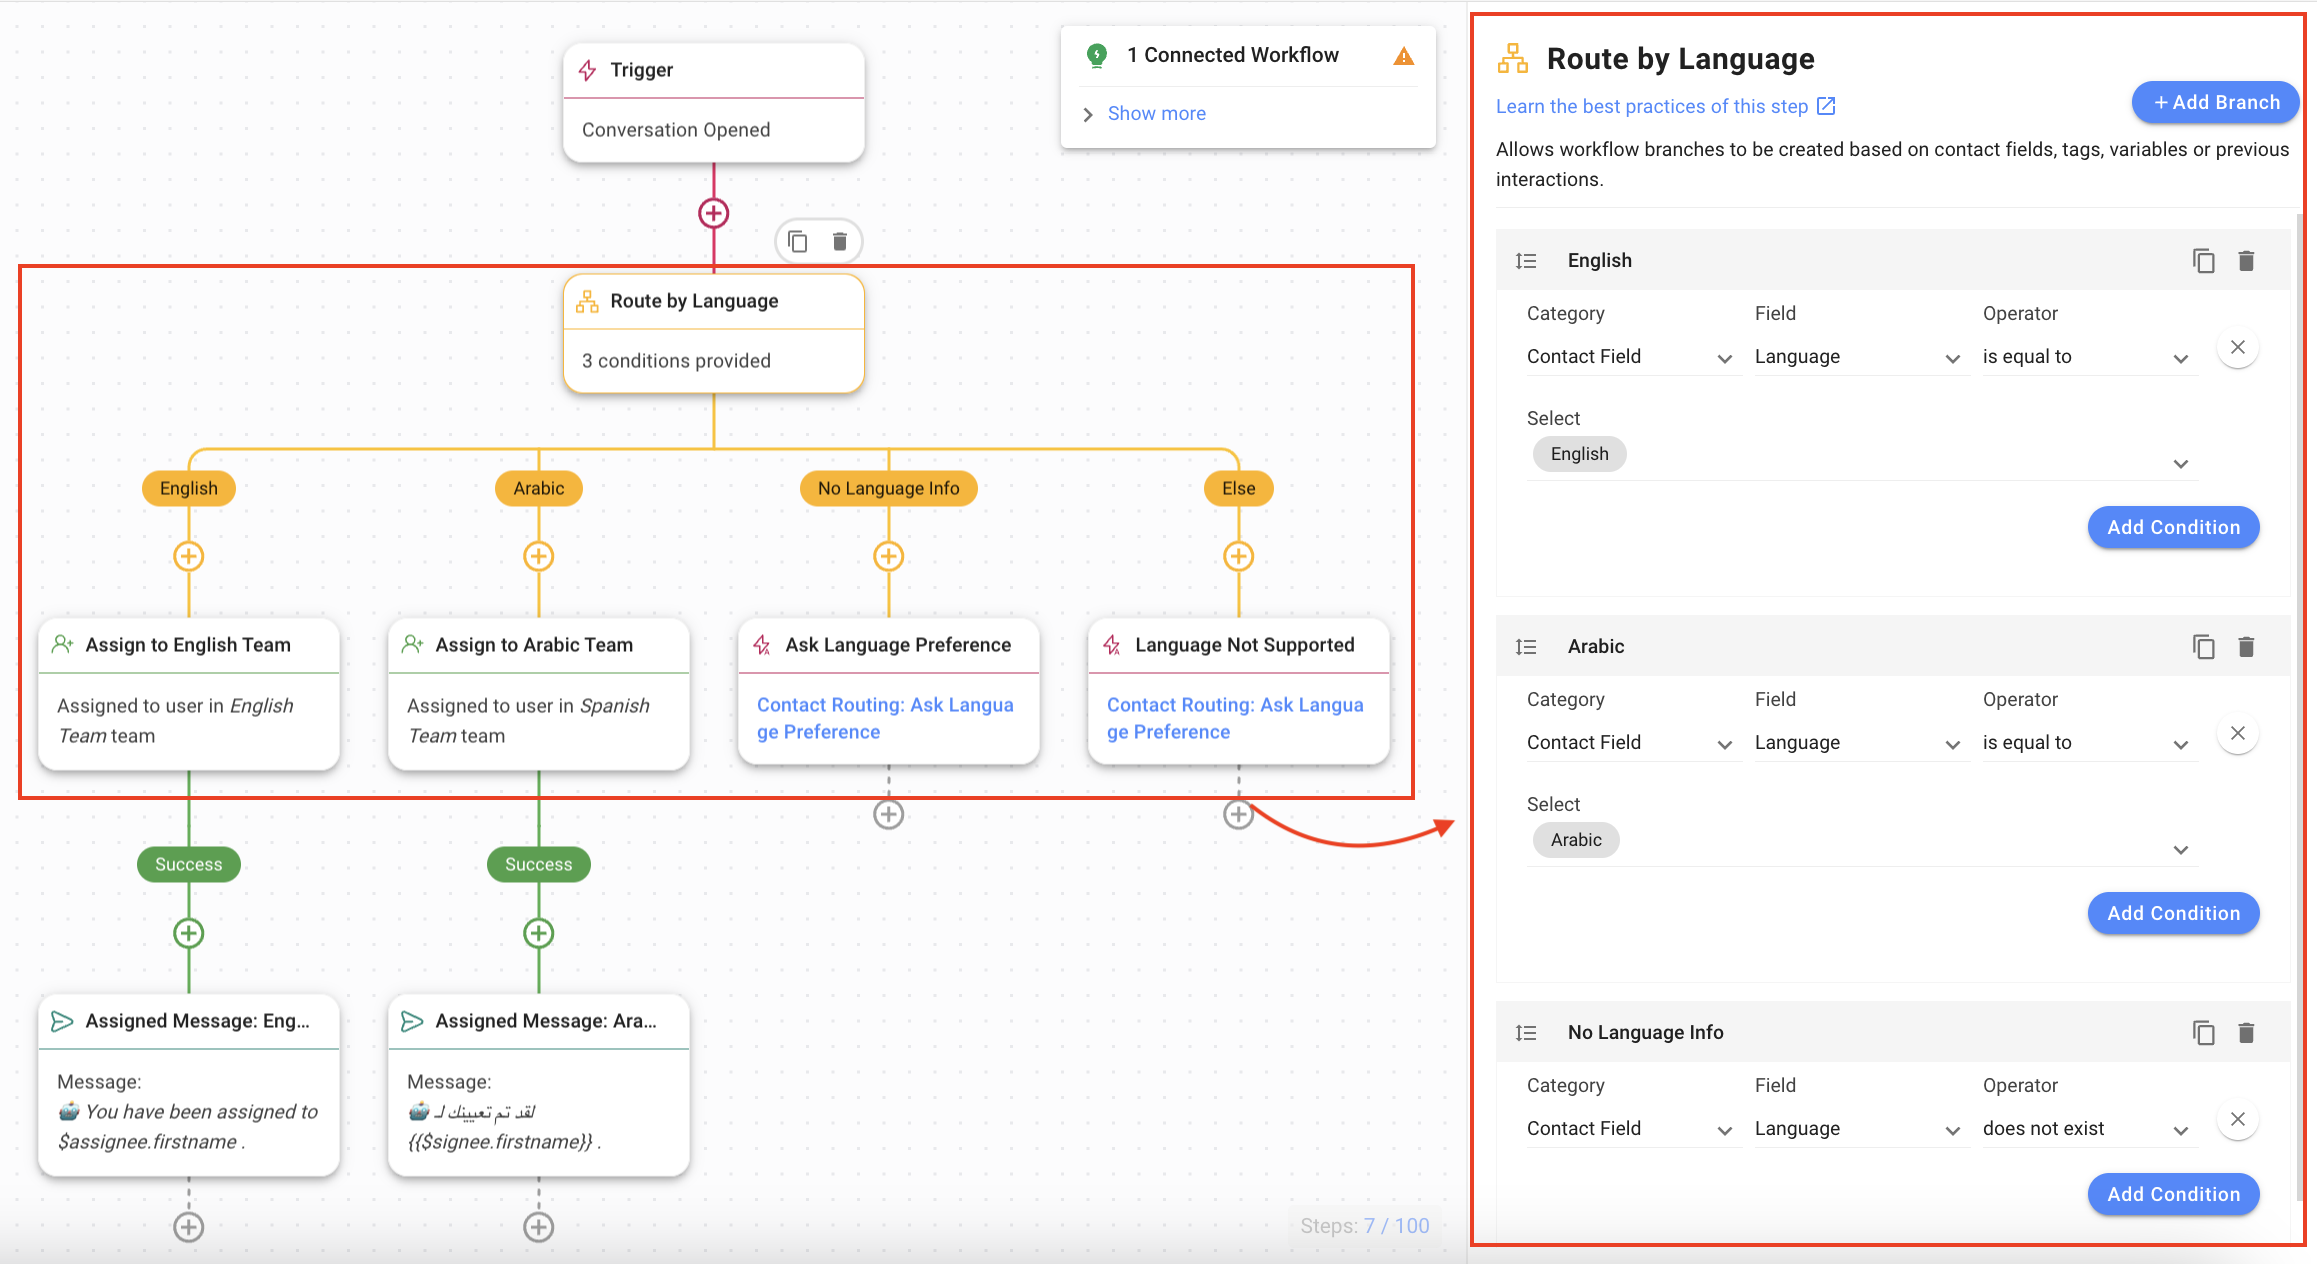
2. **Route by Language**: The workflow checks what the Contact’s language is. In this workflow template, four branches handle the results:
* **English**: This branch checks if Contact’s language is English. The following options have been selected:
* **Category**: Contact Field
* **Field**: Language
* **Operator**: is equal to
* **Select**: English
* **Arabic**: This branch checks if Contact’s language is Arabic. The following options have been selected:
* **Category**: Contact Field
* **Field**: Language
* **Operator**: is equal to
* **Select**: Arabic
{% hint style="info" %}
You can add more languages in a similar manner by adding Branches.
{% endhint %}
* **No Language Info**: This branch routes to the **Contact Routing: Ask Language Preference** workflow, when no Language information is available. The following options have been selected:
* **Category**: Contact Field
* **Field**: Language
* **Operator**: does not exist
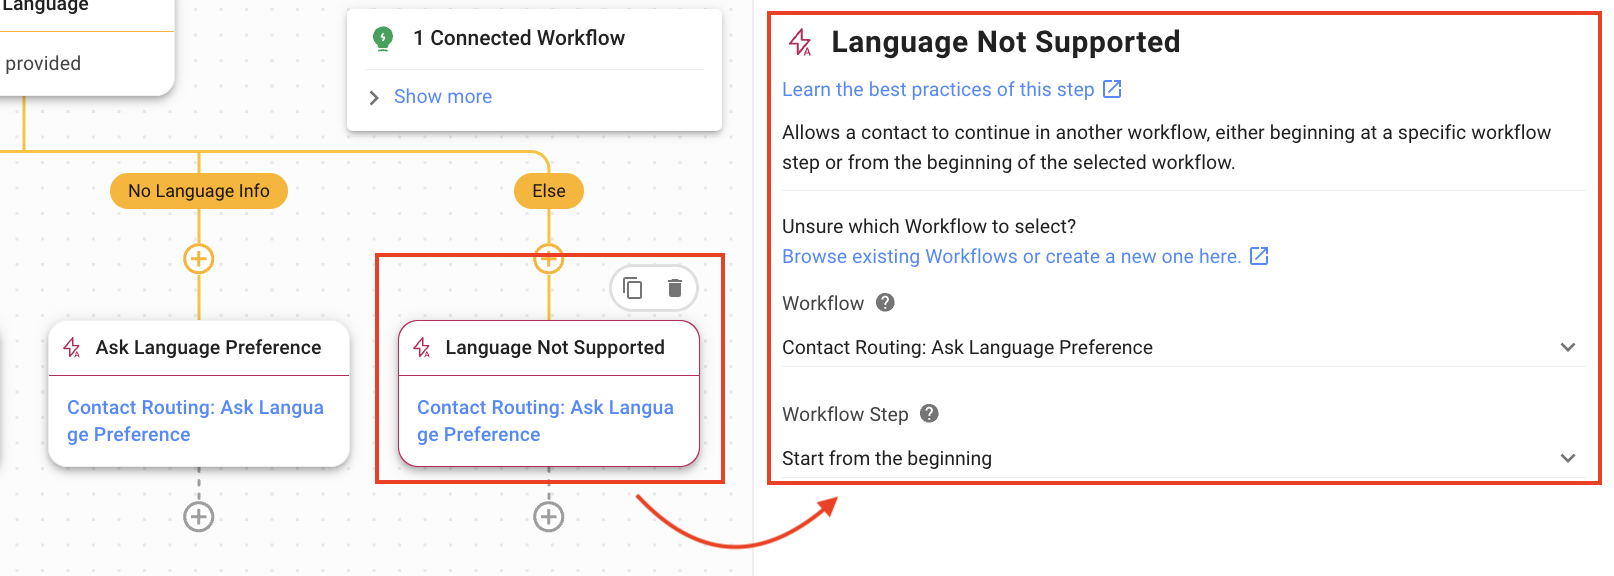
* **Else**: This branch routes to the **Contact Routing: Ask Language Preference** workflow, when the Contact’s language is not supported by the platform.
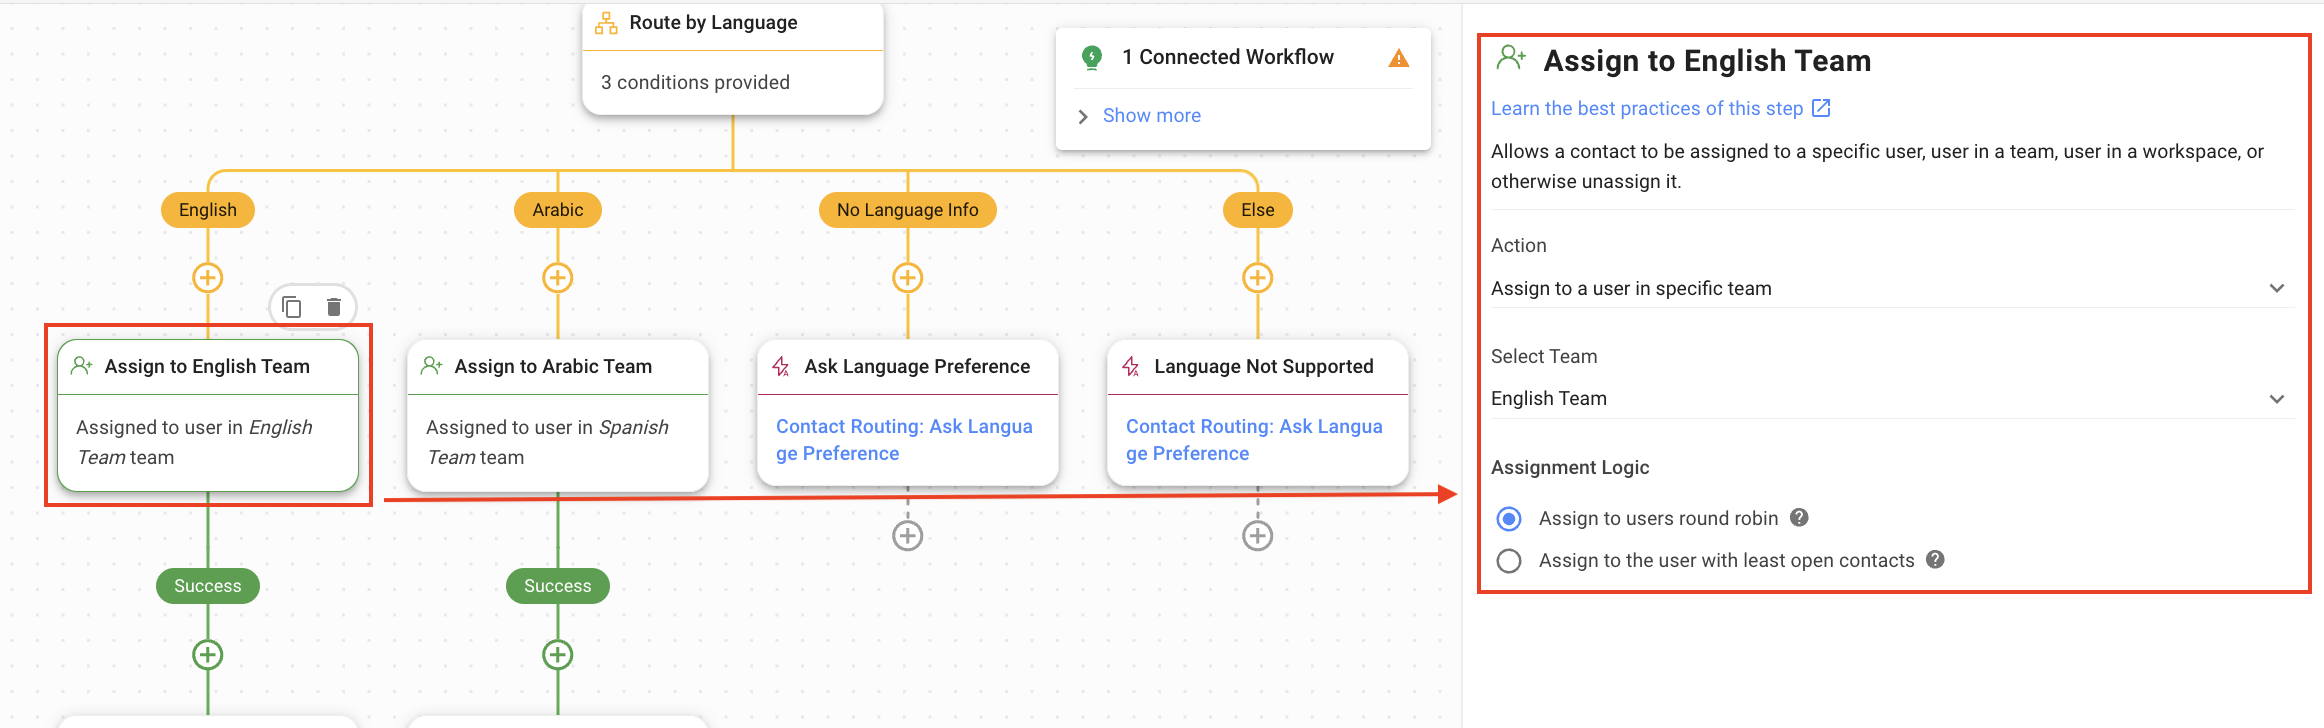
**Assign to Team:** The Contact is directed to the respective team that speaks their language. In this workflow template, the Contacts are assigned to one of the following teams:
* **Assign to English Team**: In the **English** branch, this step assigns the Contact to the English Team.
* **Assign to Arabic Team**: In the **Arabic** branch, this step assigns the Contact to the Arabic Team.
**Ask Language Preference**: In case no language info is provided, the **Trigger Another Workflow** Step is used to trigger the **Contact Routing: Ask Language Preference**.
**Language Not Supported**: In case the Contact’s language is not supported by the platform, the **Trigger Another Workflow** Step is used to trigger the **Contact Routing: Ask Language Preference**.
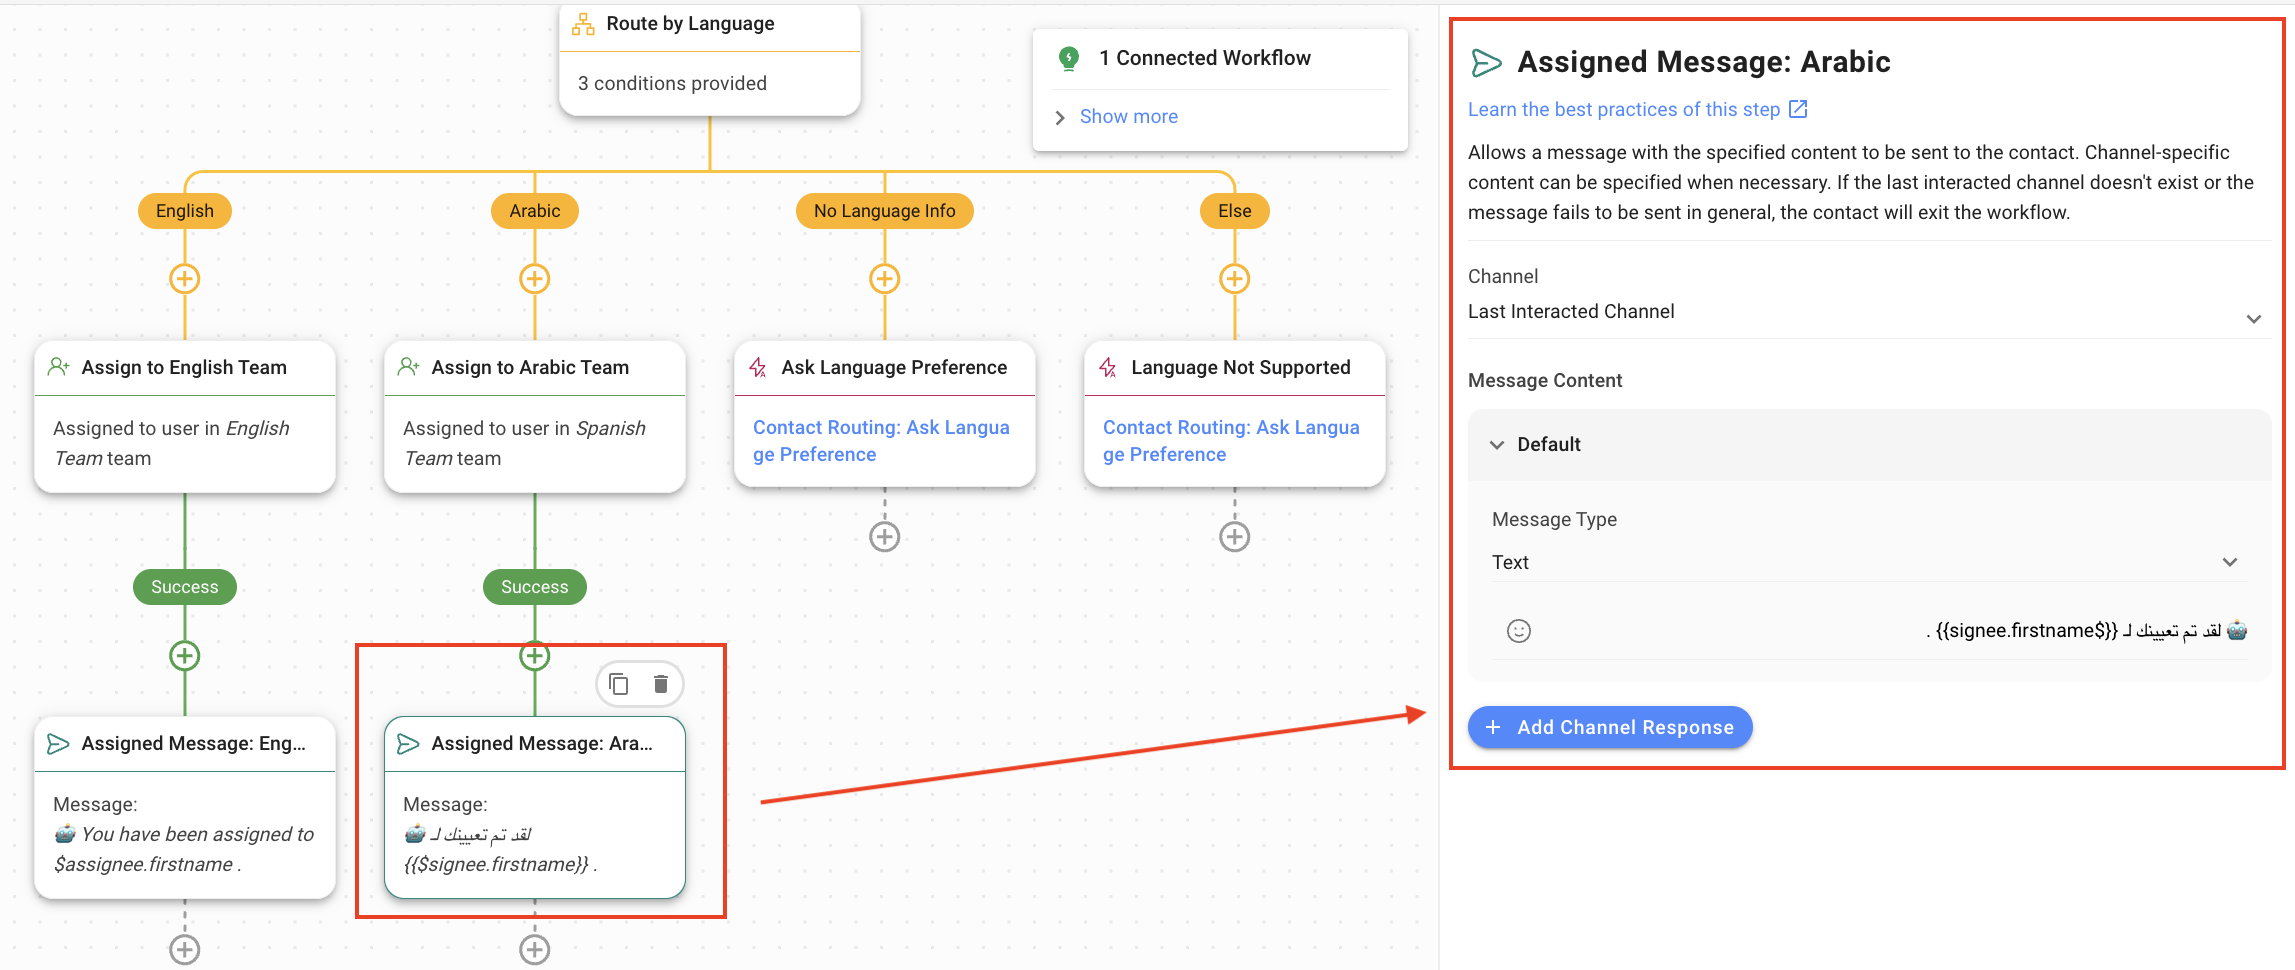
3. **Assignment Message**: The workflow informs the Contact to whom they have been assigned using the Step message.
{% hint style="success" %}
Once you have completed the setup, click **Save** and **Publish** to activate the Workflow.
{% endhint %}
The **Contact Routing: Ask Language Preference** workflow template can be manually triggered from the **Contact Routing: By Language** workflow template when the Contact’s language information is missing or if the Contact’s language is one that is supported by the platform.
To use the **Contact Routing: Ask Language Preference** workflow template, download the template JSON file.
[JSON File](https://drive.google.com/file/d/1UNLgzgYr2M1iWdTec5iM98BpkisupSaG/view?usp=drive_link)
Workflow Steps and their functions:
1. **Trigger**: The Workflow starts whenever this workflow is triggered manually.
{% hint style="info" %}
You can use this template as stand-alone template by triggering the workflow when the Contact opens the conversation.
{% endhint %}
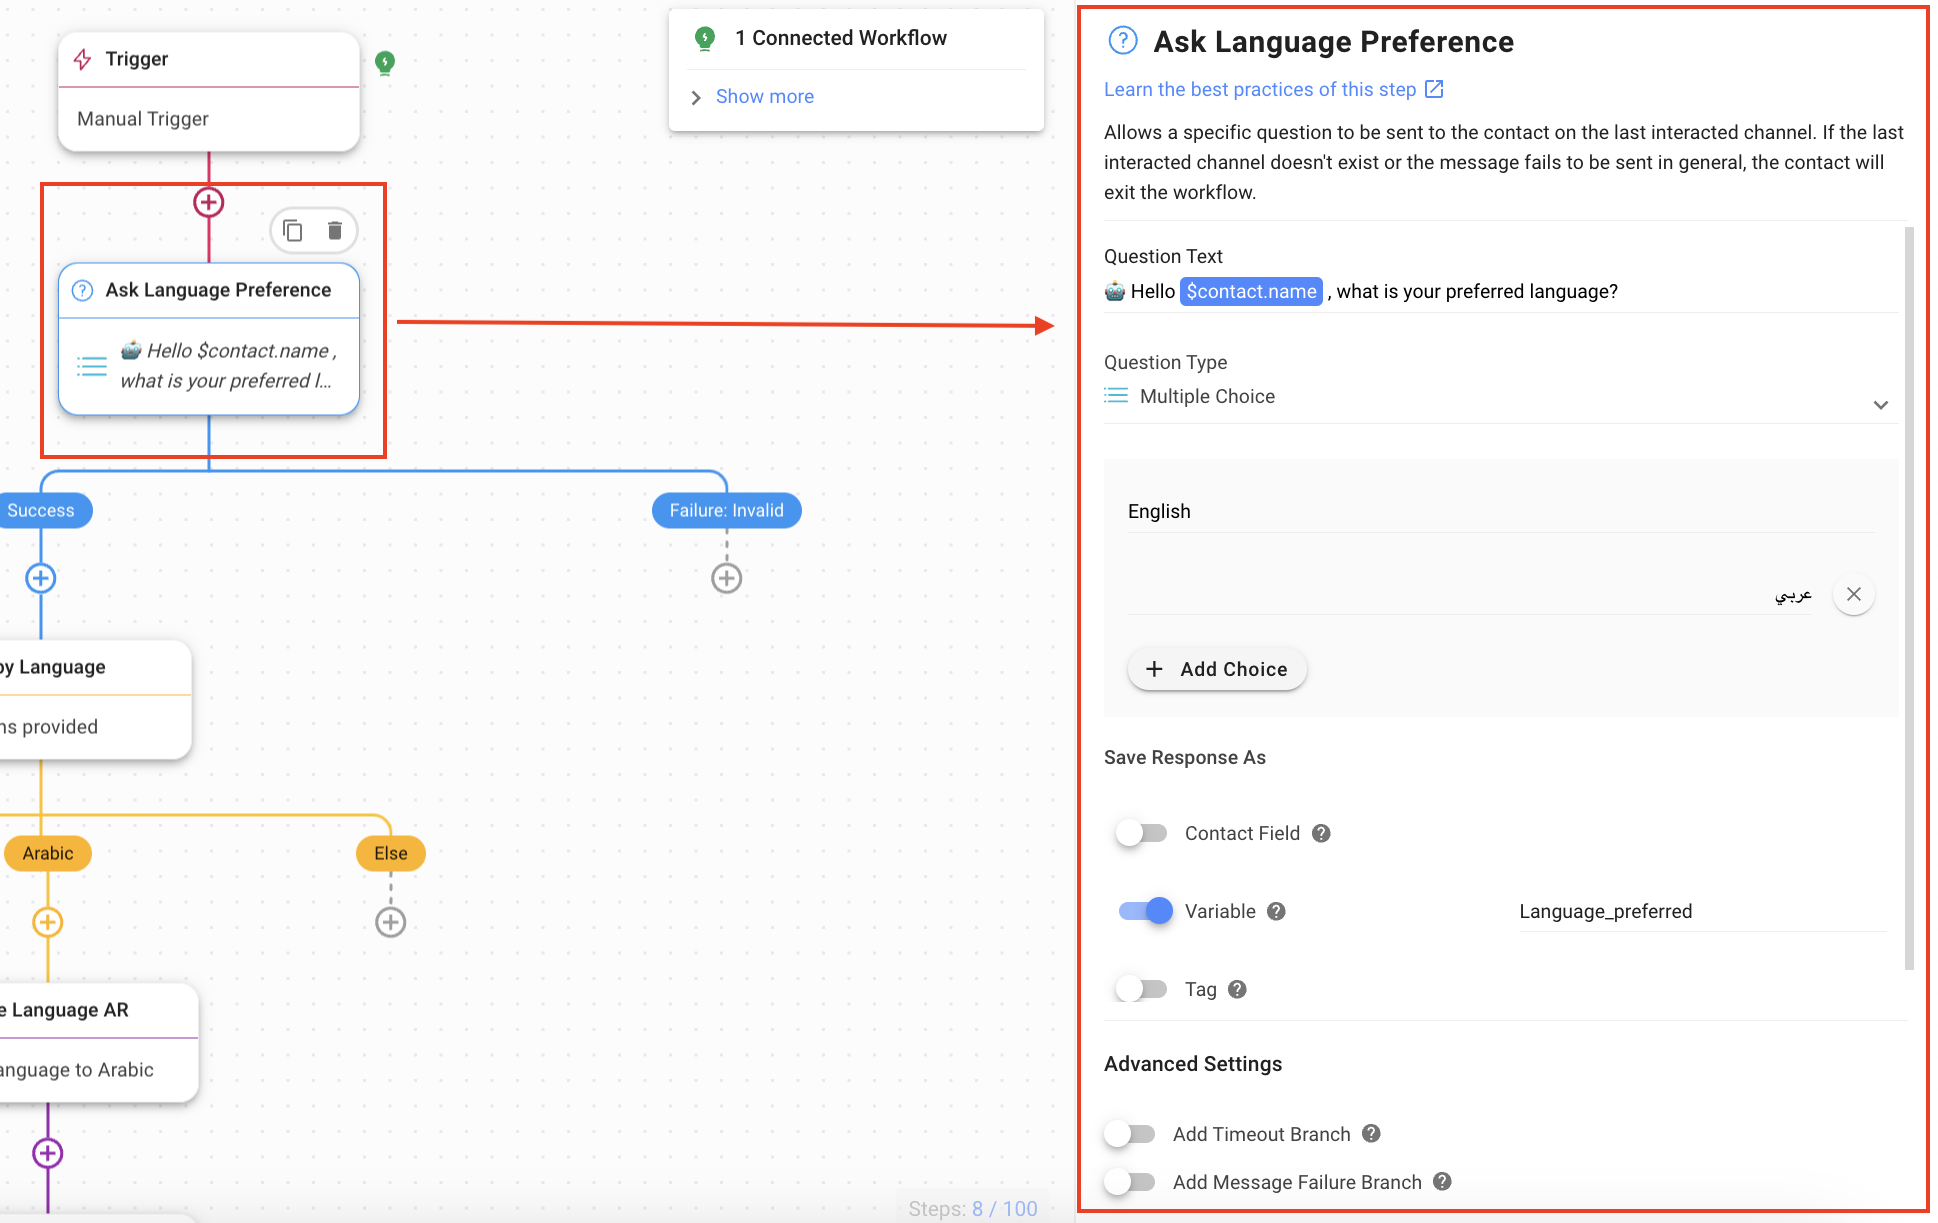
2. **Ask for Language Preferences**: The Workflow asks for the Contact’s preferred language using the Ask Step. The following options have been provided in this Workflow template:
* **Question Type**: Multiple-Choice
* English
* Arabic
* **Save Response As**: Variable (the selected option is saved in the **Language\_preferred** in this template).
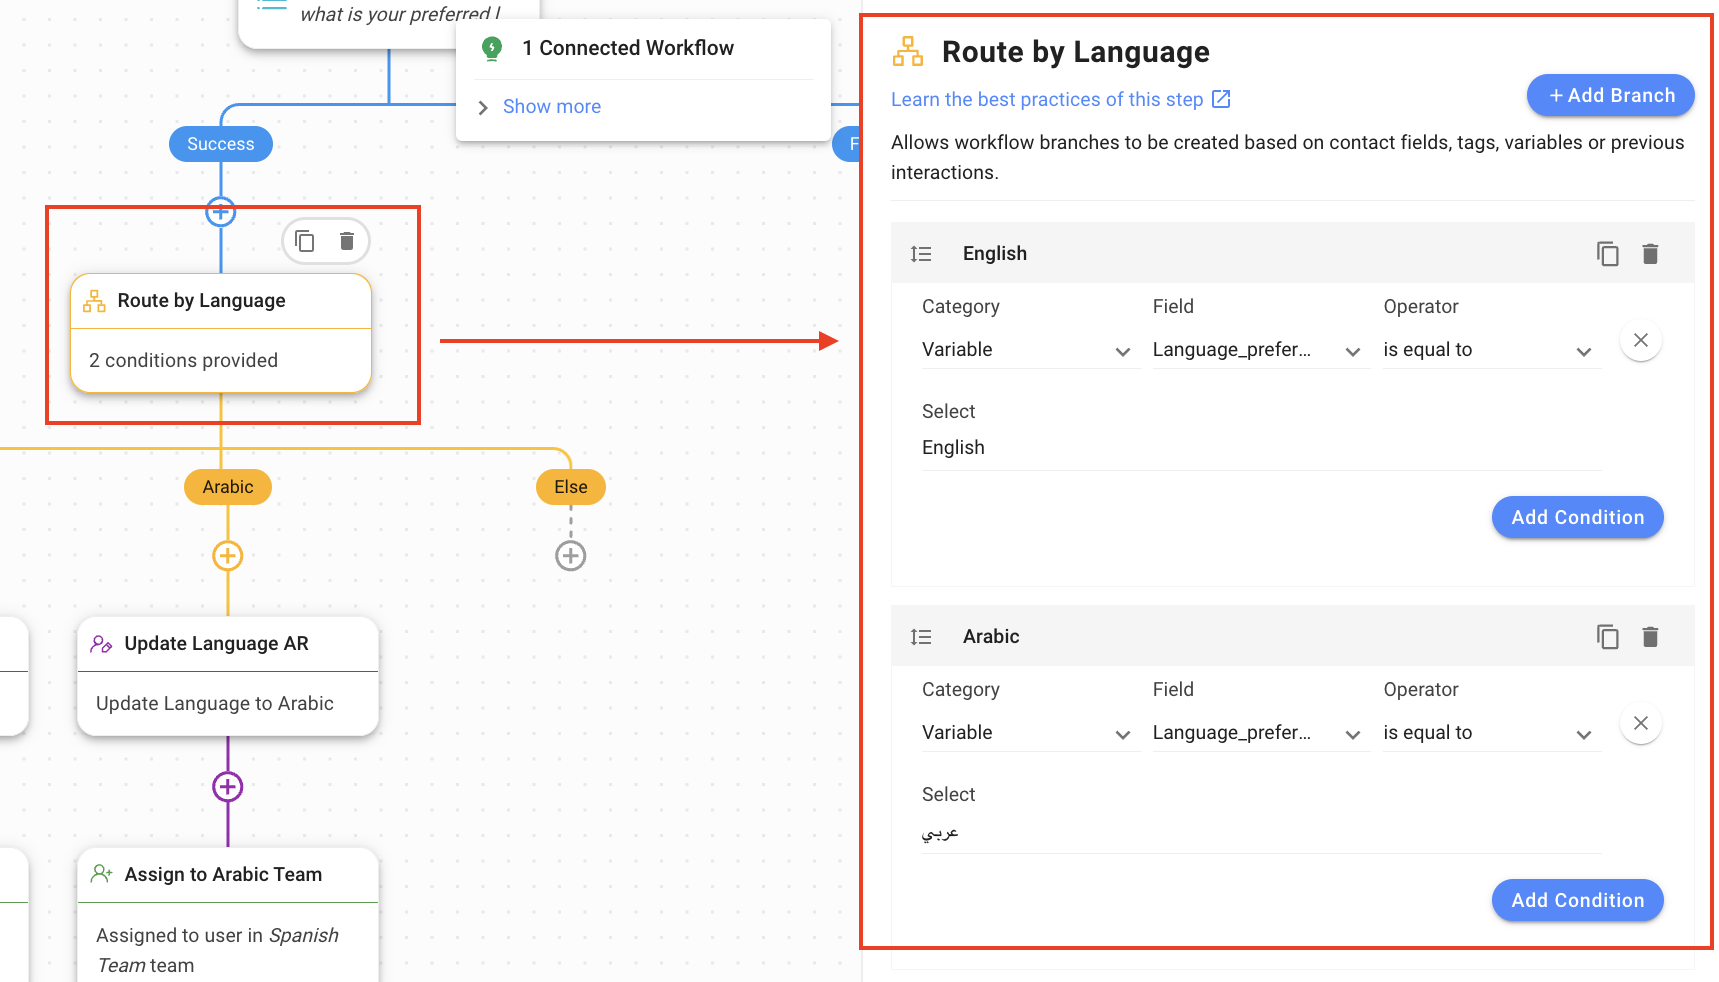
3. **Route by Language**: The workflow checks what the Contact’s language is. In this workflow template, two branches have been created:
* **English**: This branch checks if the Contact’s language is English. The following options have been selected:
* **Category**: Contact Field
* **Field**: Language
* **Operator**: is equal to
* **Select**: English
* **Arabic**: This branch checks if the Contact’s language is Arabic. The following options have been selected:
* **Category**: Contact Field
* **Field**: Language
* **Operator**: is equal to
* **Select**: Arabic
{% hint style="info" %}
You can add more languages in a similar manner by adding Branches.
{% endhint %}
4. **Update Language**: This Step updates the language information of the Contact for the next time on the platform using the **Update Contact Field** Step. In this workflow template, the following options have been selected:
* **Update Language EN:** Updates Contact’s language to English.
* **Contact Field**: Language
* **Language**: English
* **Update Language AR**: Updates Contact’s language to Arabic.
* **Contact Field**: Language
* **Language**: Arabic
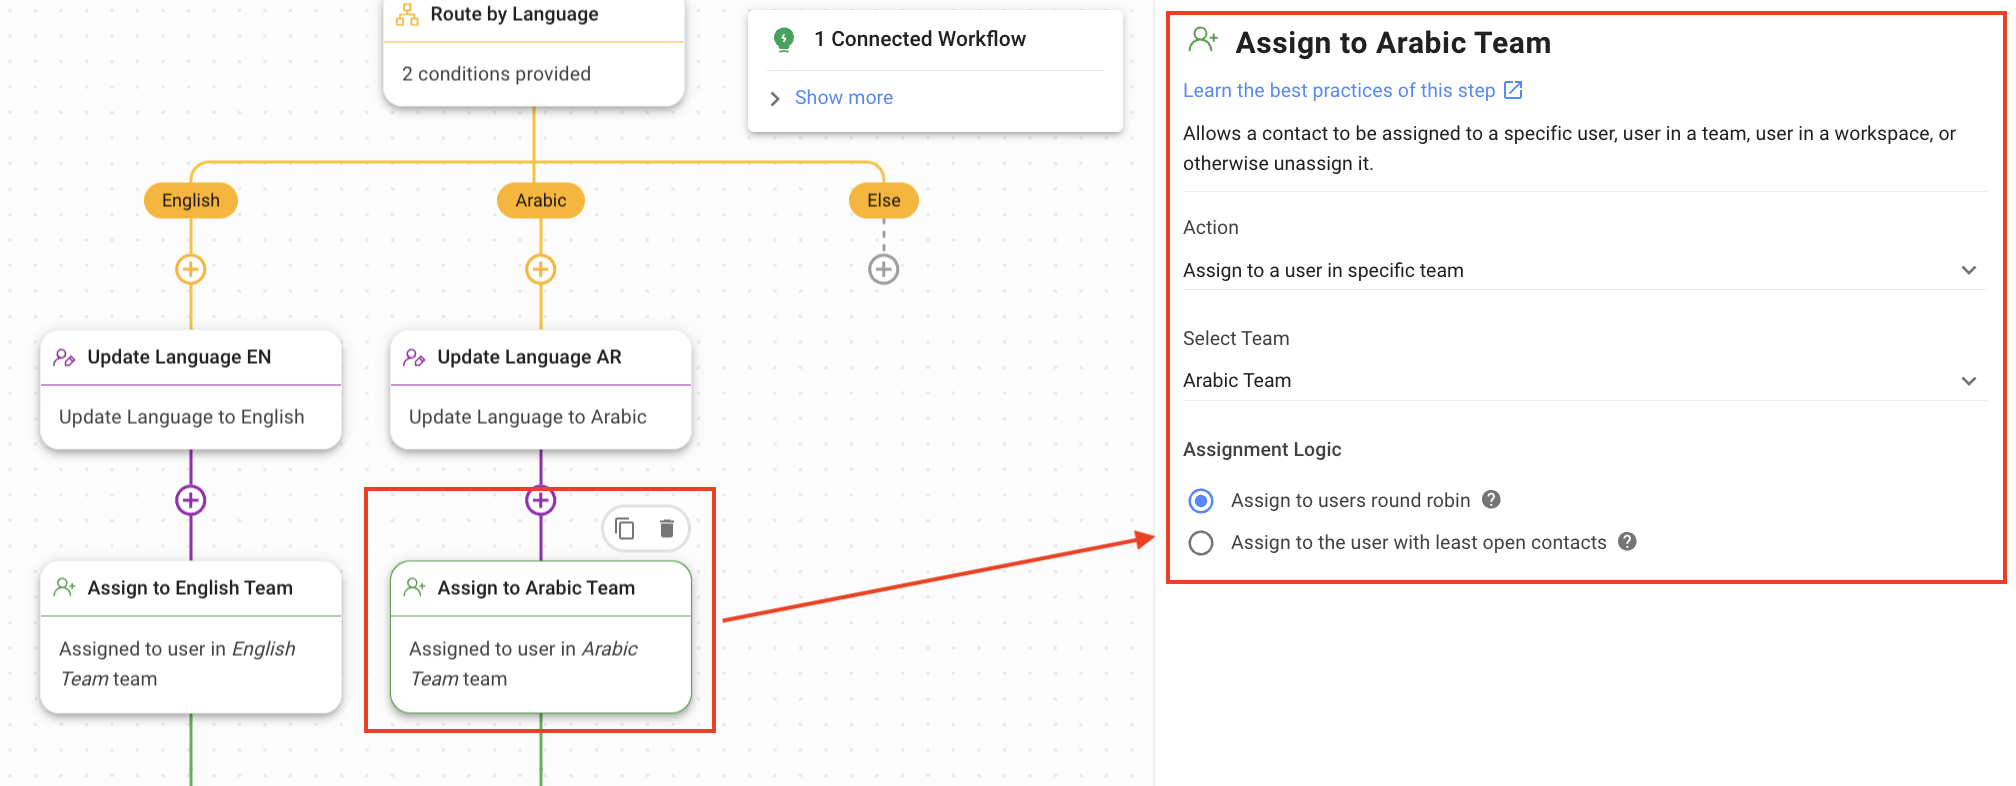
5. **Assign to Team:** The Contact is directed to the respective team that speaks their language. In this workflow template, the Contacts are assigned to one of the following teams:
* **Assign to English Team**: This step assigns the Contact to the English Team.
* **Assign to Arabic Team**: This step assigns the Contact to the Arabic Team.
6. **Assignment Message**: The workflow informs the Contact to whom they have been assigned using the Step message.
{% hint style="success" %}
Once you have completed the setup, click **Save** and **Publish** to activate the Workflow.
{% endhint %}
#### Usage Recommendation
* For Channels where language metadata is available: **Contact Routing: By Language**
* For Channels where language metadata is not available or the platform does not support the Contact’s language: **Contact Routing: Ask Language Preference**.
{% hint style="warning" %}
It is worth noting that the workflow templates can only be used for languages supported by the platform.
{% endhint %}
The availability of a Contact's language information depends on the Channel they are coming from. The table below indicates which channels provide language information and which do not.
| **Language Info Available** | **Language Info Not Available** |
| --------------------------- | ------------------------------- |
| Telegram | Facebook Messenger |
| Viber | Instagram |
| Line | 360 Dialog WhatsApp |
| WeChat | MessageBird WhatsApp |
| Twitter | MessageBird SMS |
| | Twilio WhatsApp |
| | Twilio SMS |
| | Vonage WhatsApp |
| | Vonage SMS |
| | Gmail |
| | Live Widget |
| | WhatsApp Cloud API |
| | Chat API |
| | Contact Form |
| | Nexmo |
| | Skype |
---
# Agent Instructions: Querying This Documentation
If you need additional information that is not directly available in this page, you can query the documentation dynamically by asking a question.
Perform an HTTP GET request on the current page URL with the `ask` query parameter:
```
GET https://docs.is-messenger.com/ismessenger/automate-conversations/how-to-route-contacts-by-their-preferred-language.md?ask=
```
The question should be specific, self-contained, and written in natural language.
The response will contain a direct answer to the question and relevant excerpts and sources from the documentation.
Use this mechanism when the answer is not explicitly present in the current page, you need clarification or additional context, or you want to retrieve related documentation sections.