UCal
  • Welcome
  • 🚀Getting Started
    • Quick Start
      • What is IS-Messenger?
      • Setting Up an Account
      • Connecting Channels
      • Inviting Your Teammates
      • Getting Contacts to Message You
      • Automated Welcome and Away Messages
      • Responding to Messages
      • Glossary of Terms
    • Connecting a Channel
    • Invite your teammates
    • Getting Contacts to Message You
    • Automated Welcome and Away Messages
    • Responding to messages
    • Glossary of Terms
    • Creating a Chatbot
  • ⚙️Workspace Modules
    • Dashboard
    • Inbox
      • Inbox Overview
      • Assignment and closing a conversations
      • Custom Inboxes
      • Interacting with Respond AI Prompts
      • Using AI Assist
    • Contacts
      • Contact Details
      • Contacts Overview
      • Merge Suggestions
      • Contact Activity
      • Contact Channels
      • Contact Import
      • Segments
    • Broadcast
      • Broadcast Overview
      • Managing Broadcasts
    • Workflow
      • Triggers
      • Workflow Step
        • Step: Send a Message
        • Step: Ask a Question
        • Step: Assign To
        • Step: Branch
        • Step: Update Contact Tag
        • Step: Update Contact Field
        • Step: Open Conversation
        • Step: Close Conversation
        • Step: Add Comment
        • Step: Jump To
        • Step: Wait
        • Step: Date & Time
        • Step: HTTP Request
        • Step: Trigger Another Workflow
        • Step: Add Google Sheets Row
        • Step: AI Agent
      • Workflow Templates
    • Reports
      • Reports: Conversations
      • Reports: Responses
      • Reports: Resolutions
      • Reports: Messages
      • Reports: Contacts
      • Reports: Assignments
      • Reports: Leaderboard
      • Reports: Users
      • Reports: Broadcasts
  • ⚙️Workspace Setting
    • Managing a Workspace
    • General
    • Users
      • Access Levels
    • Teams
    • Channels
      • Chat Menus
    • Contact Fields
    • Growth Widgets
      • Website Chat Widget Quick Start
      • Website Chat Widget Overview
      • Workspace Settings: Growth Widgets
      • Install Website Chat Widget on Squarespace
      • Install Website Chat Widget on Joomla
      • Install Website Chat Widget on Wix
      • Install Website Chat Widget on Shopify
      • Install Website Chat Widget on WordPress
      • How to Track Conversation Source from Multiple Websites
    • Respond AI
    • Integrations
      • Dialogflow
        • Dialogflow: Connecting to Dialogflow
        • Dialogflow: Creating a Chatbot
        • Dialogflow : Managing Intents
        • Dialogflow: Parameters
        • Dialogflow: Events
        • Dialogflow: Response Templates
        • Dialogflow: Custom Payloads
        • Dialogflow: Fulfillment Webhook Request
      • E-Commerce & CRM Integrations
        • E-Commerce Integration: Shopify
        • E-Commerce Integration: BigCommerce
        • E-Commerce Integration: WooCommerce
        • E-Commerce Integration: Magento
        • CRM Integration: HubSpot
        • CRM Integration: Salesforce
        • CRM Integration: Pipedrive
        • CRM Integration: ActiveCampaign
      • Zapier
      • Developer API
      • Webhooks
      • Make (formerly Integromat)
    • Closing Notes
    • Snippets
    • Files
    • Data Export
    • Data Import
  • ⚙️User Account
  • Profile
  • User Activity Status
  • Notifications
  • Resetting your Passwords
  • 👨‍👧‍👦CONTACT AND MESSAGES
    • Dynamic Variables
      • Dynamic Variables Overview
      • How to Use Dynamic Variables
    • Contact Search and Custom Inbox
    • Conversations
  • ⚙️MESSAGING CHANNELS
    • Channel Overview
    • Facebook Messenger
      • Facebook Messenger Quick Start
      • Facebook Chat Plugin
      • Private Replies
      • Message Tag
    • Instagram
      • Instagram Overview
      • Instagram Quick Start
    • WhatsApp
      • WhatsApp Business API Quick Start
      • Getting Ready for Inbound Conversations
      • Getting Ready for Promotional Messaging
      • WhatsApp Official Business Account (Green Tick)
      • Grow your WhatsApp Audience by Maximizing Entry Points
      • Get WhatsApp API Account for Government Agencies
      • Meta Business Verification
      • WhatsApp Message Templates
      • WhatsApp Pricing
      • WhatsApp Business Platform (API) Channel Configuration
      • WhatsApp Messaging Limits
      • Meta Product Catalog
      • Change Your WhatsApp Business Display Name
      • Phone Number Migration to IS-Messenger WhatsApp Business API
      • Turn-off WhatsApp Number Two-Step Verification
      • WhatsApp Cloud API
        • Migrating from On-Premises API to Cloud API
        • Migrating from Cloud API to On-Premises API
        • Set up the WhatsApp Echo Bot
        • Load Testing on Cloud API
        • Experiments
        • Webhooks Setup
      • 360Dialog WhatsApp
      • Twillio WhatsApp
      • MessageBird WhatsApp
      • Vonage WhatsApp
      • Phone Number Migration to WhatsApp Cloud API
    • Website Chat Widget
      • Install on WordPress
      • Install on Shopify
      • Install on Wix
      • Install on Squarespace
      • Install Website Chat Widget on Joomla
    • LINE
      • LINE Overview
      • LINE Quick Start
    • Telegram
      • Telegram Overview
      • Telegram Quick Start
    • Viber
      • Viber Overview
      • Viber Quick Start
    • SMS Overview
      • Twilio SMS Quick Start
        • Importing Contacts to Twilio SMS
      • MessageBird SMS Quick Start
      • Vonage SMS Quick Start
    • Twitter Overview
      • Twitter Quick Start
    • WeChat
      • WeChat Overview
      • WeChat Quick Start
    • Google Business Message
    • Email
      • Google Workspace Quick Start
      • Other Email
    • Custom Channel
      • Custom Channel Overview
      • Custom Channel Quick Start
  • New Release Update
  • Support Use Cases
    • How to Identify Contacts by Email and Phone NumberI
    • How to Enrich Customer Data from a CRM or other Business Software
    • How to Route Customers to the Right Team Automatically
    • How to Auto-Assign Customers to a Team or Dedicated Agent
    • How to Send Outbound Support Messages
    • Support: Closing Conversations
    • How to Supervise Your Support Agents
    • How to Analyze Reports for Support
    • How to Send CSAT to Customer and Save Data in Google Sheets or CRMs
  • Handling Inbound Conversations
    • Managing Spam
    • Create Automated Welcome and Away Messages
    • Get Contacts’ Consent for Personal Data Collection
    • Create Automated Chat Menus
    • Collect Contacts’ Emails and Phone Numbers
    • Route Contacts by Shifts
    • Route Contacts by Team Functions
    • Route New & Returning Contacts
    • Route VIP Contacts
    • Assignment Strategy: Automatic Contact Distribution & Load Balancing
    • Assignment Strategy: Unassign Agents after Conversations Closed
  • Capture Conversations
    • How to Streamline Meeting Scheduling via CTC Ads
    • How to Automate Product Info Sharing in Conversations Initiated via CTC Ads
    • How to Track Conversation Source from Multiple Websites
    • How to Route Contacts from CTC Ads to Agents
  • Automate Conversations
    • How to Maximize Customer Service Potential with AI Agent
    • How to Automate Contact Information Collection with AI
    • How to Route Contacts to Preferred AI Agent
    • How to Automatically Qualify Contacts Based on Budget Using AI Agent
    • How to Route Contacts by their Preferred Language
    • How to Create Automated Chat Menus
    • Assignment Strategy: How to Automate Contact Distribution & Load Balancing
    • Assignment Strategy: Unassign Agents after Conversations Closed
    • How to Create Automated Welcome and Away Messages
    • How to Block Contacts and Manage Spam
    • How to Route New and Returning Contacts
    • How to Collect Contacts’ Emails and Phone Numbers
    • How to Route New and Returning Contacts
    • How to Route Contacts by Team Functions
    • How to Route Contacts by Shifts
    • How to Get Contacts’ Consent for Personal Data Collection
    • How to Route VIP Contacts
  • How to Promptly Transfer Conversation Between Agents
  • How to Guide Customers from Exploration to Purchase with Engaging Menus
  • How to Optimize Customer Onboarding with Automated & Customized Welcome Messages
  • Converse with Customers
    • How to Get a Complete View of the Customers
    • How to Simplify Customer Escalation with Automation
    • How to Transfer Contacts to the Next Shift Automatically
    • How to Optimize Agents’ Productivity in the Messages Module
    • How to Align AI Conversations with Your Brand Voice
    • How to Draft Customer Replies with AI
    • How to Convert Image to Text Using AI
    • How Automate Calculations Using AI
  • Broadcasts Use Cases
    • How to Sending a Simple Broadcast
    • How to Start a Workflow Based on Broadcast Response
    • How to Import to Broadcast via WhatsApp
    • How to Troubleshoot a Failed Broadcast
  • Sales Use Cases
    • How to Collect Leads' Email and Phone Number
    • How to Enrich Contact Data and Qualify Leads
    • How to Route Leads
    • How to Auto-Assign Leads to Sales Agents
    • How to Send Outbound Sales Messages
    • How to Track Productivity by Closing Conversations
    • How to Supervise Sales Agents
    • How to Analyze Reports for Sales
  • Accessing Help Menu
Powered by GitBook
On this page
  1. Automate Conversations

How to Route New and Returning Contacts

PreviousHow to Block Contacts and Manage SpamNextHow to Collect Contacts’ Emails and Phone Numbers

Last updated 1 year ago

In this use case article, you’ll discover how to differentiate and manage new and returning Contacts separately.

  • Some businesses may want to treat new and returning customers differently to address their unique needs and expectations.

  • This can be achieved on IS-Messenger platform by using Workflows.

  • When a Contact start a conversation, the platform will automatically identify if the Contact is new or returning and route them separately.

Benefits of Routing New & Returning Contacts

  • Provide personalized customer experience for returning Contacts to help foster loyalty and customer retention.

  • Allow businesses to prioritize efforts towards capturing new Contacts’ attention and converting them into loyal patrons.

Workflow Setup

Click Workflows > Click + Add Workflow > Select Routing: New & Returning Contacts > Click Use Template

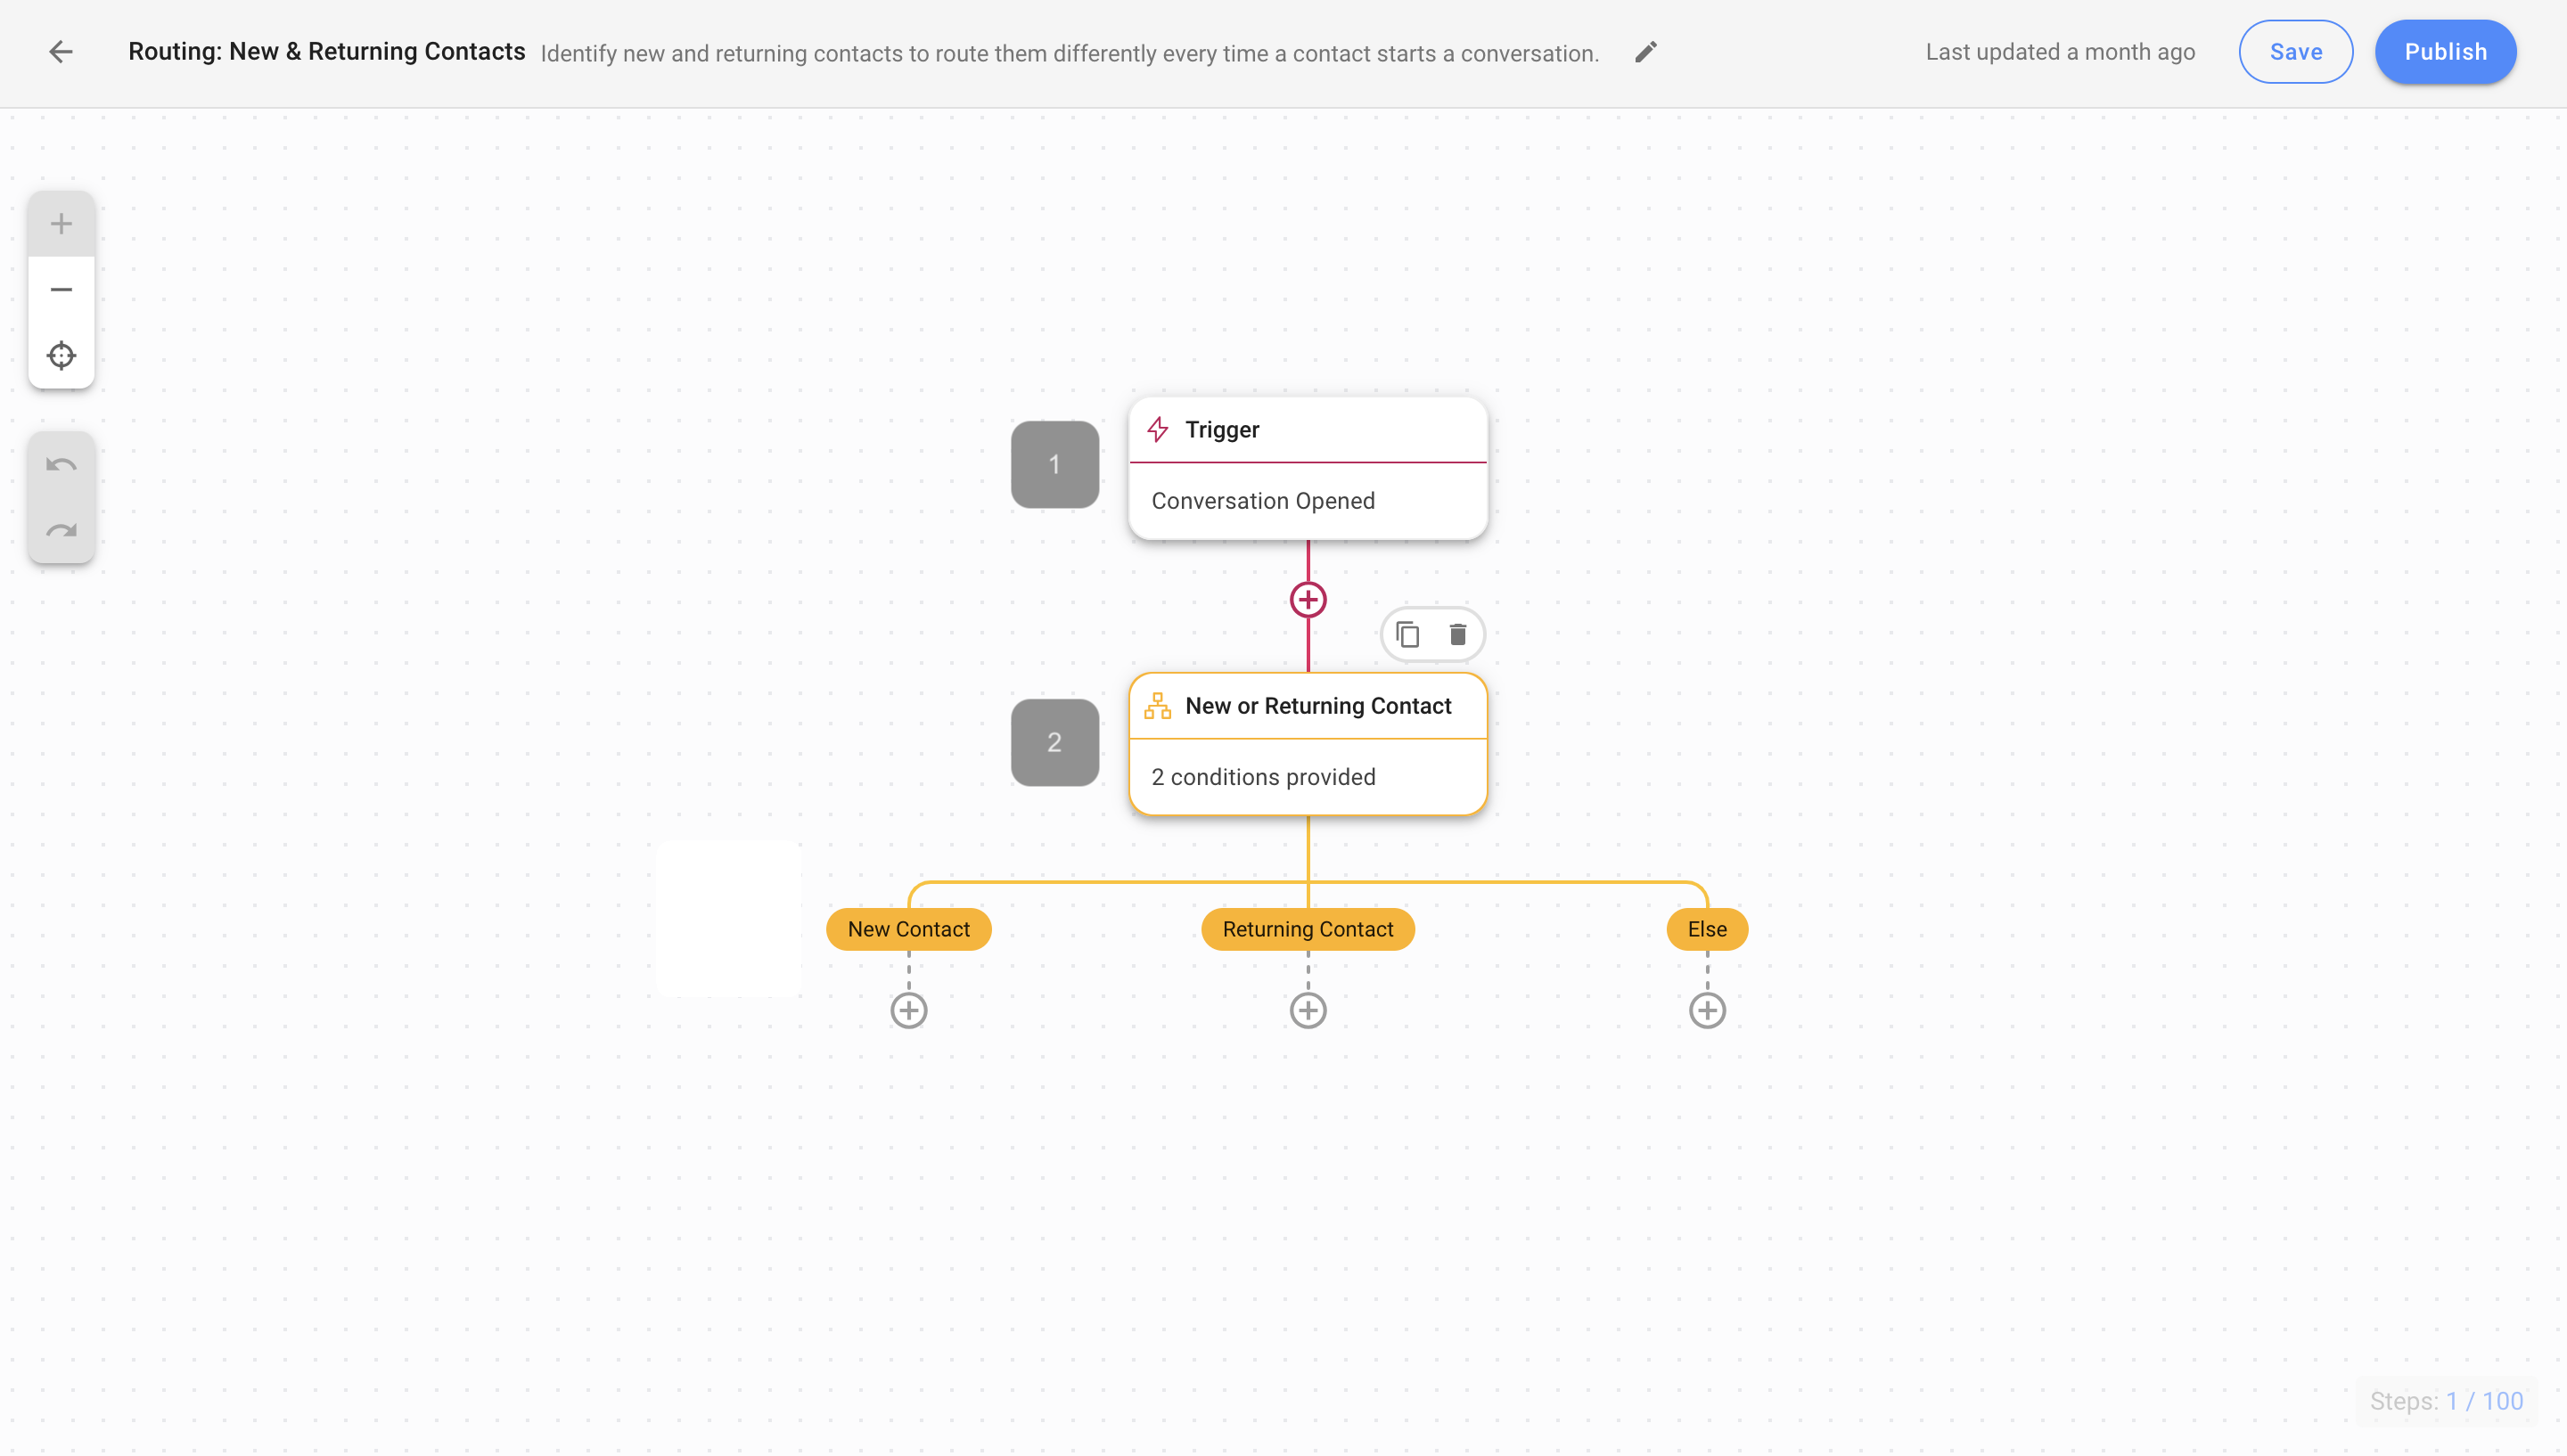
Workflow steps and their functions:

1. Trigger: This Workflow starts whenever a conversation is opened by a Contact.

2. New or Returning Contact: This branch step checks if a Contact is new or returning and route them to different branches.

At this point, you can choose to add steps under each branch based on how you want to manage your new and returning Contacts. Here are a few suggestions:

Once you have completed the setup, publish your Workflow to start routing new and returning Contacts.

New Contact branch: consider adding steps to and for data enrichment.

Returning Contact branch: consider adding steps to or to for further contact personalization.

welcome new contact
collect contact information
automate frequently asked questions
identify customer type