# CRM Integration: HubSpot
{% hint style="success" %}
Business Goal 1: Synchronize Contact information in HubSpot and IS-Messenger
{% endhint %}
### Synchronize Contact Information in HubSpot and IS-Messenger
**Understanding Contact Syncing Logic**
There are four tasks that can be automated in order to sync contacts.
**Sending data from IS-Messenger to HubSpot**
* [Create or update a contact in HubSpot when a new Contact is added in I](/ismessenger/workspace-setting/integrations/e-commerce-and-crm-integrations/crm-integration-hubspot.md)[S-Messenger](/ismessenger/workspace-setting/integrations/e-commerce-and-crm-integrations/crm-integration-hubspot.md)
* [Create or update a contact in HubSpot when a Contact is updated in IS-Messenger](/ismessenger/workspace-setting/integrations/e-commerce-and-crm-integrations/crm-integration-hubspot.md)
**Sending data from HubSpot to IS-Messenger**
* [Create or update a Contact in IS-Messenger when a new contact is added in HubSpot.](/ismessenger/workspace-setting/integrations/e-commerce-and-crm-integrations/crm-integration-hubspot.md)
* [Update a Contact's information in IS-Messenger when the Contact is updated in HubSpot.](/ismessenger/workspace-setting/integrations/e-commerce-and-crm-integrations/crm-integration-hubspot.md)
**Create or update a contact in HubSpot when a new Contact is added in IS-Messenger.**
When a new Contact is added in IS-Messenger, the Zapier template will automatically search for that contact in Hubspot using the email as the identifier. These are the expected outcomes.
| **Trigger Event** | **Conditions** | **Actions** |
| ------------------------------------ | ---------------------------------------------- | ------------------------------------------ |
| New Contact is added in IS-Messenger | Contact exists in HubSpot | Update Contact in HubSpot with new details |
| New Contact is added in IS-Messenger | Contact does not exist in HubSpot | Create a new HubSpot Contact |
| New Contact is added in IS-Messenger | Contact does not have an email in IS-Messenger | Zap will stop |
### **Method**
* Use a Zapier template
### **Template Configuration**
**IS-Messenger Trigger**
First, follow the steps to set up aIS-Messenger[ Zapier integration here](/ismessenger/workspace-setting/integrations.md) to configure the trigger.
Run the trigger test and continue on to the action.
**Filter Action**
Filters by Zapier and multi-step Zaps are only available on [Zapier’s Starter plan](https://zapier.com/app/pricing) and above.
This template contains a filter so the Zap will only continue if the IS-Messenger Contact’s email address exists. This is because HubSpot has set email as the required identifier to be used by Zapier.
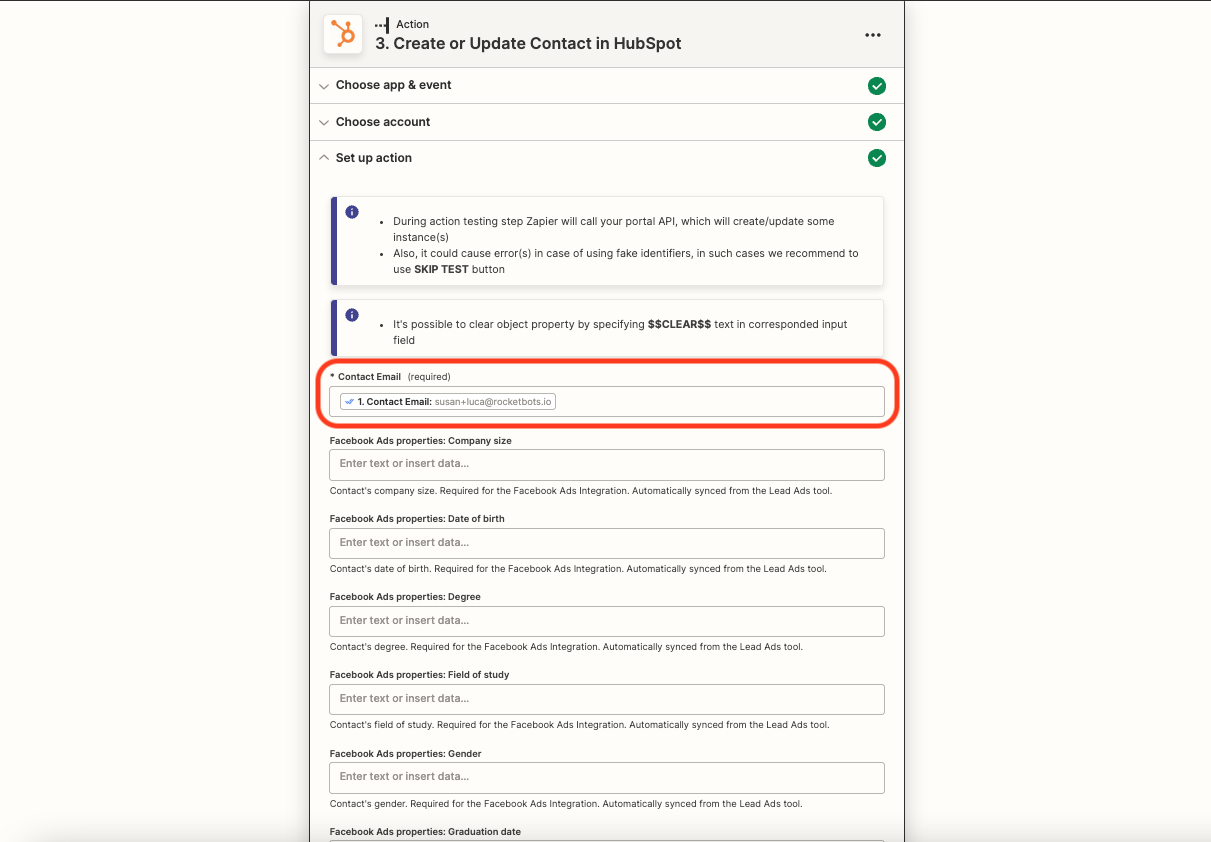
### **HubSpot Action**
Map the fields to be filled in for the newly created Contact. HubSpot has a long list of fields, but email is the only mandatory one. Scroll down and choose any other fields you want to add, e.g., first name, last name, phone number. If you have created [Custom Fields](/ismessenger/workspace-setting/managing-a-workspace.md) in IS-Messenger that match certain HubSpot fields, consider mapping those as well.
### **Create or update a contact in HubSpot when a Contact is updated in IS-Messenger**
When a Contact is updated in IS-Messenger, the Zapier template will automatically search for that contact in Hubspot using the email as the identifier. These are the expected outcomes.
| **Trigger Event** | **Conditions** | **Actions** |
| ---------------------------------- | ---------------------------------------------- | ------------------------------------------ |
| Contact is updated in IS-Messenger | Contact exists in HubSpot | Update Contact in HubSpot with new details |
| Contact is updated in IS-Messenger | Contact does not exist in HubSpot | Create a new HubSpot Contact |
| Contact is updated in IS-Messenger | Contact does not have an email in IS-Messenger | Zap will stop |
**Method**
* Use a Zapier template
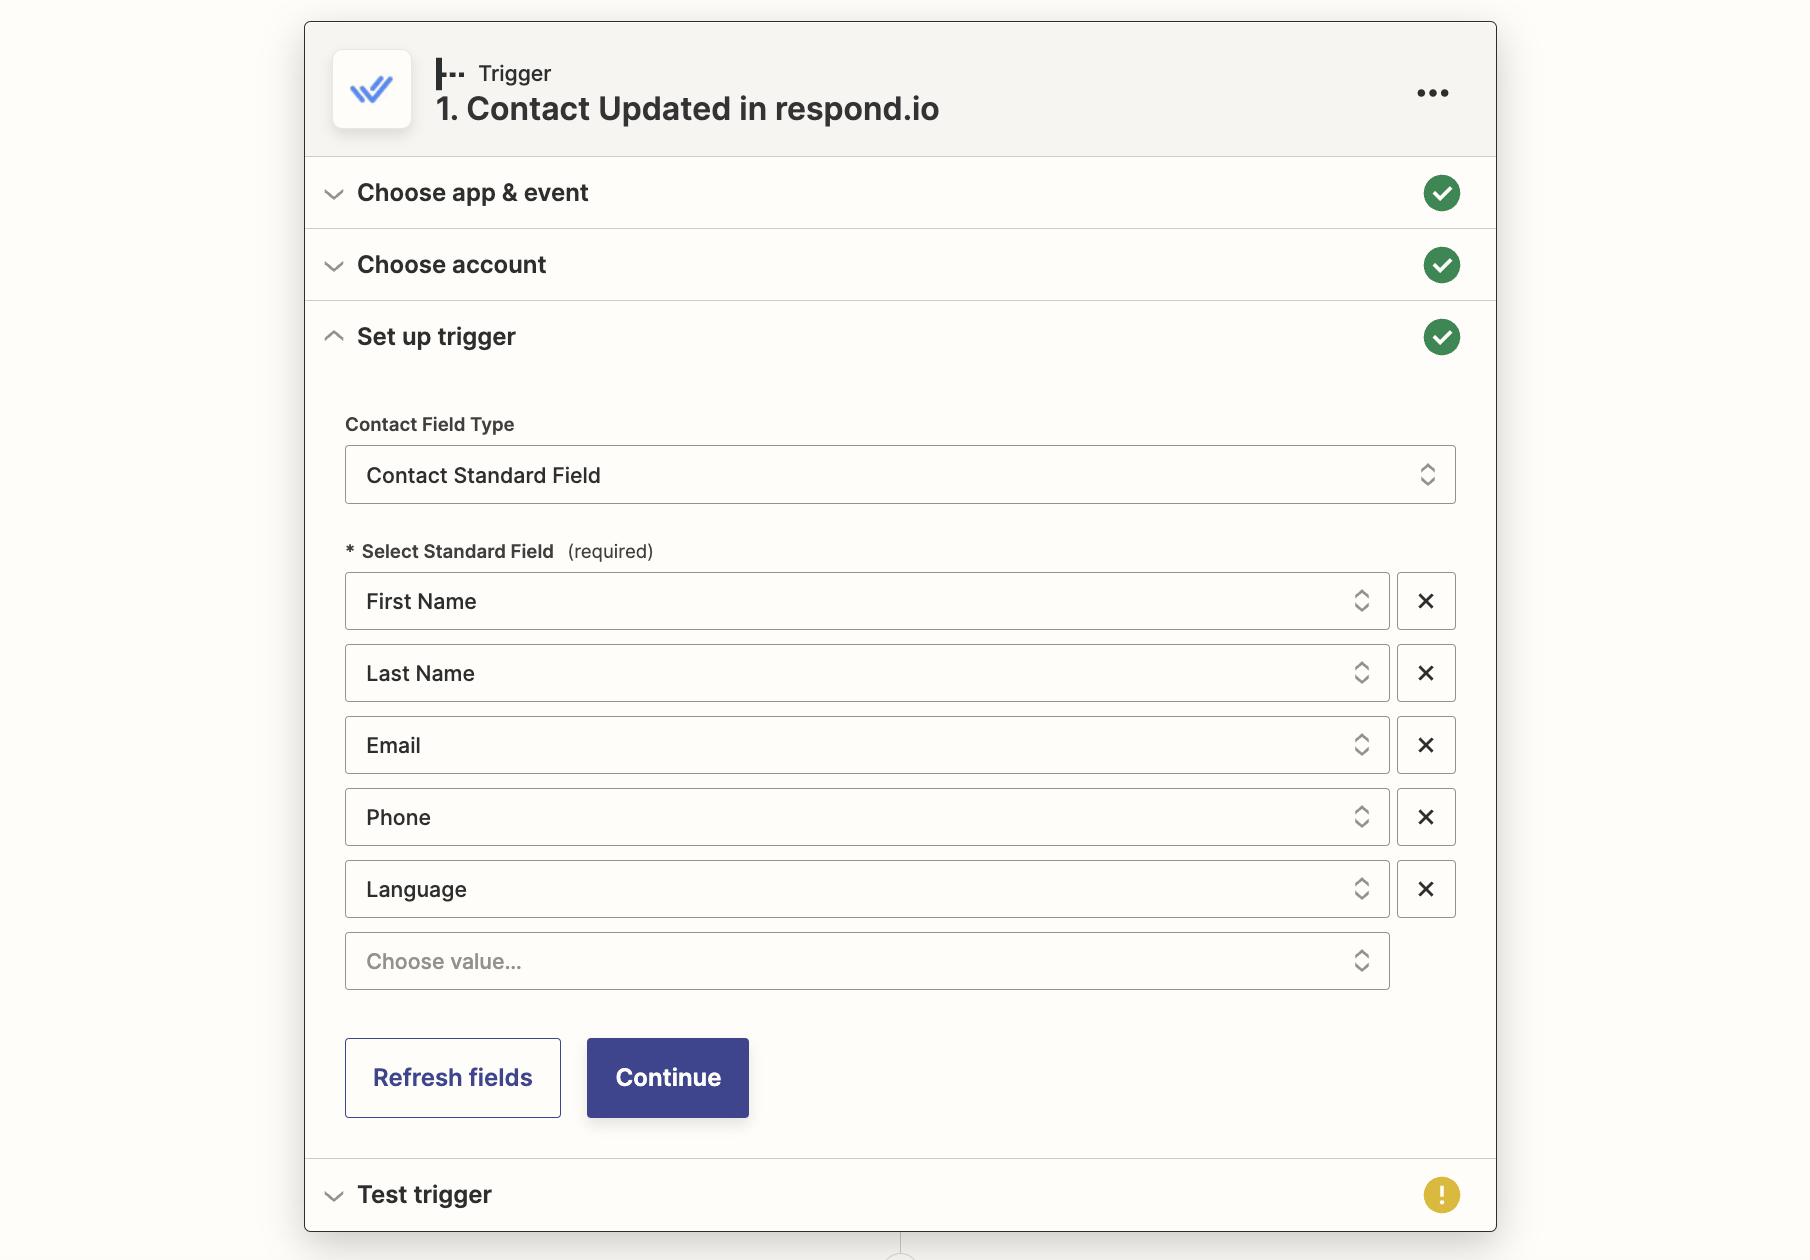
### **IS-Messenger Trigger**
First, follow the steps to set up a IS-Messenger[ Zapier integration here](/ismessenger/workspace-setting/integrations.md).
For this trigger, you’ll need to choose which updated fields you want to be included as a trigger. There is the option to select Standard or Custom. For this example, we chose Standard as this would be the best choice for most common use cases. Add all relevant fields by selecting from the dropdown.
### **Filter Action**
Filters by Zapier and multi-step Zaps are only available on [Zapier’s Starter plan](https://zapier.com/app/pricing) and above.
This template contains a filter so the Zap will only continue if theIS-Messenger Contact’s email address exists. This is because HubSpot has set email as the required identifier to be used by Zapier.
### **HubSpot Action**
Map the fields to be filled in for the newly created or update Contact. HubSpot has a long list of fields, but the only mandatory field is email. Scroll down and choose any other fields you want to add, e.g., first name, last name, phone number. If you have created [Custom Fields](/ismessenger/workspace-setting/managing-a-workspace.md) in IS-Messenger that match certain HubSpot fields, consider mapping those as well.
### **Create or update a Contact in** IS-Messenger **when a new contact is added in HubSpot**
When a new contact is added in HubSpot, the Zapier template will automatically search for that contact in IS-Messenger using email as the identifier. These are the expected outcomes.
| **Trigger Event** | **Conditions** | **Actions** |
| --------------------------- | ----------------------------------------------- | ----------------------------------------------- |
| Contact is added in HubSpot | Contact exists in IS-Messenger with an email | Update Contact in IS-Messenger with new details |
| Contact is added in HubSpot | Contact does not exist in IS-Messenger | Create a new IS-Messenger Contact |
| Contact is added in HubSpot | Contact exists in IS-Messenger without an email | Create a new IS-Messenger Contact\* |
\*If you recognize this has happened, you can [merge the contacts](/ismessenger/modules/contacts.md).
**Method**
* Use a Zapier template
### **Template Configuration**
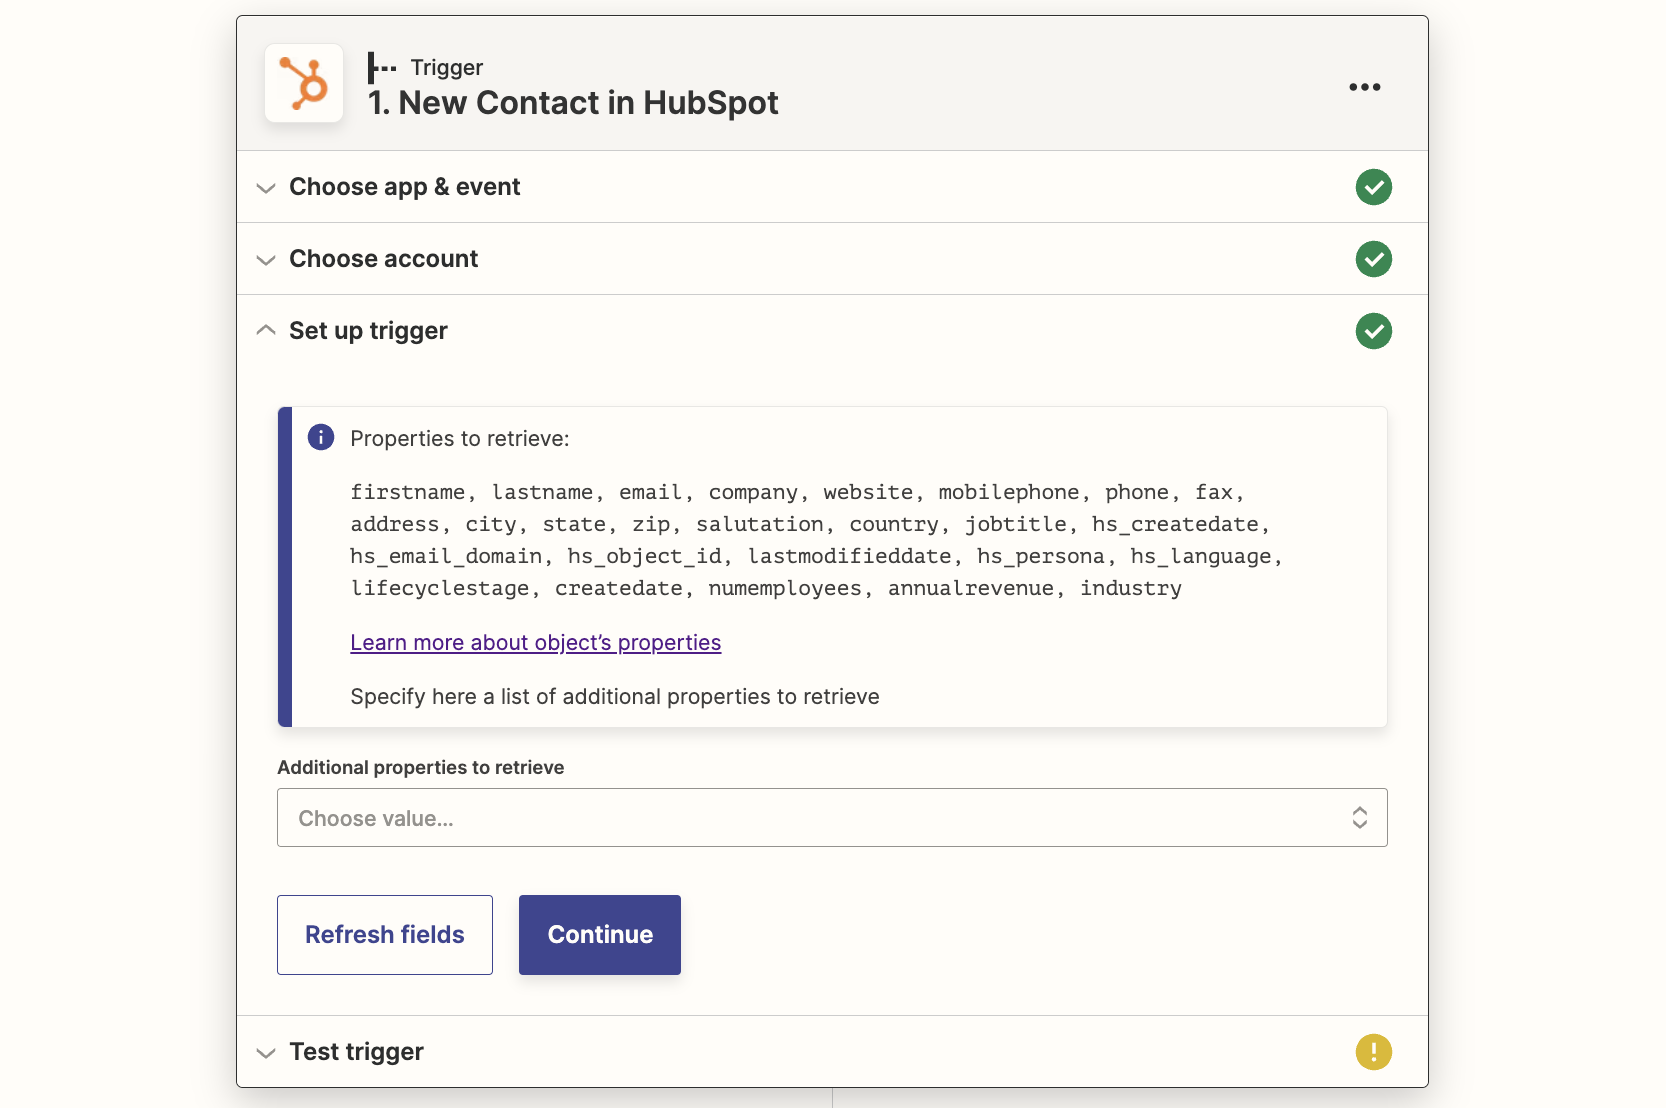
**HubSpot Trigger**
Select your HubSpot account and set up the trigger. For most use cases, simply select Continue. If you have custom fields you want to add, select these from the Additional Properties dropdown.
### **IS-Messenger Action**
{% hint style="warning" %}
First, follow the steps to set up aIS-Messenger[ Zapier integration here](/ismessenger/workspace-setting/integrations.md).
{% endhint %}
Select email as the Identifier Type. Map the other fields with the information you want from HubSpot, e.g., first name, last name, phone number.
### **Update a Contact’s information in IS-Messenger when the Contact is updated in HubSpot**
When a new Contact is added in HubSpot, the Zapier template will automatically search for that contact in IS-Messenger using email as the identifier. These are the expected outcomes.
| **Trigger Event** | **Conditions** | **Actions** |
| ----------------------------- | ----------------------------------------------- | ----------------------------------------------- |
| Contact is updated in HubSpot | Contact exists in IS-Messenger with an email | Update Contact in IS-Messenger with new details |
| Contact is updated in HubSpot | Contact does not exist in IS-Messenger | Create a new IS-Messenger Contact |
| Contact is updated in HubSpot | Contact exists in IS-Messenger without an email | Create a new IS-Messenger Contact\* |
\*If you recognize this has happened, you can [merge the contacts](/ismessenger/modules/contacts.md).
**Method**
Use a Zapier template
### **Template Configuration**
**HubSpot Trigger**
Select your HubSpot account and set up the trigger. For most use cases, simply select Continue. If you have custom fields you want to add, select these from the Additional Properties dropdown.
**IS-Messenger Action**
{% hint style="warning" %}
First, follow the steps to set up a IS-Messenger [ Zapier integration here](/ismessenger/workspace-setting/integrations.md).
{% endhint %}
Select email as the Identifier Type because HubSpot uses email as the required identifier for Zapier. Map the other fields with the information you want from HubSpot, e.g., first name, last name, phone number.
### **Enrich Contact Data using a Workflow**
If you don’t have a Zapier subscription or you only need to get extra details on a particular Contact, use a Workflow. For example, if you’re chatting with someone about a support issue, you can use this Workflow to get additional information about them from HubSpot.
**Method Objectives**
* Provide Contact’s identifier to HubSpot
* Save retrieved data
* Update Contact information on IS-Messenger platform
### **Workflow Setup**
{% hint style="info" %}
**Tip**: Consider using the [Ask for Phone Number or Email method](/ismessenger/support-use-cases/how-to-identify-contacts-by-email-and-phone-numberi.md) earlier in the Workflow.
{% endhint %}
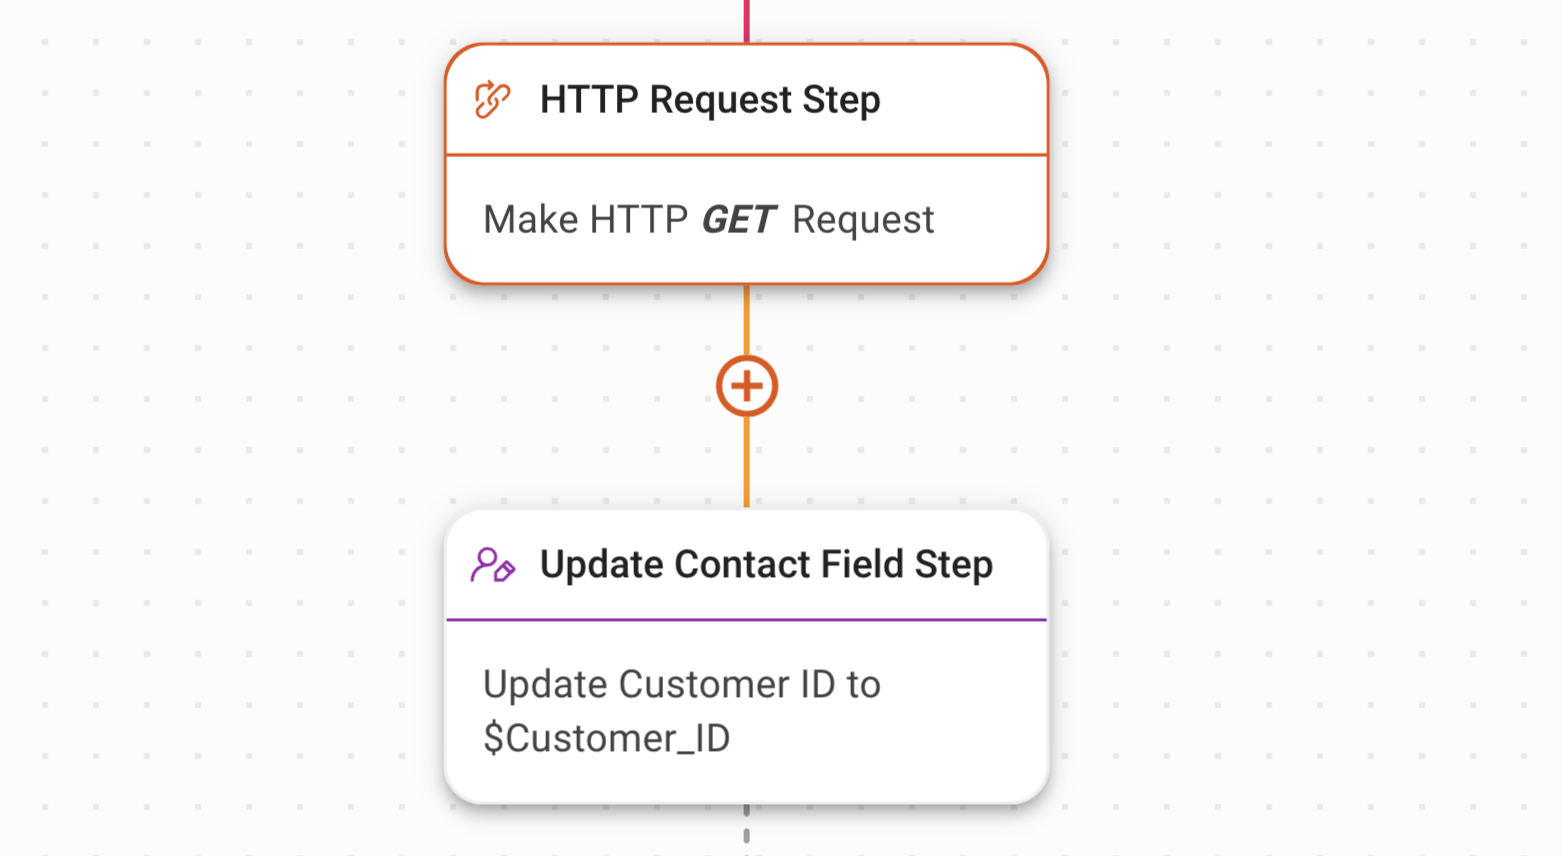
Here’s how to use an HTTP Request to retrieve one field from an external CRM.
### **Provide Contact’s Identifier to your CRM**
{% hint style="info" %}
**Tip**: Learn more about [sending HTTP requests here](/ismessenger/modules/workflow.md).
{% endhint %}
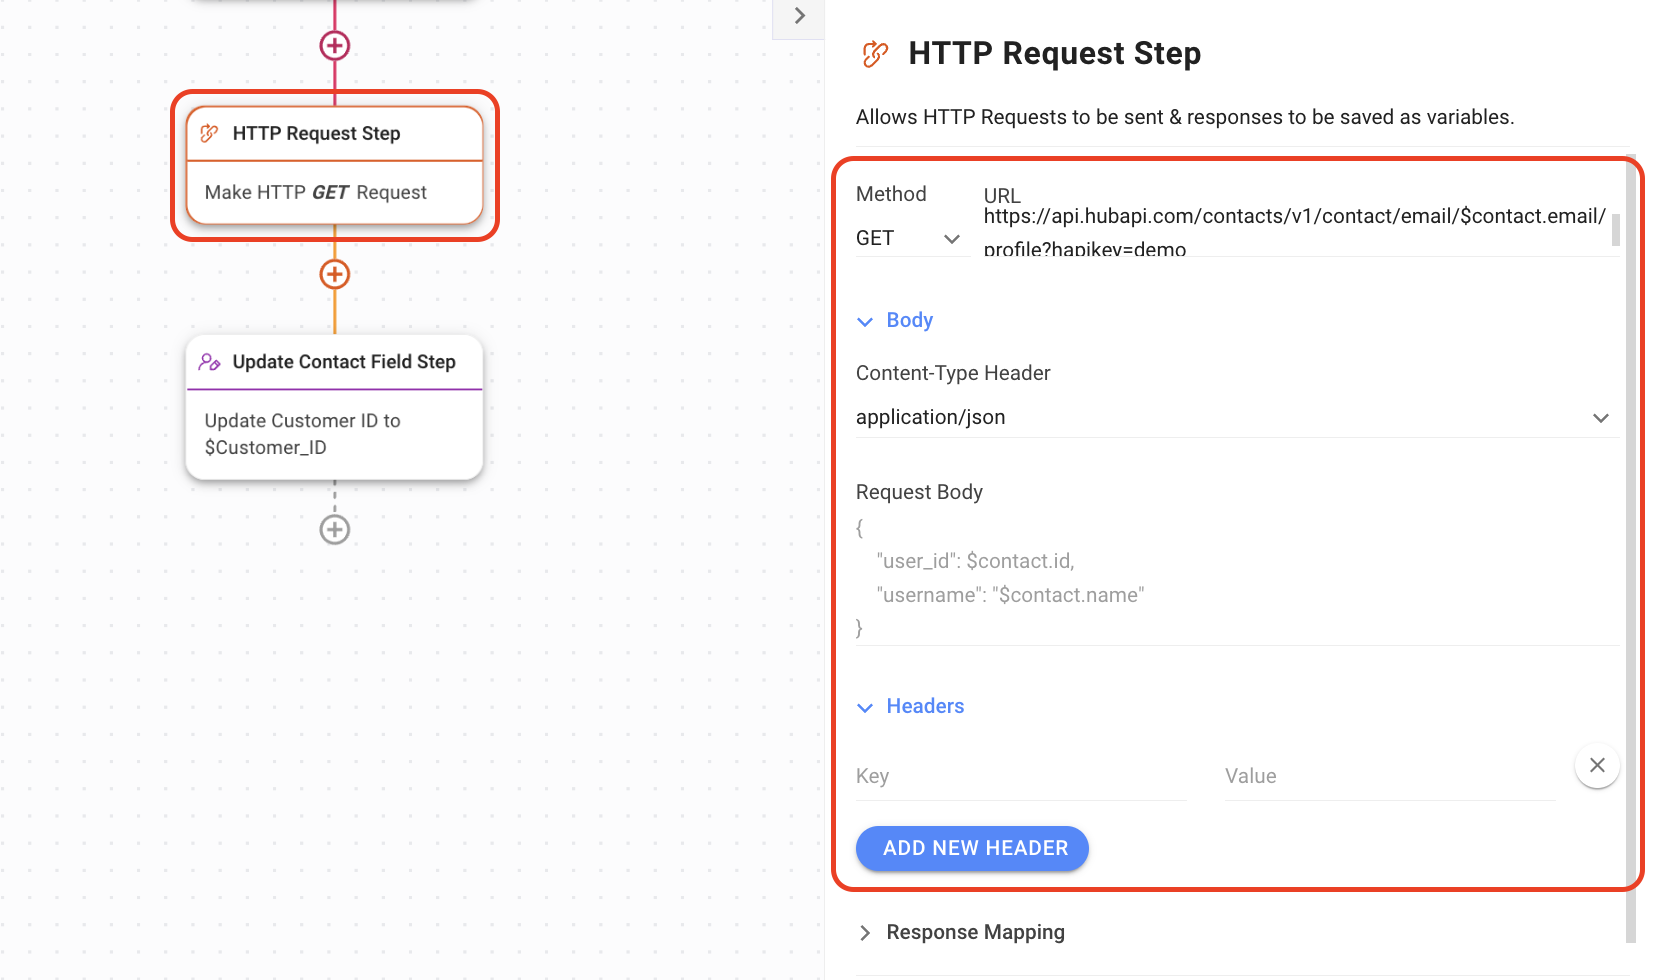
Use the HTTP Request Step to provide the Contact’s identifier to your CRM or business software. In this example, we’ll use Email as the Contact’s identifier. Keep in mind, your CRM may use Email, Phone Number or some other identifier.
HubSpot HTTP Request initial configuration
1\. Add HTTP Request Step and select the request method GET from the dropdown.\
2\. Input the URL endpoint for HubSpot API with your HubSpot API Key (hapikey). Here’s how to get your [HubSpot API Key](https://knowledge.hubspot.com/integrations/how-do-i-get-my-hubspot-api-key).\
3\. Expand Body toggle, select *application/json* as Content-Type Header and leave the Request Body field empty as it’s not required for the *GET* method.\
4\. For the Header toggle, leave the Key and Value field empty as it’s not required by HubSpot.\
\
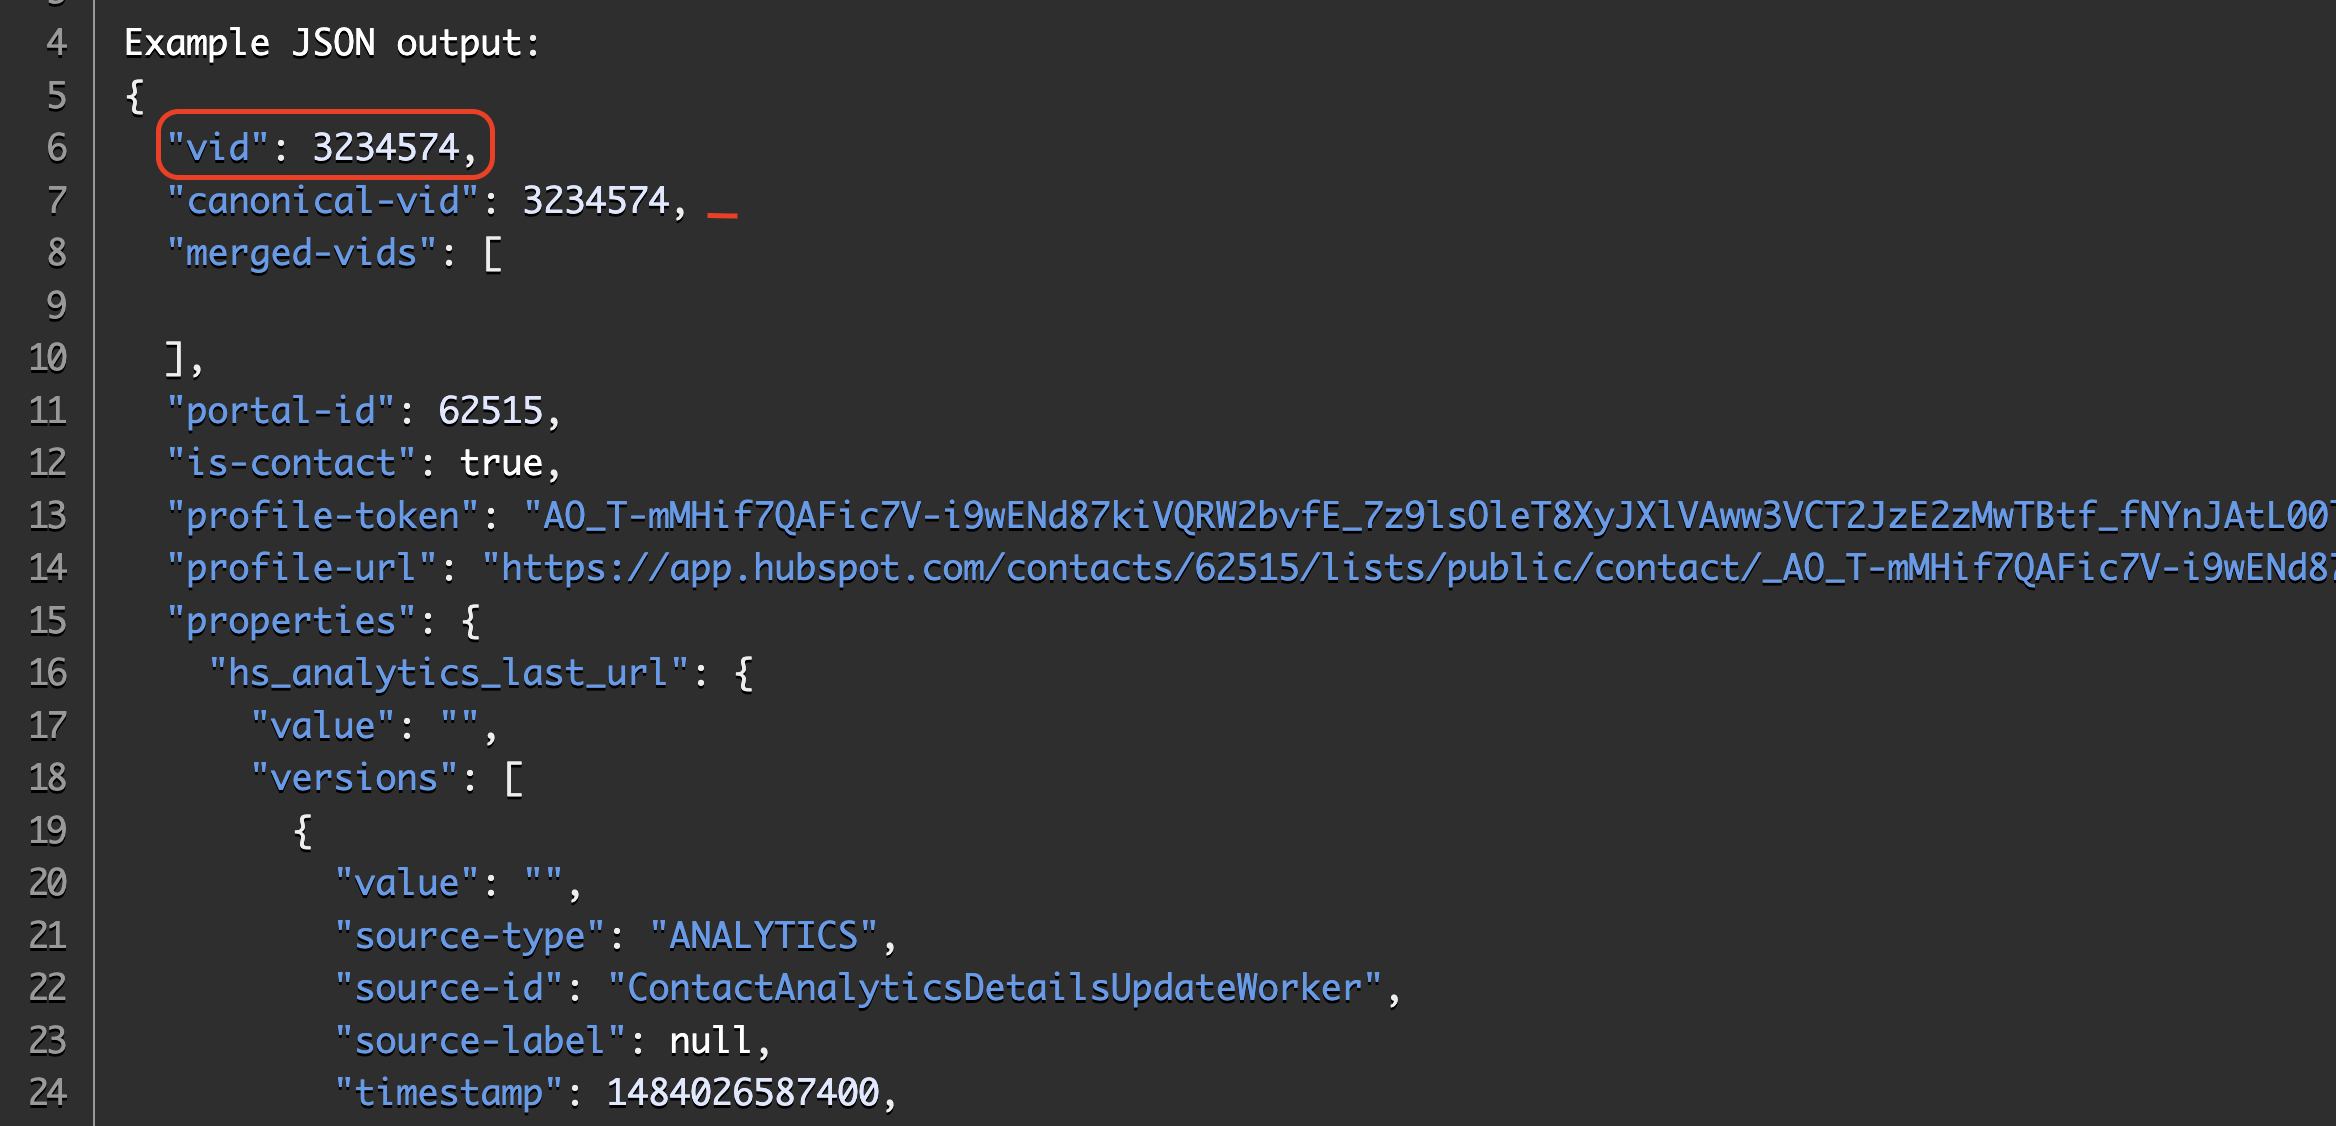
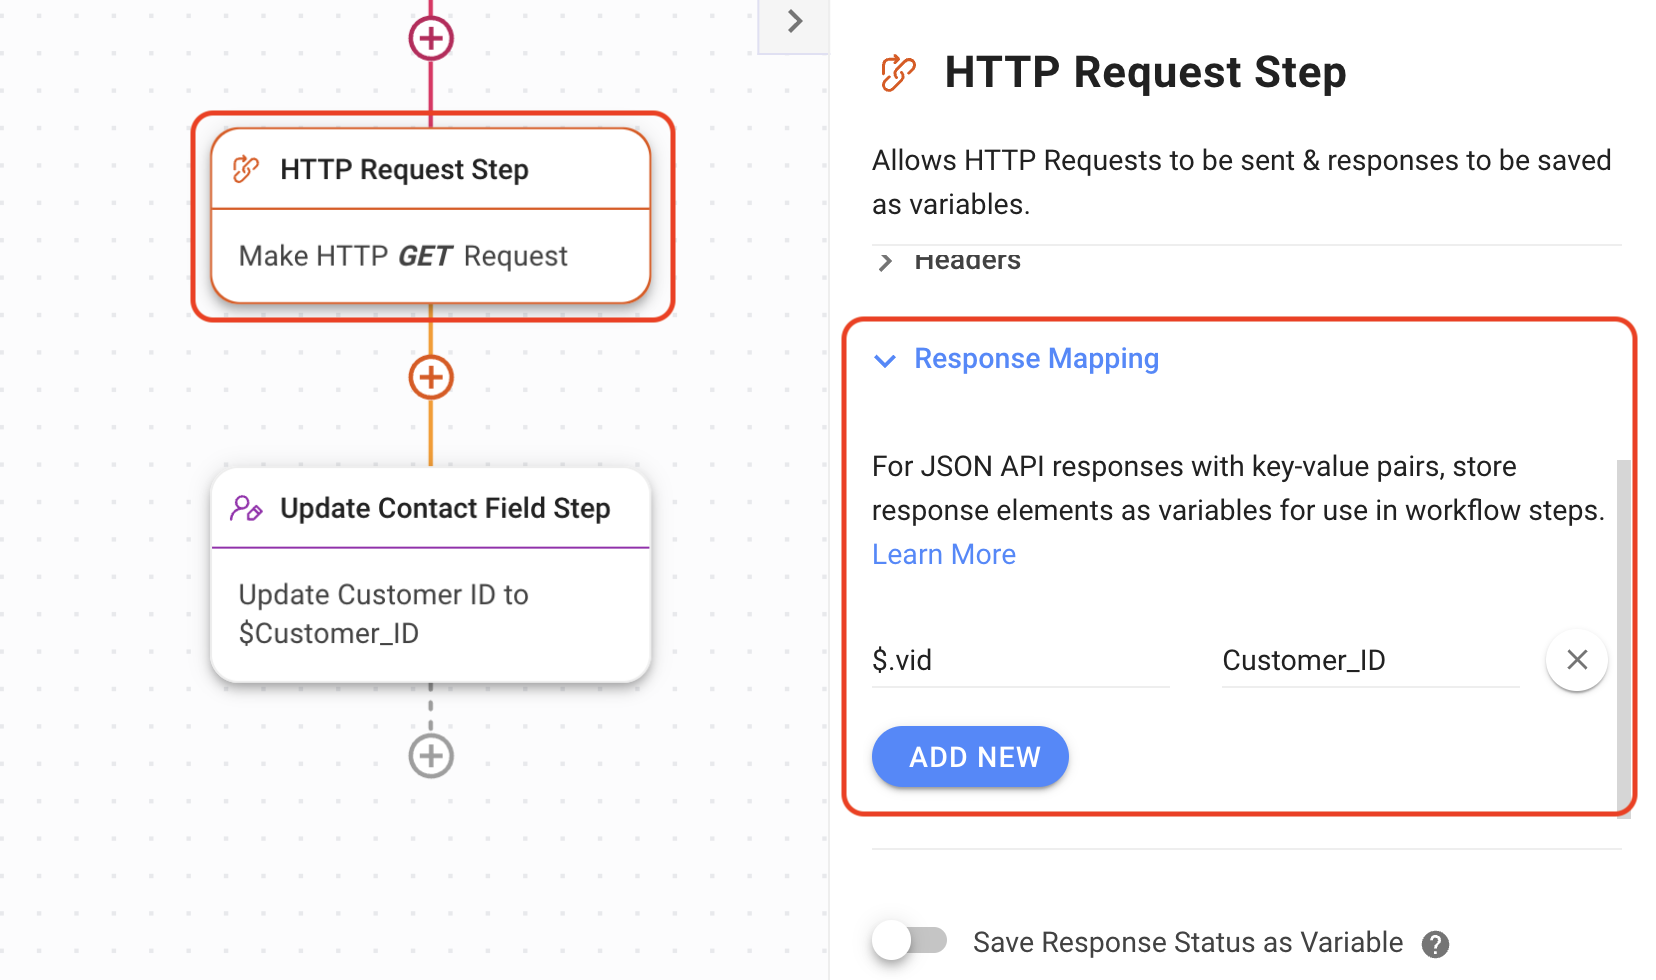
### **Save Retrieved Data**
Response Mapping is used to save the information you get from the CRM as a Variable. The Variable can later be used to update the Contact’s field on IS-Messenger. This example will show you how to save the Customer ID field as a Variable.
HubSpot Response Mapping configuration
In order to map the retrieved data, you’ll need to know what the response looks like. For our HubSpot API call example, we can see the [response sample here](https://legacydocs.hubspot.com/docs/methods/contacts/get_contact_by_email#:~:text=The%20get%20a%20contact%20by,correlate%20contacts%20by%20email%20address). If you want to see what your specific response looks like, use [Postman](https://www.postman.com/).\
\
1\. Pick the fields you want to retrieve. In this example, we’ll retrieve the vid field to get HubSpot Unique Customer ID\
\
\
2\. In the HTTP Request configuration panel, expand the Response Mapping toggle, add *$.vid* in the JSON Key field and give it a Variable name. Here’s [how to fill JSON Key for different response formats](/ismessenger/modules/workflow.md).\
\
\
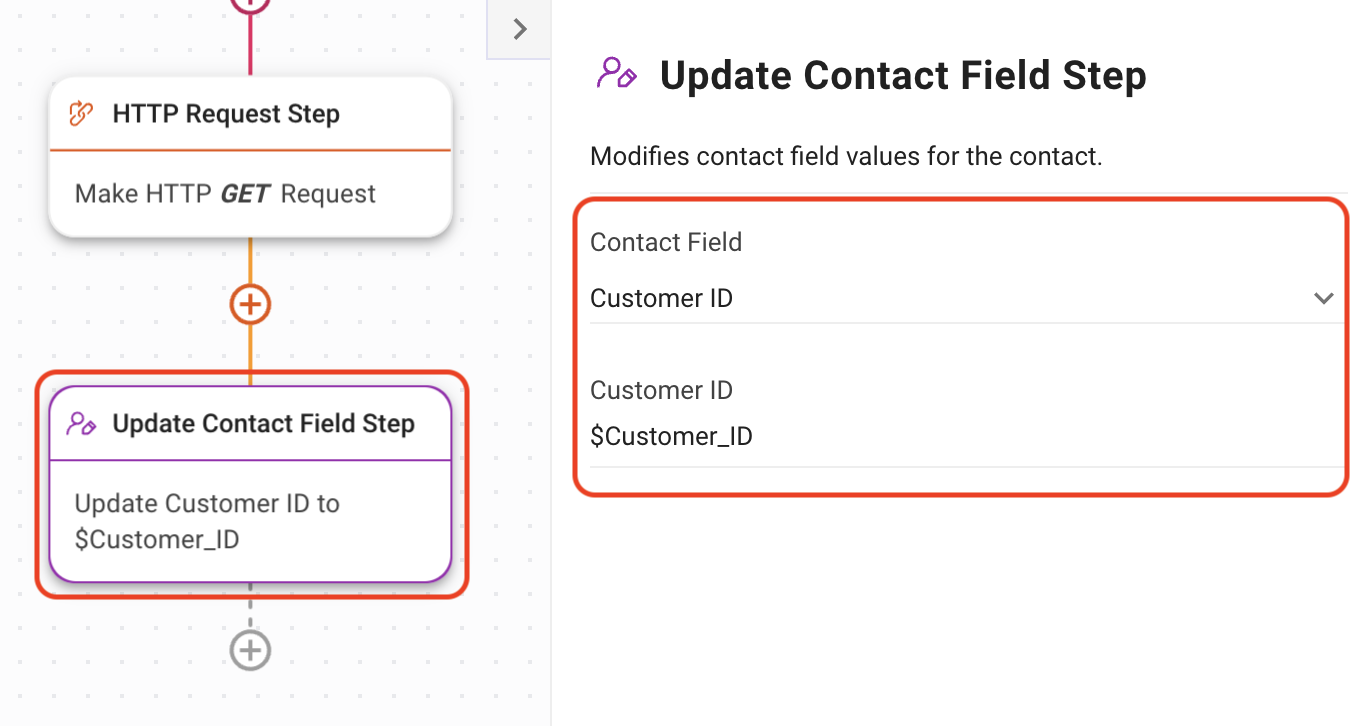
**Update Contact information on IS-Messenger platform**
{% hint style="info" %}
**Tip**: Learn more about [Update Contact Field Step here](/ismessenger/workspace-setting/managing-a-workspace.md).
{% endhint %}
Use Update Contact Field Step to automatically update a Contact’s data in IS-Messenger. Here’s an example of how to update one field.
Update Contact Field configuration
1. Add Update Contact Field Step and select the field you want to save from dropdown.
2. Input in the field with the Variable from the Response Mapping section.\
\
---
# Agent Instructions: Querying This Documentation
If you need additional information that is not directly available in this page, you can query the documentation dynamically by asking a question.
Perform an HTTP GET request on the current page URL with the `ask` query parameter:
```
GET https://docs.is-messenger.com/ismessenger/workspace-setting/integrations/e-commerce-and-crm-integrations/crm-integration-hubspot.md?ask=
```
The question should be specific, self-contained, and written in natural language.
The response will contain a direct answer to the question and relevant excerpts and sources from the documentation.
Use this mechanism when the answer is not explicitly present in the current page, you need clarification or additional context, or you want to retrieve related documentation sections.