# E-Commerce Integration: Shopify
{% hint style="success" %}
Business Goal 1: [Automatically sync Contact information in Shopify and IS-Messenger. ](/ismessenger/workspace-setting/integrations/e-commerce-and-crm-integrations/e-commerce-integration-shopify.md)
{% endhint %}
{% hint style="success" %}
Business Goal 2: [Manage orders and carts by sending customers messages and keeping agents up-to-date on status changes](/ismessenger/workspace-setting/integrations/e-commerce-and-crm-integrations/e-commerce-integration-shopify.md).
{% endhint %}
### Prerequisites for integrating IS-Messenger with Shopify using Zapier
Shopify uses email as the required Zapier identifier for contacts. To send information between IS-Messenger and Shopify, you’ll need to:
* ensure you have Contacts’ email addresses in IS-Messenger. To automatically collect Contacts’ emails in IS-Messenger, consider using [Workflows](/ismessenger/modules/workflow.md).
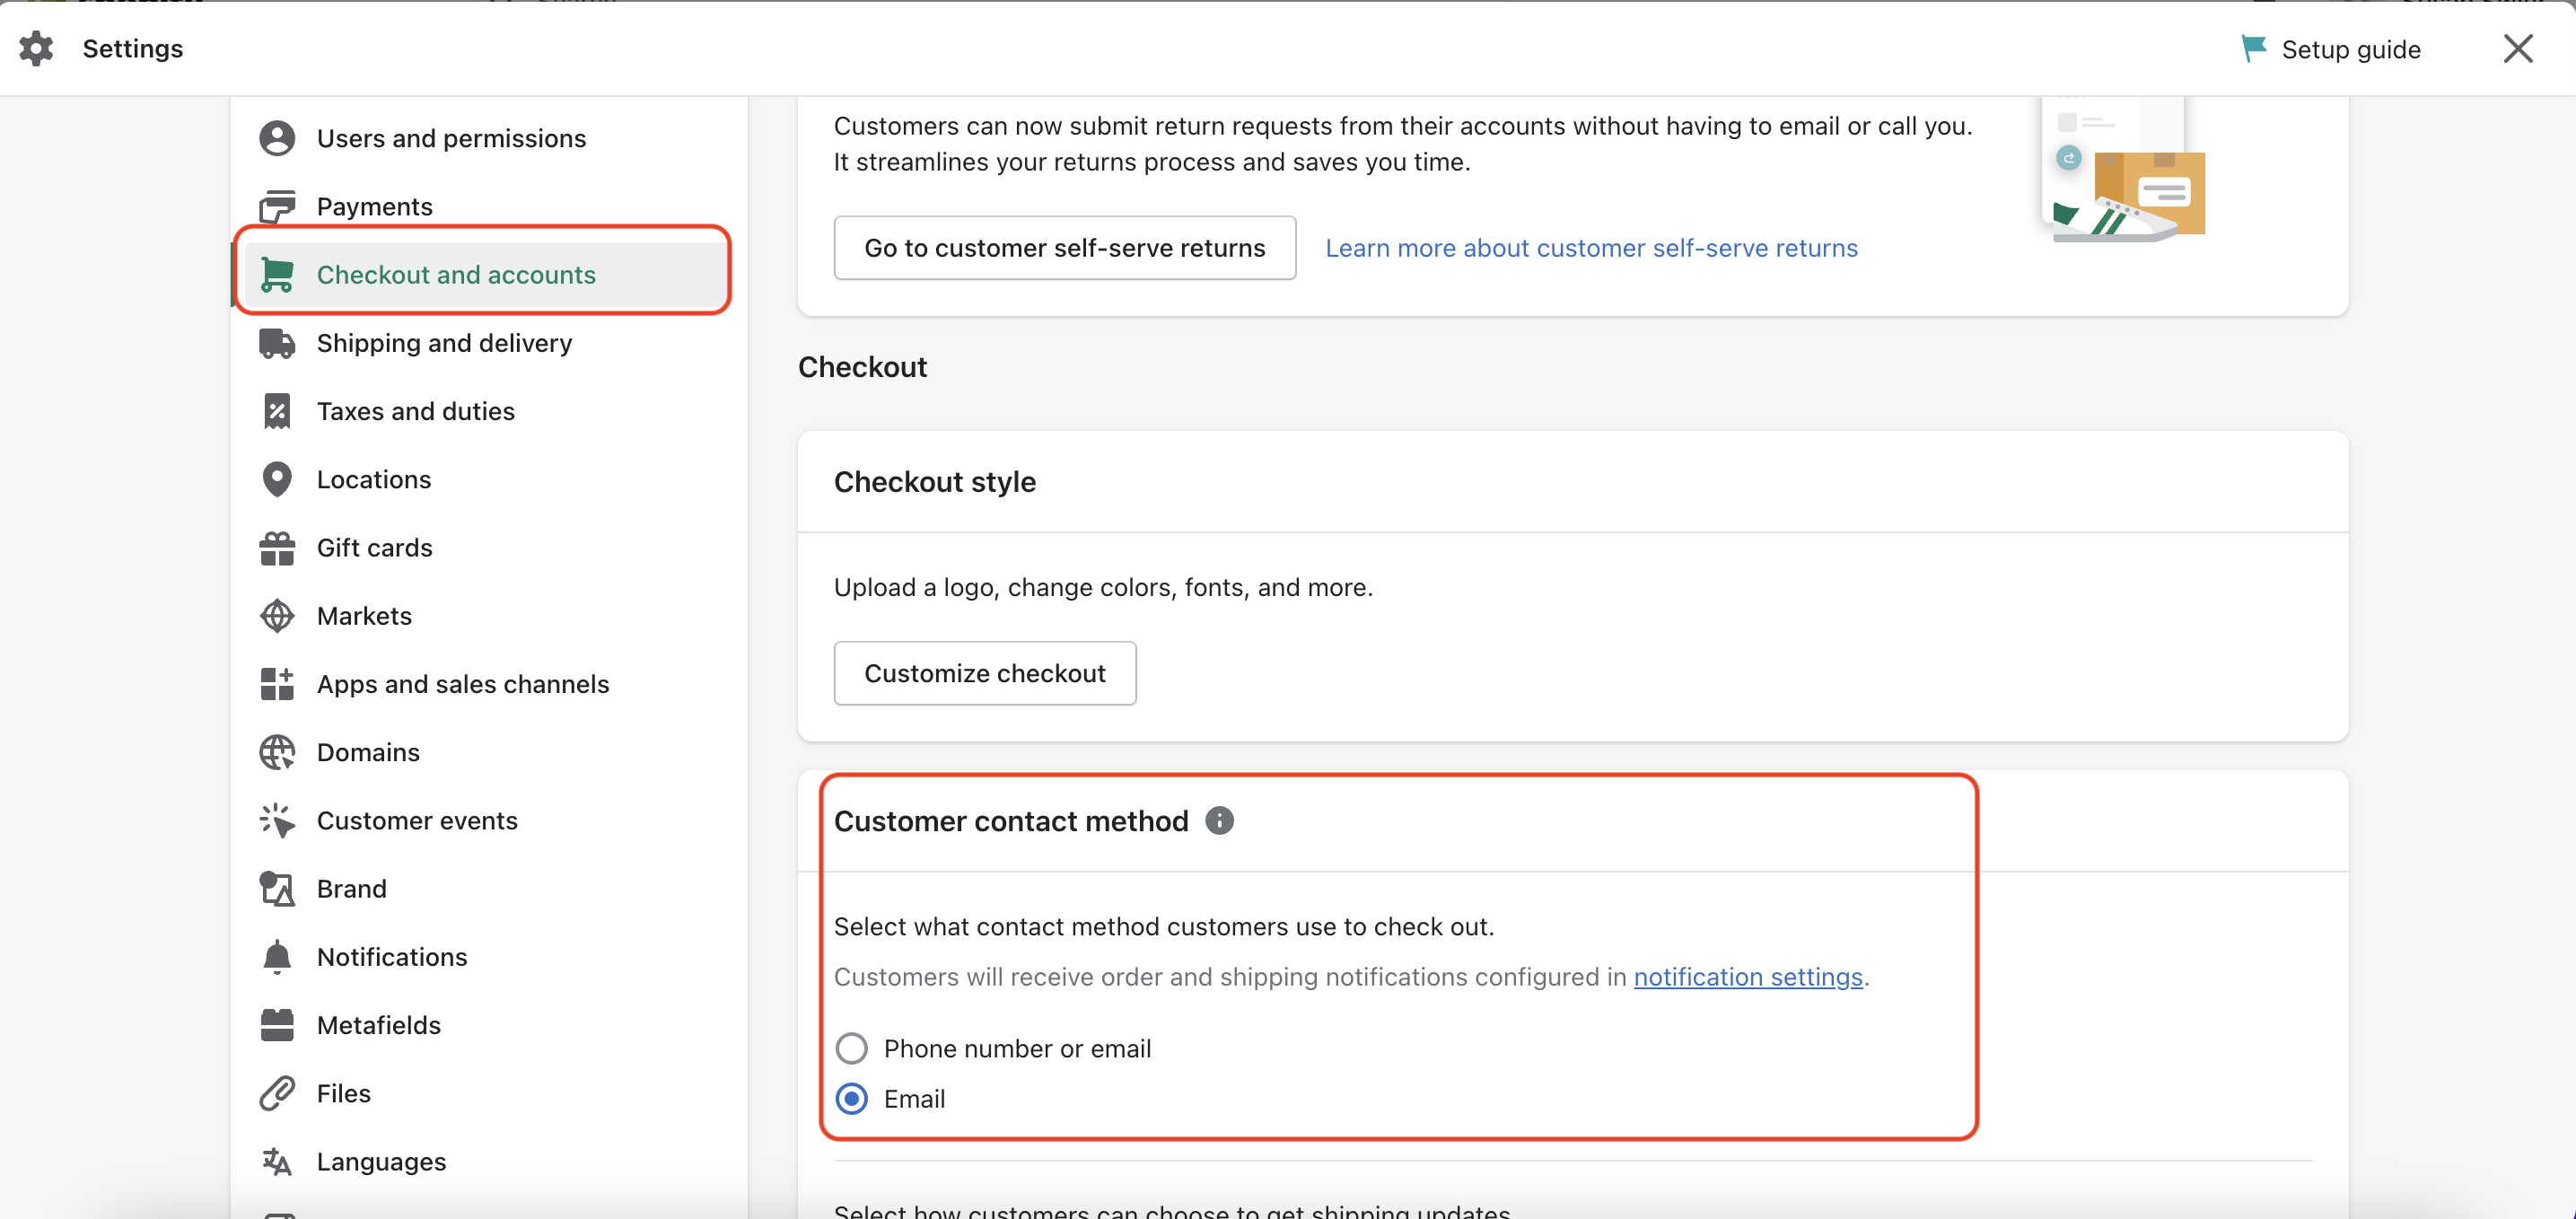
* ensure customers check out with an email address. To do this, go to Shopify Settings > Checkout and accounts > Customer contact method > select email.
### Automatically sync Contact information in Shopify and IS-Messenger
{% hint style="warning" %}
Check if you have the [necessary Contact identifiers and settings](/ismessenger/workspace-setting/integrations/e-commerce-and-crm-integrations/e-commerce-integration-shopify.md) for your Zaps to work.
{% endhint %}
### **Understanding Contact Syncing Logic**
There are four tasks that you can automate in order to sync contacts.
### **Sending data from IS-Messenger to Shopify**
* [Create a customer in Shopify when a new Contact is added in IS-Messenger](/ismessenger/workspace-setting/integrations/e-commerce-and-crm-integrations/e-commerce-integration-shopify.md)
* [Update a customer’s information in Shopify when it is updated in IS-Messenger](/ismessenger/workspace-setting/integrations/e-commerce-and-crm-integrations/e-commerce-integration-shopify.md)
### **Sending data from Shopify to IS-Messenger**
* [Create or update a Contact in IS-Messenger when a new customer is added in Shopify.](/ismessenger/workspace-setting/integrations/e-commerce-and-crm-integrations/e-commerce-integration-shopify.md)
* [Create or update a Contact’s information in IS-Messenger when a customer is updated in Shopify.](/ismessenger/workspace-setting/integrations/e-commerce-and-crm-integrations/e-commerce-integration-shopify.md)
### **Create a customer in Shopify when a new Contact is added in IS-Messenger**
When a new Contact is added in IS-Messenger, the Zapier template will automatically search for that contact in Shopify using the email as the identifier. These are the expected outcomes.
| **Trigger Event** | **Conditions** | **Outcomes** |
| ------------------------------------ | ---------------------------------------------- | ----------------------------- |
| New Contact is added in IS-Messenger | Customer exists in Shopify | Zap will stop |
| New Contact is added in IS-Messenger | Customer does not exist in Shopify | Create a new Shopify customer |
| New Contact is added in IS-Messenger | Contact does not have an email in IS-Messenger | Zap will stop |
**Method**
* Use a Zapier template
**How-to**
Use this template:
Add new IS-Messenger contacts as Shopify customers.
**Template Configuration**
### **IS-Messenger Trigger - New Contact**
{% hint style="warning" %}
First, follow the steps to set up a IS-Messenger Zapier integration here and set up your IS-Messenger trigger.
{% endhint %}
Test the trigger and continue to the next step.
**Filter Action**
{% hint style="warning" %}
Filters by Zapier and multi-step Zaps are only available on [Zapier’s Starter plan](https://zapier.com/app/pricing) and above.
{% endhint %}
{% hint style="warning" %}
Create a [Custom Field](/ismessenger/modules/workflow.md) in IS-Messenger and name it `Contact Note`.
{% endhint %}
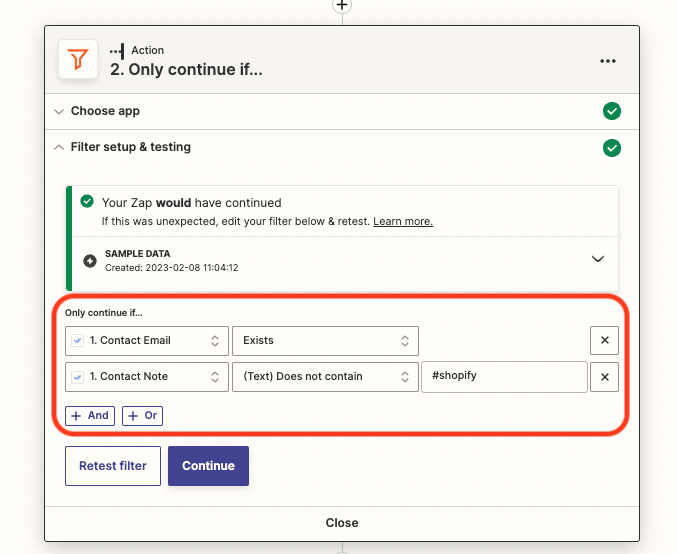
Only continue if…
* **Contact Email exists in IS-Messenger** This is because Shopify uses email as a required identifier for Zapier.
* Select **+And** to add **Contact Note in IS-Messenger does not contain #shopify.** This is necessary to prevent a [Zap loop](/ismessenger/workspace-setting/integrations.md) due to Zapier’s limitations on contact syncing.
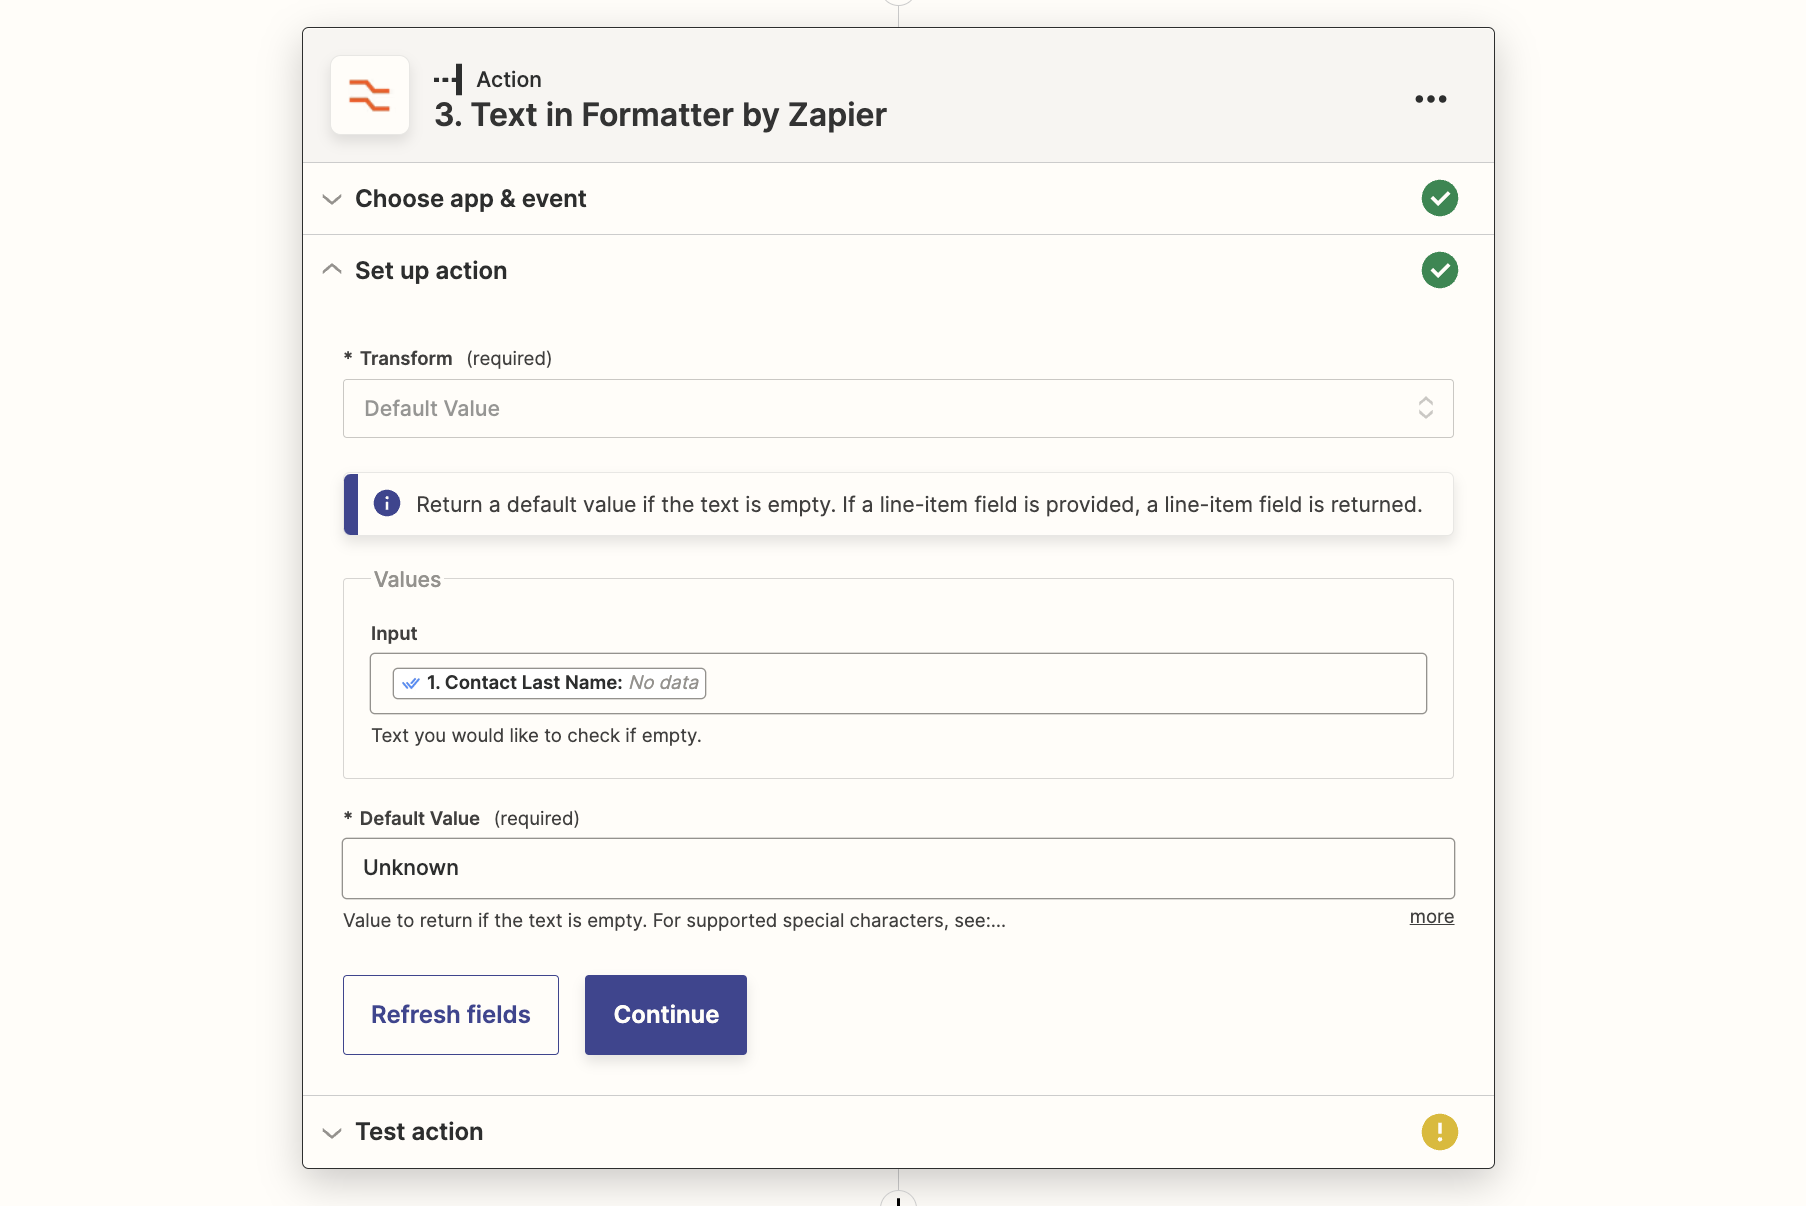
### **Formatter Action**
`Last name` is required by Shopify to complete a Zap. This action will fill in the `last name` field if IS-Messenger Contacts do not have a last name on record. Most of the configuration is already done by the template. Simply fill in “Unknown” or any other default value you want to use.
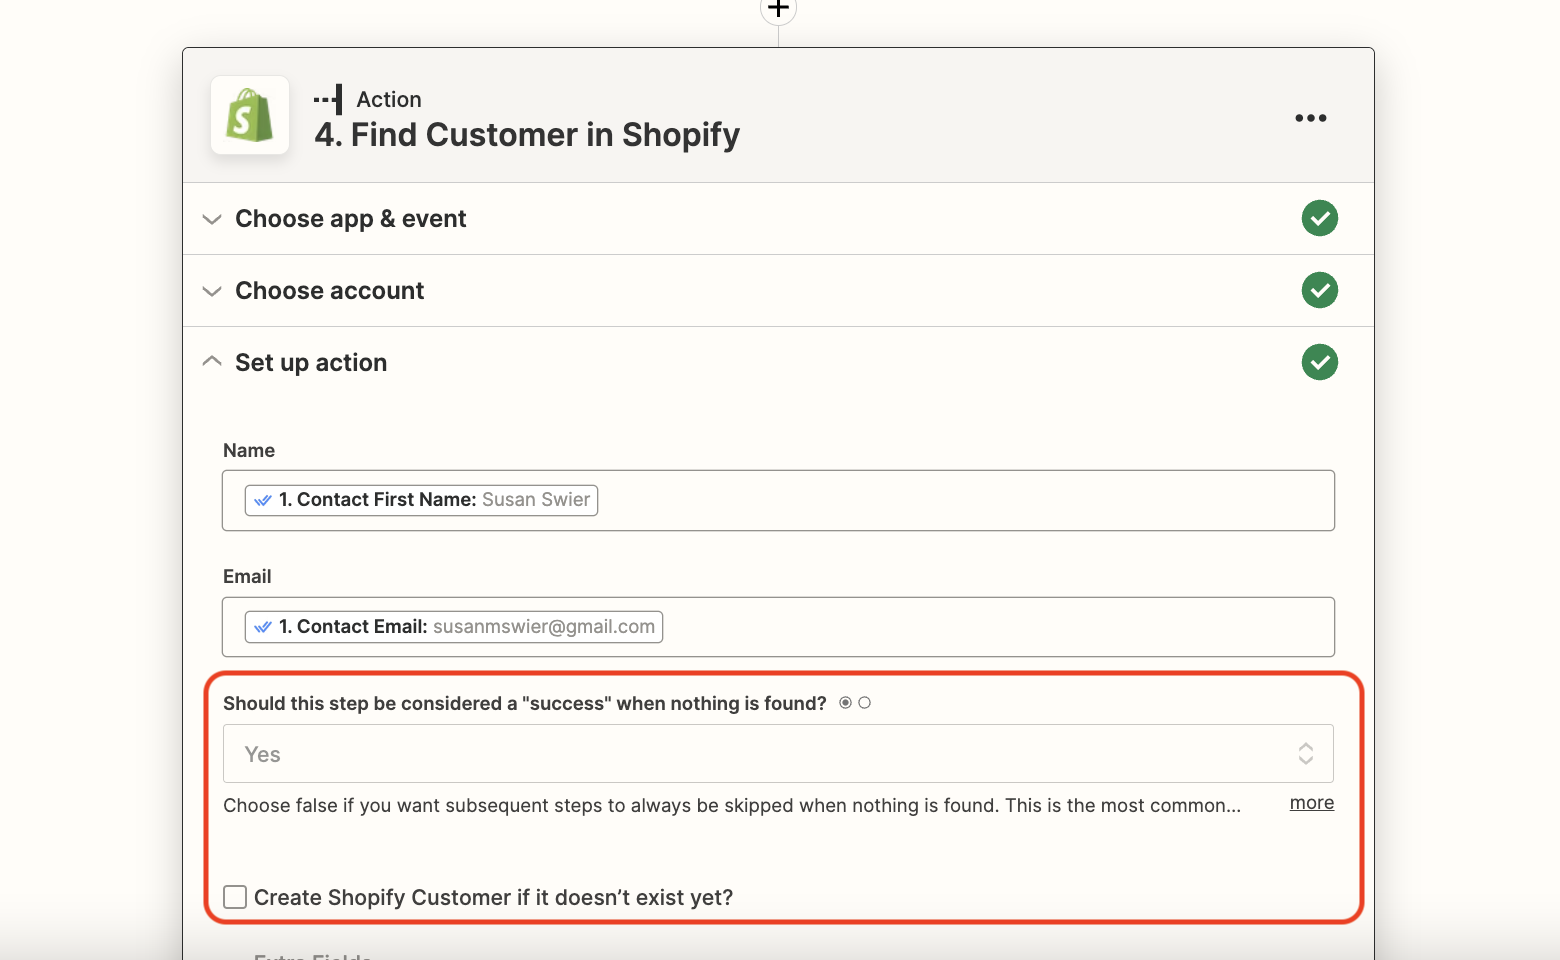
### **Shopify Action - Find Customer**
Select your Shopify account and continue to set up the action. Map the name and email fields to identify the Contact > choose **Yes** for the step to be considered a success when nothing is found > tick **create Shopify Customer if it doesn’t exist yet**.
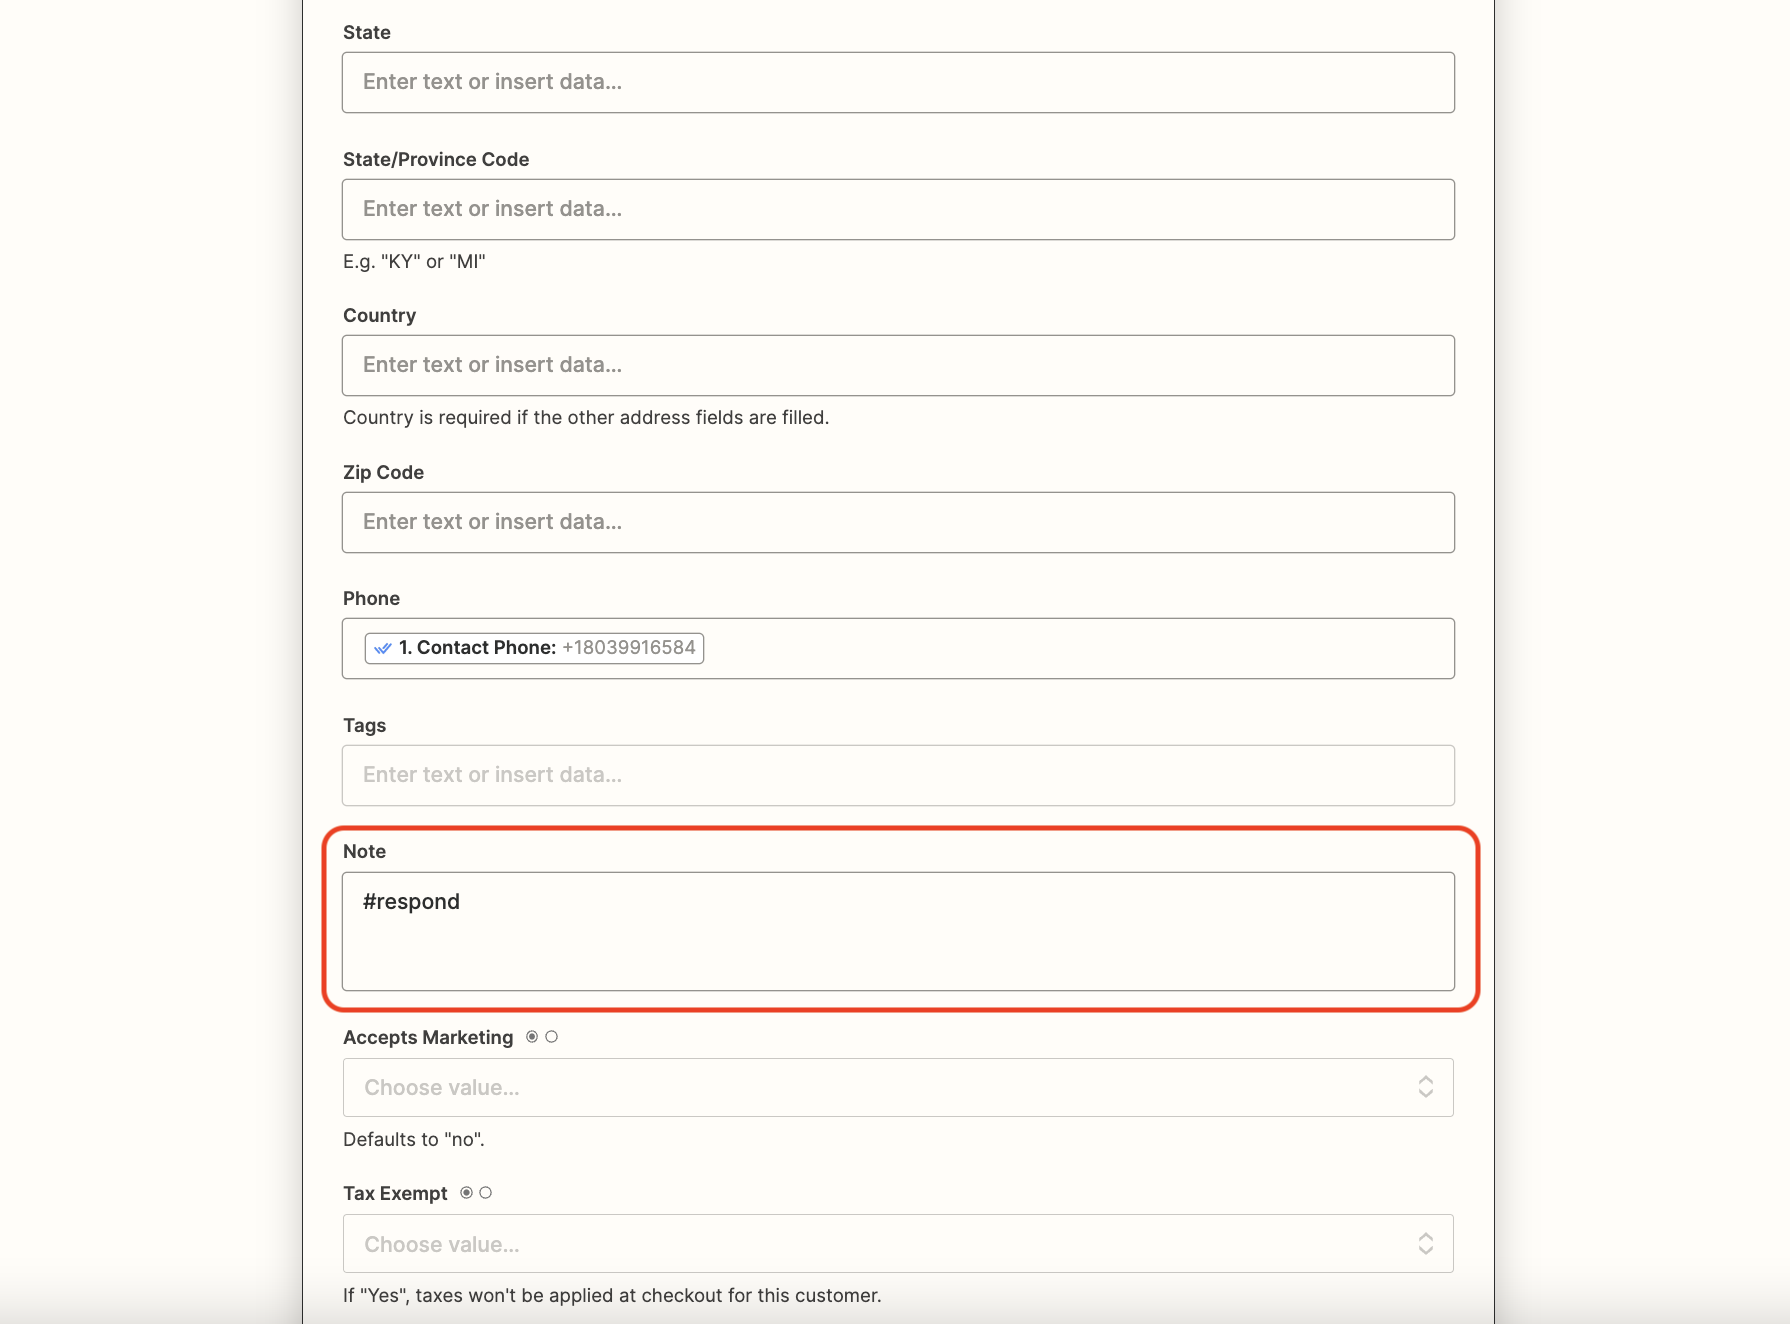
Map the fields to be filled in for the newly created customer.
* Fill in email and last name (mandatory fields).
* Fill in the Note field with #respond to prevent [Zap loops](/ismessenger/workspace-setting/integrations.md) (this is case sensitive).
* Choose any other fields you want to add.
* If you have [Custom Fields](/ismessenger/workspace-setting/managing-a-workspace.md) in IS-Messenger that match certain Shopify fields, consider mapping those as well.
### **Update a customer’s information in Shopify when it is updated in IS-Messenger**
When a Contact is updated in IS-Messenger, the Zapier template will automatically search for that contact in Shopify using the email as the identifier. These are the expected outcomes.
| **Trigger Event** | **Conditions** | **Outcomes** |
| -------------------------------------- | ---------------------------------------------- | ------------------------------------------ |
| Contact is updated in **IS-Messenger** | Customer exists in Shopify | Customer information is updated in Shopify |
| Contact is updated in **IS-Messenger** | Customer does not exist in Shopify | New Customer is created in Shopify |
| Contact is updated in **IS-Messenger** | Contact in IS-Messenger does not have an email | Zap will stop |
### **Method**
* Use a Zapier template
### **Template Configuration**
**IS-Messenger Trigger - Contact Updated**
{% hint style="warning" %}
First, follow the steps to set up a IS-Messenger Zapier integration here and set up your IS-Messenger trigger.
{% endhint %}
Test the trigger and continue to the next step.
**Filter Action**
{% hint style="warning" %}
Filters by Zapier and multi-step Zaps are only available on [Zapier’s Starter plan](https://zapier.com/app/pricing) and above.
{% endhint %}
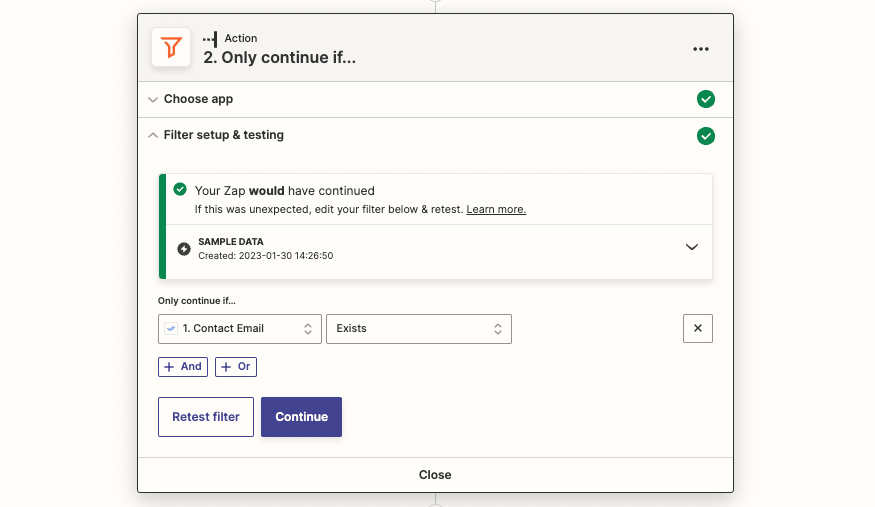
Only continue if…
* **Contact Email exists in** **IS-Messenger**. This is because Shopify uses email as a required identifier for Zapier.
### **Formatter Action**
`Last name` is required by Shopify to complete a Zap. This action will fill in the `last name` field if IS-Messenger Contacts do not have a last name on record. Most of the configuration is already done by the template. Simply fill in “Unknown” or any other default value you want to use.
### **Shopify Action - Find Customer in Shopify**
Select your Shopify account and continue to set up the action. Map the name and email fields to identify the Contact > choose **Yes** for the step to be considered a success when nothing is found > tick **create Shopify Customer if it doesn’t exist yet.**
Map the fields to be filled in for the newly created customer.
* Fill in email and last name (mandatory fields).
* Fill in the Note field with #respond to prevent [Zap loops](/ismessenger/workspace-setting/integrations.md) (this is case sensitive).
* Choose any other fields you want to add.
* If you have [Custom Fields](/ismessenger/workspace-setting/managing-a-workspace.md) in IS-Messenger that match certain Shopify fields, consider mapping those as well.
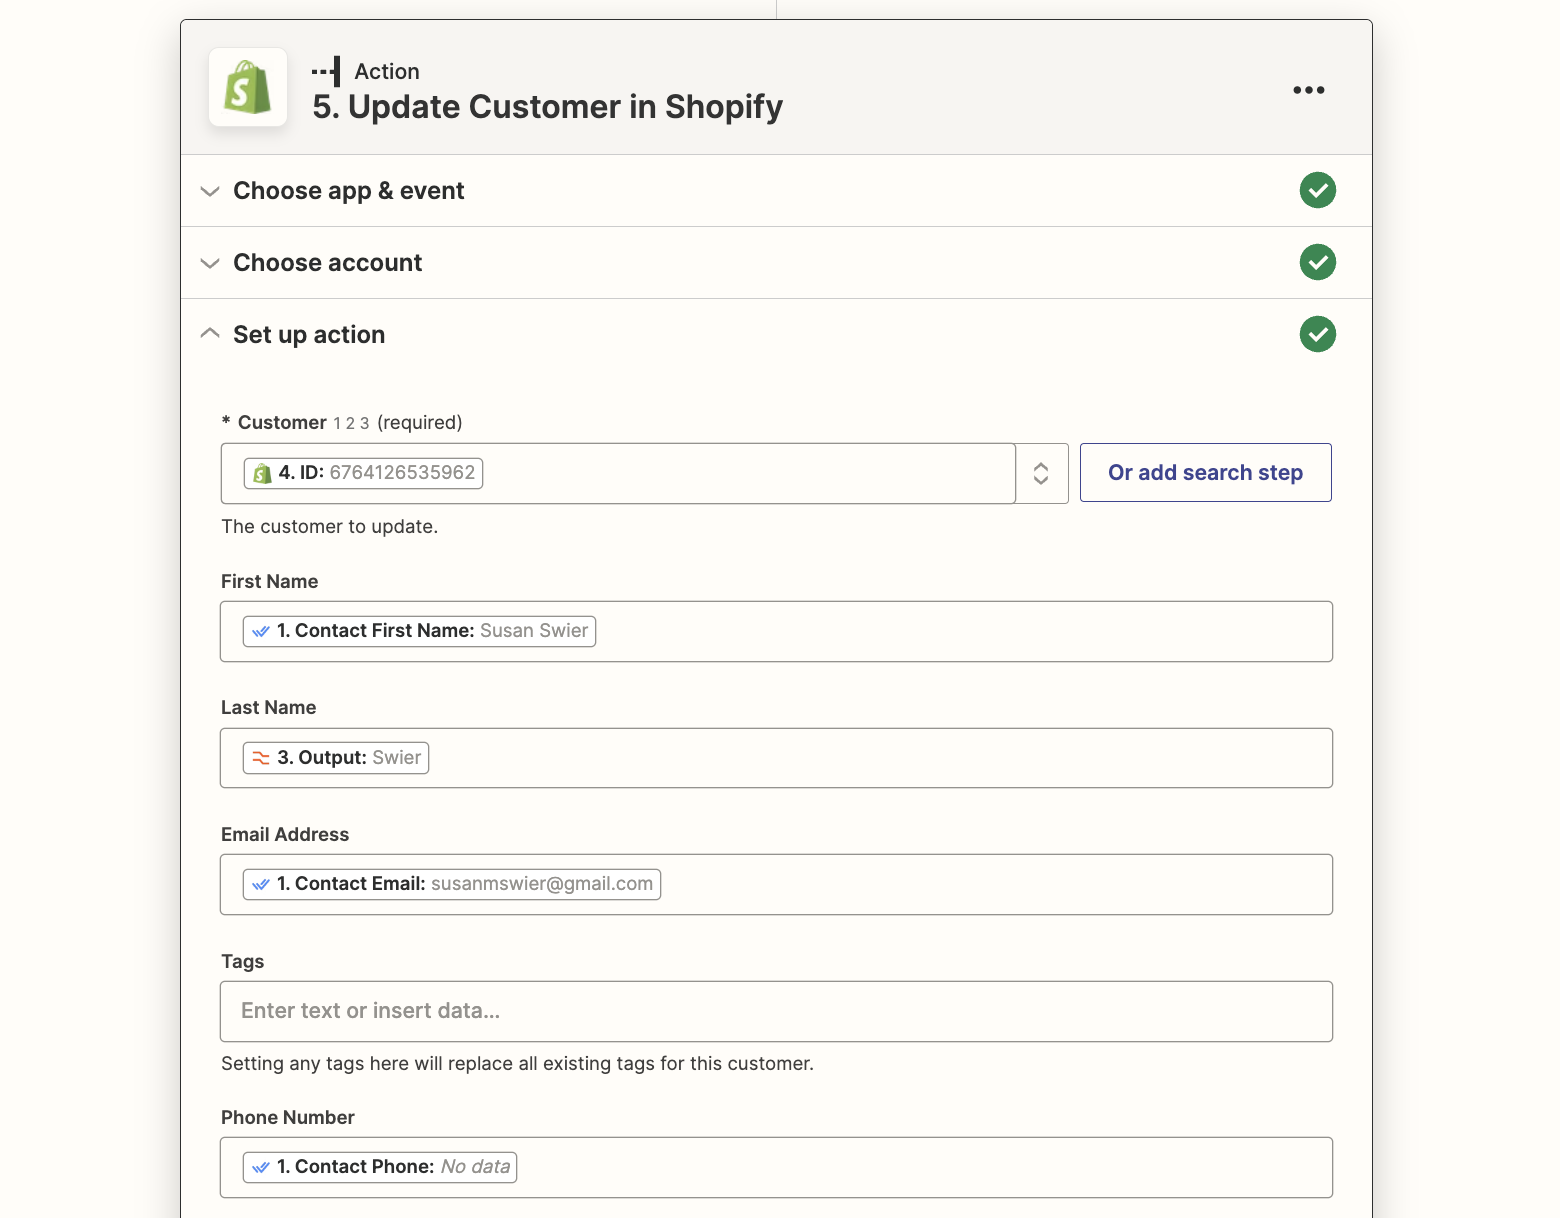
**Shopify Action - Update Customer in Shopify**
Map the fields you want to fill in to update customer in Shopify.
* Choose Shopify Customer ID as the customer identifier.
* Fill in Last Name with the Output value from the Formatter step.
* Choose any other fields to be updated.
### **Create or update a Contact in IS-Messenger when a new customer is added in Shopify**
When a new customer is added in Shopify, the Zapier template will automatically search for that contact in IS-Messenger using email as the identifier. These are the expected outcomes.
| **Trigger Event** | **Conditions** | **Outcomes** |
| -------------------------------- | ----------------------------------------------- | --------------------------------------------------- |
| New customer is added in Shopify | Contact exists in IS-Messenger | Update Contact in IS-Messenger with any new details |
| New customer is added in Shopify | Contact does not exist in IS-Messenger | Create a new IS-Messenger Contact |
| New customer is added in Shopify | Contact exists in IS-Messenger without an email | Create a new IS-Messenger Contact |
### **Method**
* Use a Zapier template
**How-to**
Use this template:
Add new Shopify customers as IS-Messenger contacts
### **Template Configuration**
#### **Shopify Trigger - New Customer in Shopify**
Choose your connected Shopify account and test the trigger.
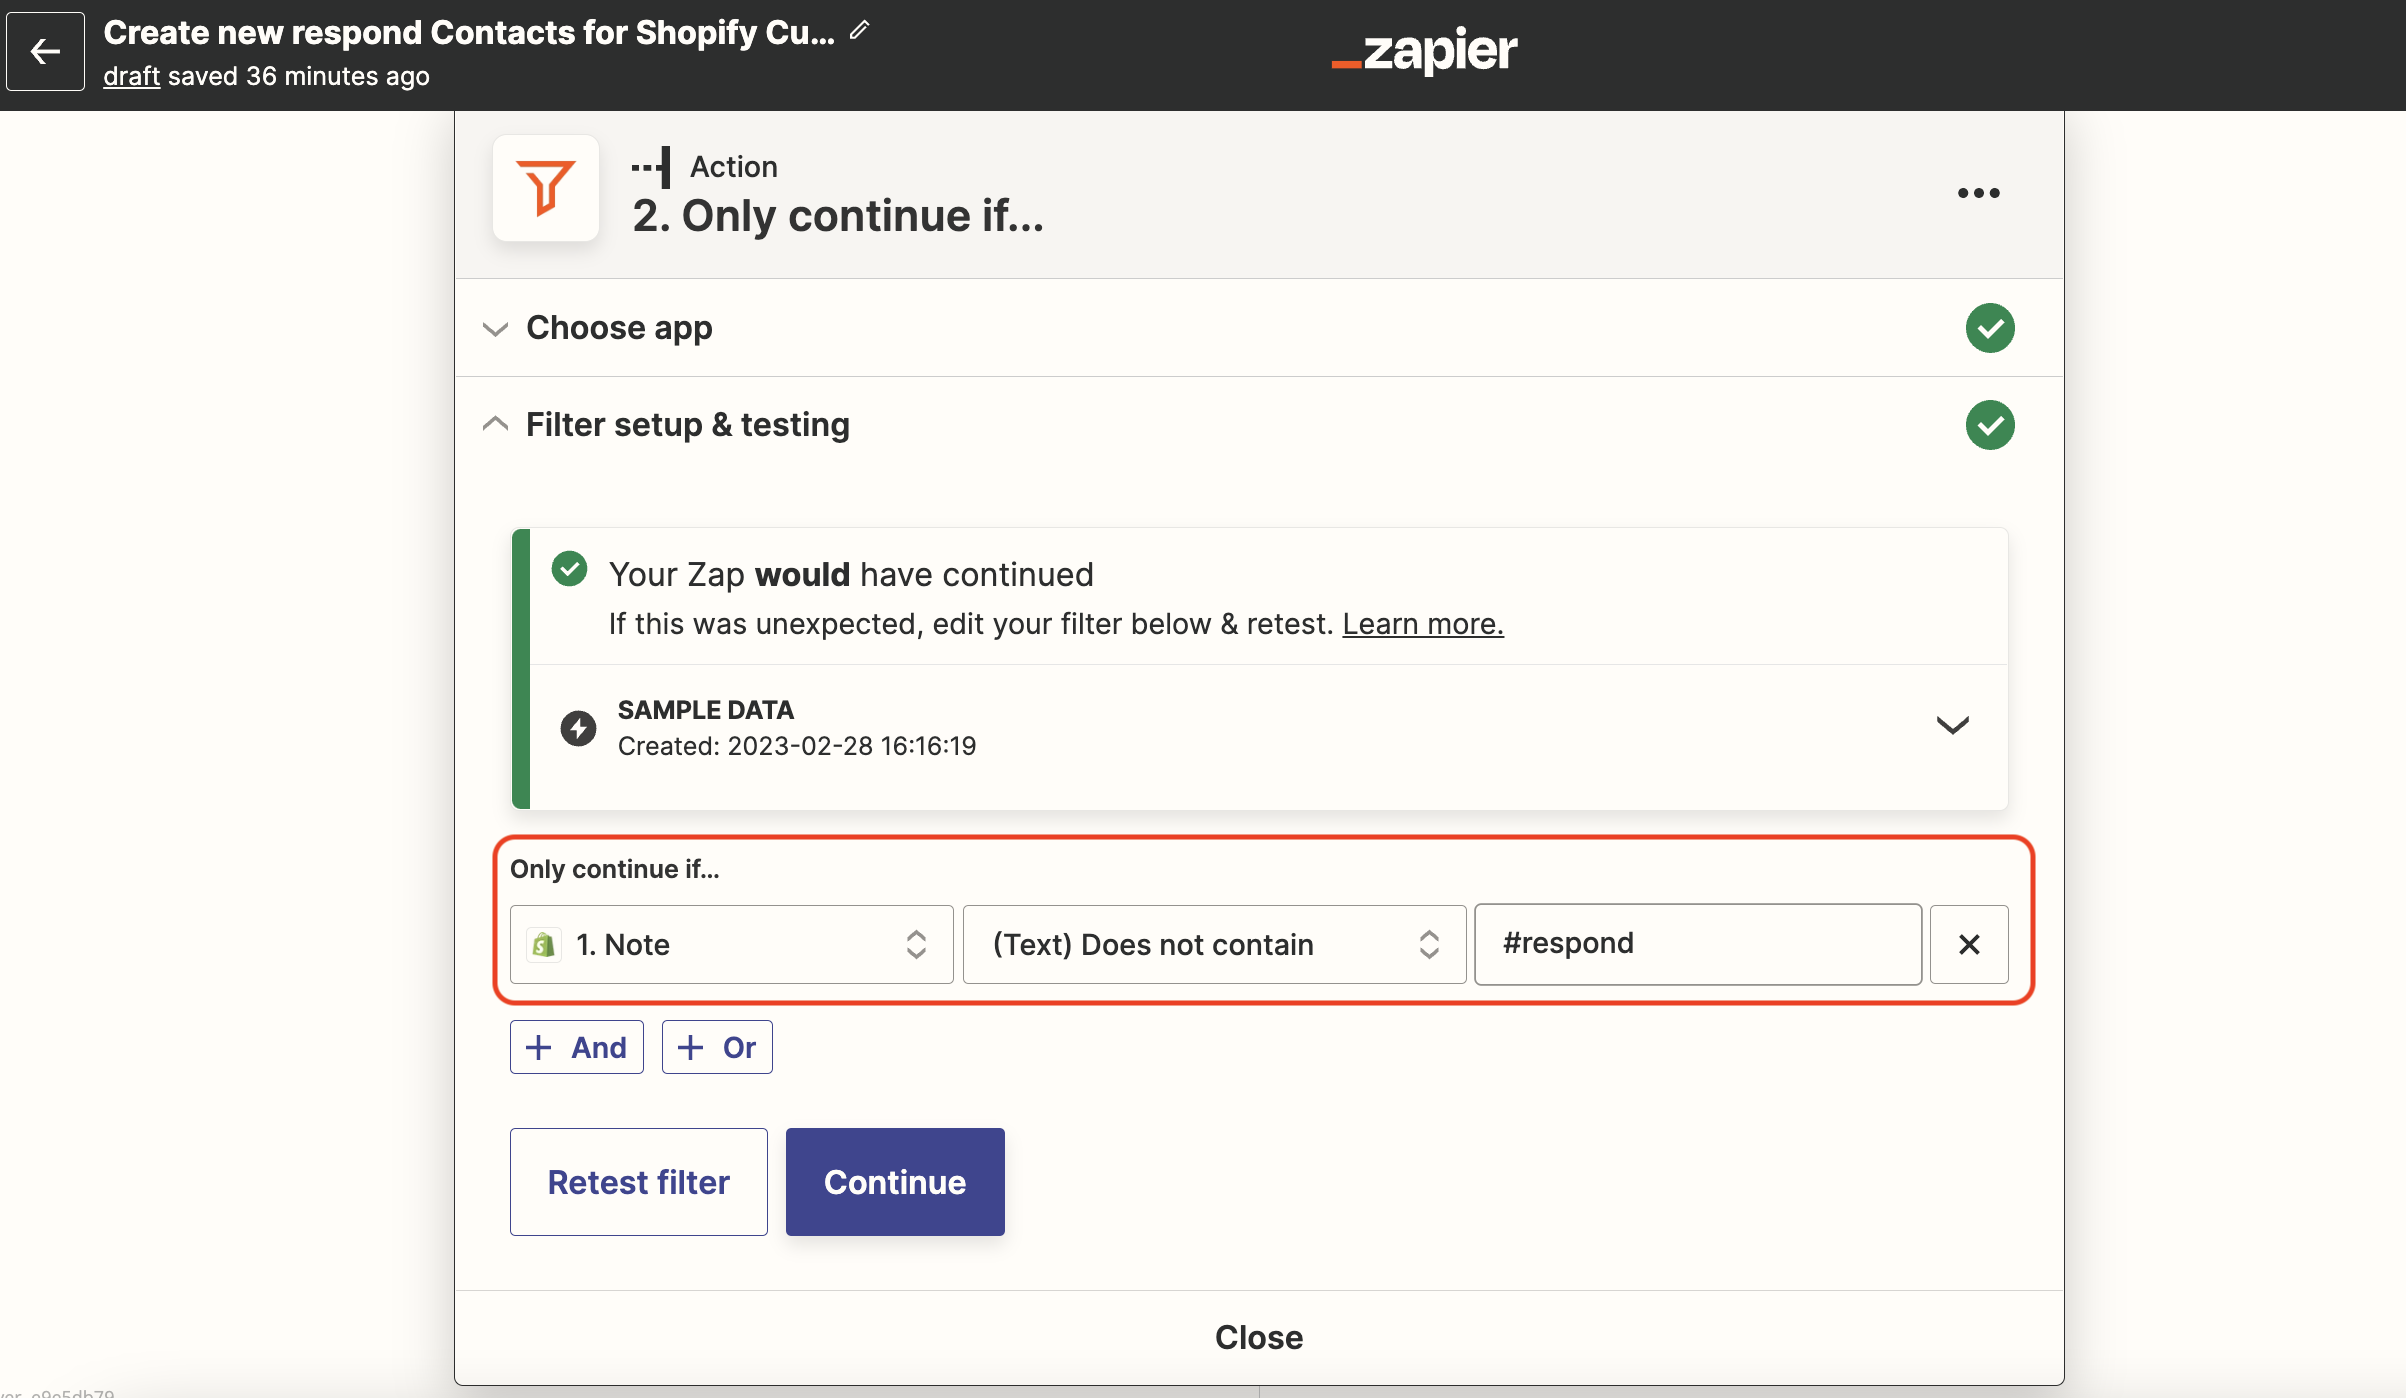
**Filter Action**
Only continue if…
* **Note in Shopify does not contain #respond**. This is necessary to prevent a [Zap loop](/ismessenger/workspace-setting/integrations.md) due to Zapier’s limitations on contact syncing.
Filters by Zapier and multi-step Zaps are only available on [Zapier’s Starter plan](https://zapier.com/app/pricing) and above.
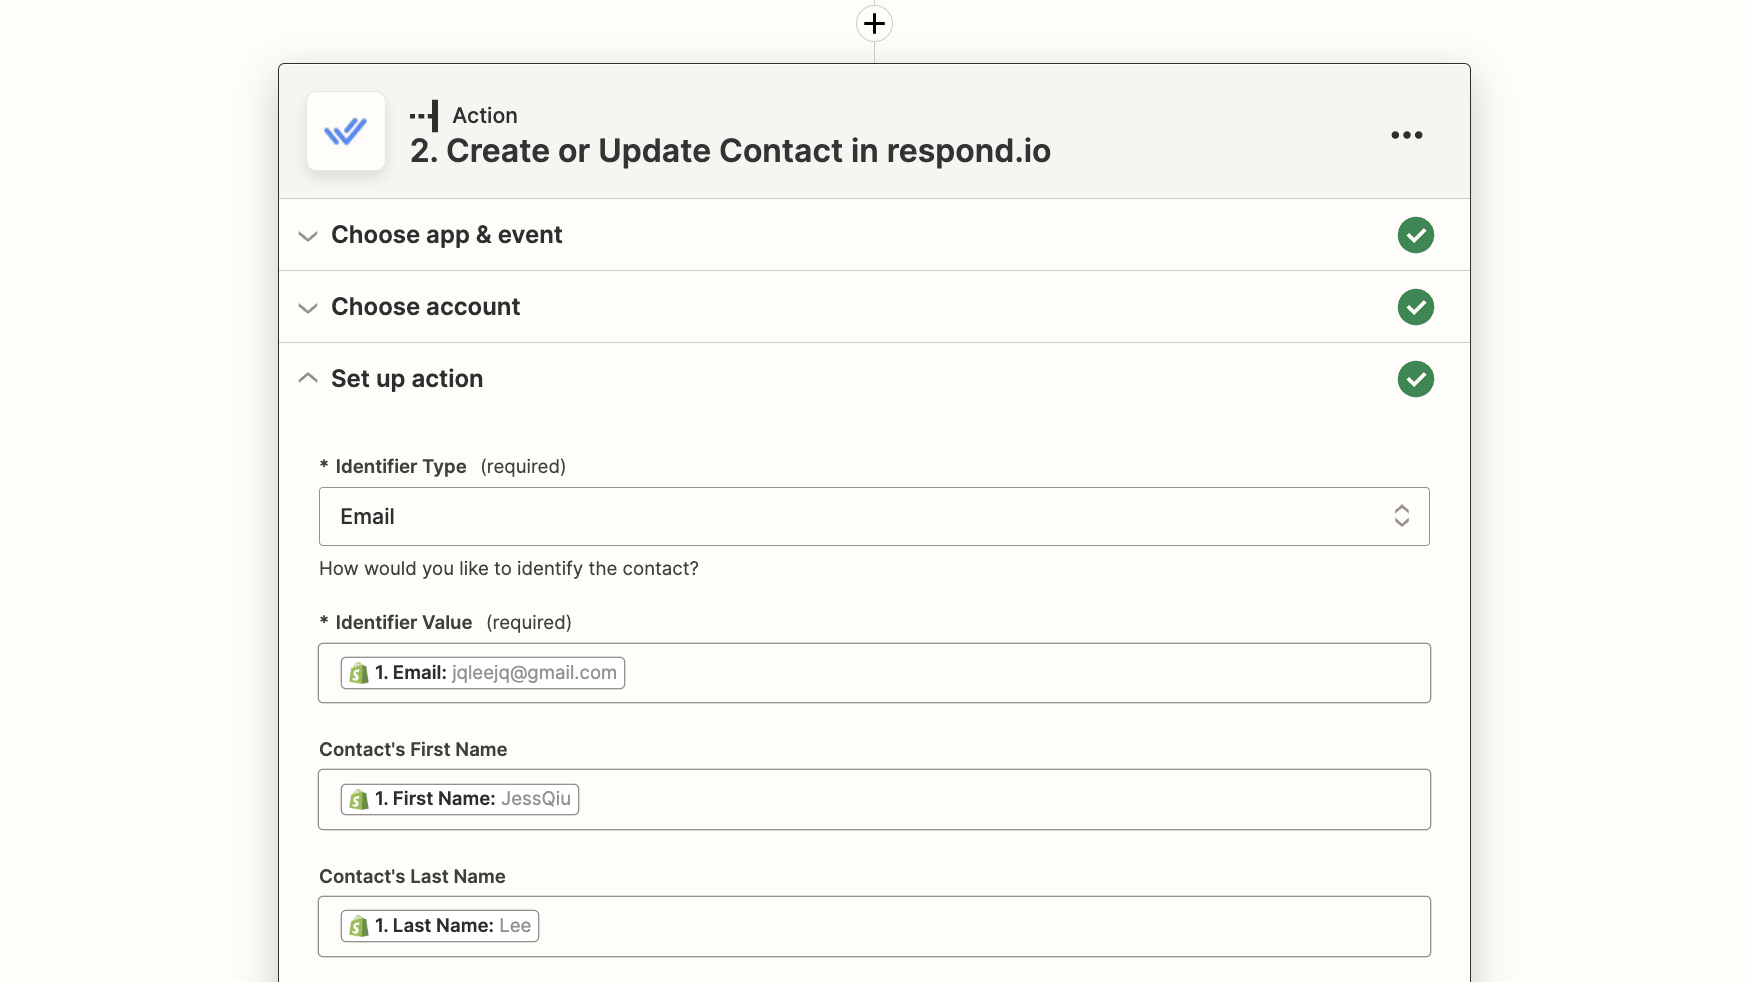
### **IS-Messenger Action - Create or Update Contact in IS-Messenger**
{% hint style="warning" %}
First, follow the steps to set up a [IS-Messenger Zapier integration here](/ismessenger/workspace-setting/integrations.md).
{% endhint %}
{% hint style="warning" %}
To prevent a [Zap loop](/ismessenger/workspace-setting/integrations.md), add a [Custom Field](/ismessenger/workspace-setting/managing-a-workspace.md) in IS-Messenger and name it Contact Note.
{% endhint %}
Map the fields you want to add for the IS-Messenger Contact.
* Choose Email as the Identifier Type.
* Fill in the Contact Note field with #shopify (this is case sensitive).
* Fill the other fields with the information you want from Shopify.
### **Create or update a Contact in IS-Messenger when a customer is updated in Shopify**
When a customer is updated in Shopify, the Zapier template will automatically search for that contact in IS-Messenger using email as the identifier. These are the expected outcomes.
| **Trigger Event** | **Conditions** | **Outcomes** |
| ------------------------------ | ----------------------------------------------- | --------------------------------------------------- |
| Customer is updated in Shopify | Contact exists in IS-Messenger | Update Contact in IS-Messenger with any new details |
| Customer is updated in Shopify | Contact does not exist in IS-Messenger | Create a newIS-Messenger Contact |
| Customer is updated in Shopify | Contact exists in IS-Messenger without an email | Create a new IS-Messenger Contact |
### **Method**
* Use a Zapier template
**How-to**
Use this template:
Add new Shopify customer updates to IS-Messenger contacts
### **Template Configuration**
**Shopify Trigger - Updated Customer in Shopify**
Choose your connected Shopify account and test the trigger.
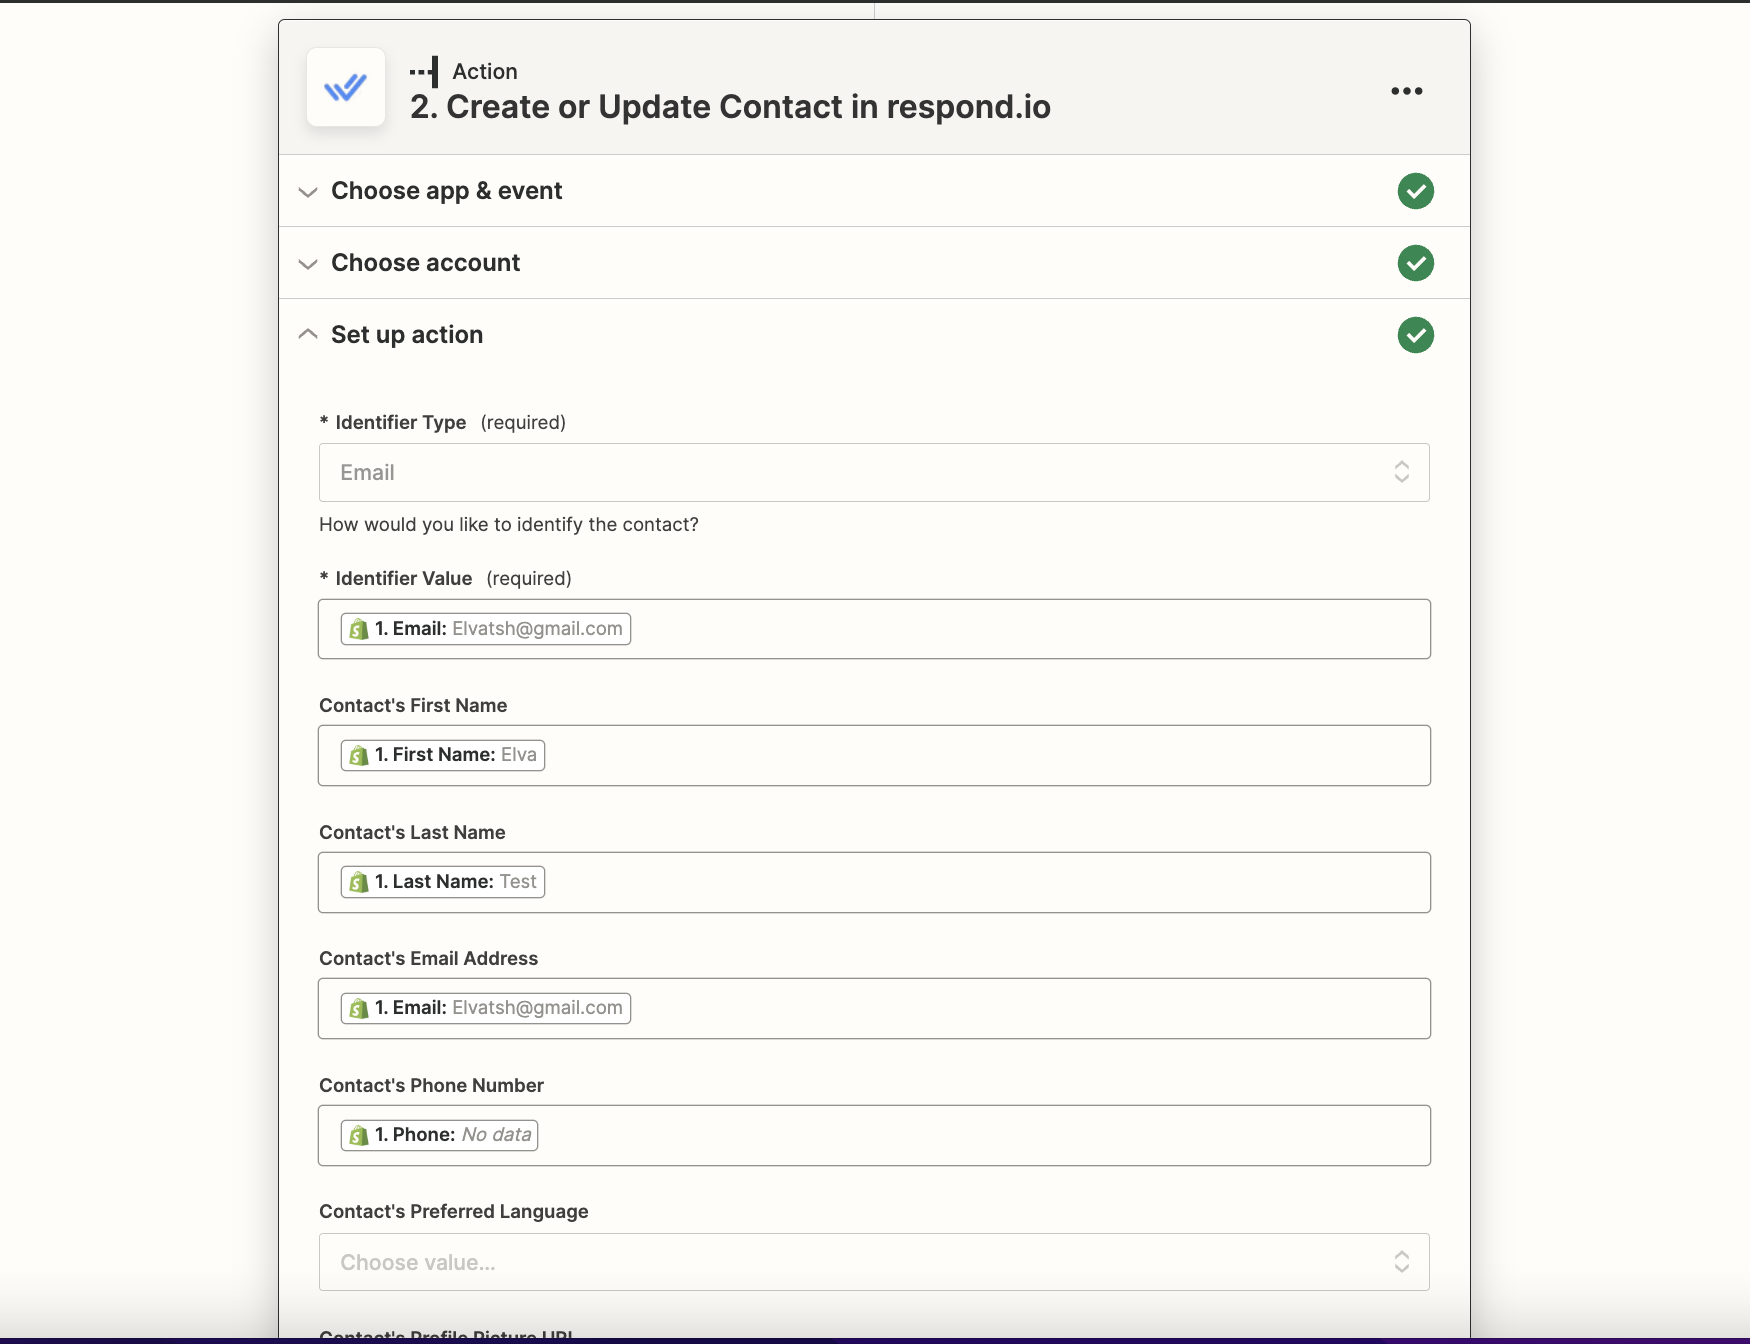
**IS-Messenger Action - Create or Update Contact**
First, follow the steps to set up a IS-Messenger[ Zapier integration here](/ismessenger/workspace-setting/integrations.md).
Map the fields you want to add for the IS-Messenger Contact.
* Select email as the Identifier Type.
* Fill the other fields with the information you want from Shopify.
### Manage Orders and Carts with IS-Messenger and Shopify
If your customers are IS-Messenger Contacts and you have their email, you can send them instant messages about their Shopify orders and notify agents about customers’ order status. First set up [Contact syncing](/ismessenger/workspace-setting/integrations/e-commerce-and-crm-integrations/e-commerce-integration-shopify.md) so your customers are more likely to be in both places.
For channels like WhatsApp and SMS, you will also need to have the customer’s phone number.Check that you have the [necessary Contact identifiers and settings](/ismessenger/workspace-setting/integrations/e-commerce-and-crm-integrations/e-commerce-integration-shopify.md) for your Zaps to work.
### Benefits of Managing Orders and Carts with IS-Messenger and Shopify
* Keep customers informed about their Shopify orders over their preferred messaging channel
* Track customer activity and send tailored messages to prompt purchases
**Methods**
* [Send customers instant messages related to their orders using Zapier.](/ismessenger/workspace-setting/integrations/e-commerce-and-crm-integrations/e-commerce-integration-shopify.md)
* [Send abandoned cart messages to prompt customers to complete their Shopify purchase using Zapier.](/ismessenger/workspace-setting/integrations/e-commerce-and-crm-integrations/e-commerce-integration-shopify.md)
* [Update IS-Messenger Contacts’ Shopify order status using Zapier.](/ismessenger/workspace-setting/integrations/e-commerce-and-crm-integrations/e-commerce-integration-shopify.md)
### **Send customers instant messages related to their orders using Zapier**
{% hint style="warning" %}
This can only be done if the customer is a IS-Messenger Contact and you have their email. For channels like WhatsApp or SMS, a phone number is also required.
{% endhint %}
**How-to**
Use this template to send a message to a customer when they make an order in Shopify:
Send messages via IS-Messenger for new Shopify orders
Use this template to send a customer a receipt for their Shopify order:
Send IS-Messenger messages for new Shopify paid orders
Use this template to send customers messages about changes to their order status:
Send messages via IS-Messenger for newly updated Shopify orders
### **Template Configuration**
The configuration is similar for all of these templates.
**Shopify Trigger**
Select your Shopify account, test the trigger and continue.
**IS-Messenger Action - Send Message**
First, follow the steps to set up a IS-Messenger[ Zapier integration here](/ismessenger/workspace-setting/integrations.md).
Map the fields accordingly:
* Identifier Type: Choose email
* Identifier Value: Choose Shopify customer email
* Channel Type: Select Last Interacted Channel or Specific Channel.
* Message Type: Select Text, Attachment, Quick Reply, Custom Payload, or Email.
If the last interacted channel has a messaging window that is closed, the message will not be sent. Use Specific Channel to send template or tagged messages.
### **Send abandoned cart messages to prompt customers to complete their Shopify purchase using Zapier**
This can only be done if the customer is a IS-Messenger Contact and you have their email. For channels like WhatsApp and SMS, a phone number is also required.
**How-to**
Use this template to send abandoned cart messages:
Send IS-Messenger messages for new abandoned Shopify carts
### **Template Configuration**
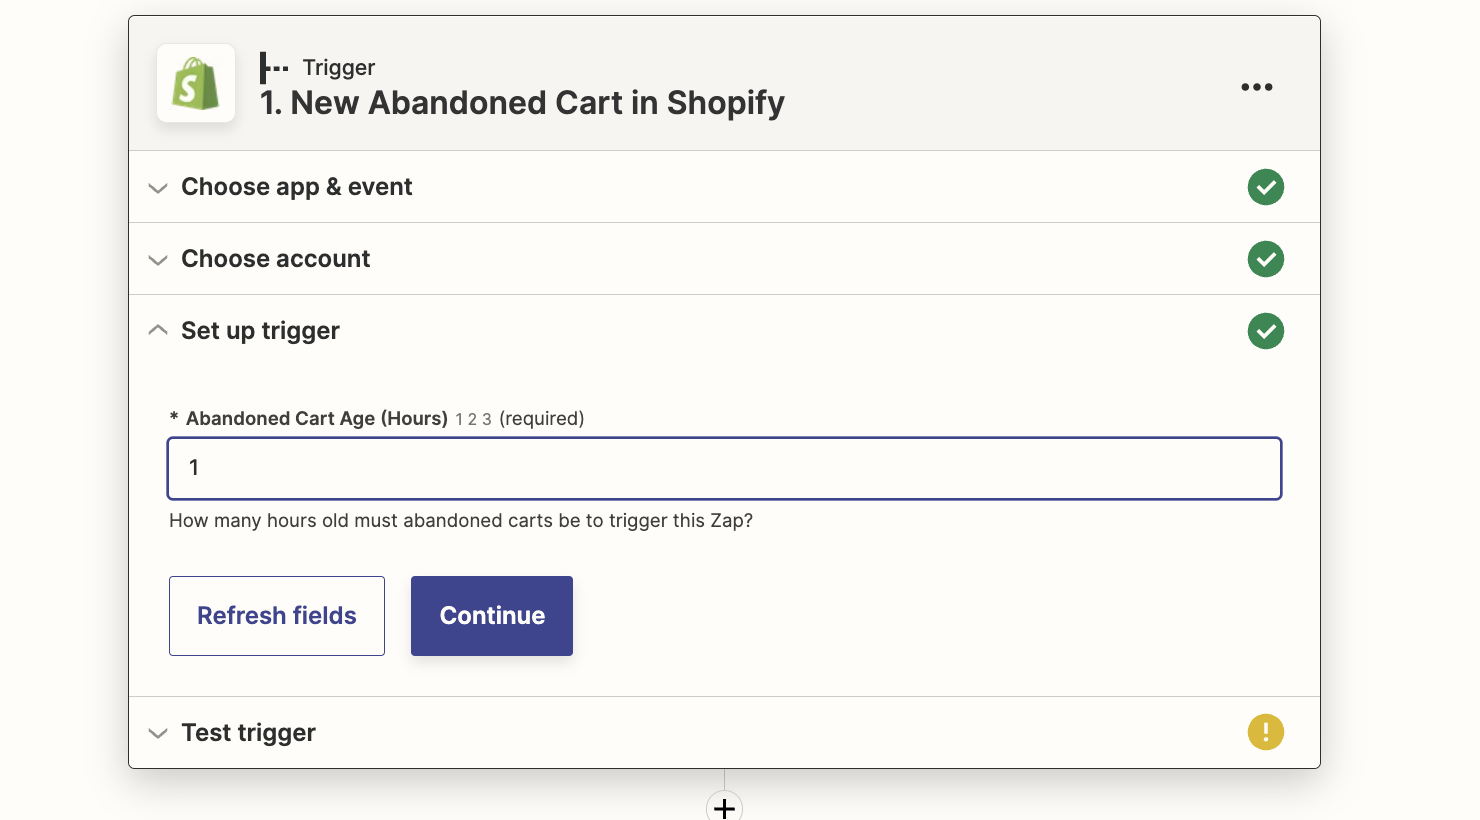
**Shopify Trigger - New Abandoned Cart in Shopify**
Select your Shopify account and select the age of the cart in hours. Test the trigger and continue.
**IS-Messenger Action - Send Message**
First, follow the steps to set up a IS-Messenger[ Zapier integration here](/ismessenger/workspace-setting/integrations.md).
Map the fields accordingly:
* Identifier Type: Choose email
* Identifier Value: Choose Shopify customer email
* Channel Type: Select Last Interacted Channel or Specific Channel
* Message Type: Select Text, Attachment, Quick Reply, Custom Payload, or Email
If the last interacted channel has a messaging window that is closed, the message will not be sent. Use Specific Channel to send template or tagged messages.
**Update IS-Messenger Contacts’ Shopify order statuses using Zapier**
You can only do this if you have the Contact’s email in IS-Messenger. These are the expected outcomes.
| **Trigger Event** | **Conditions** | **Outcomes** |
| ---------------------- | ----------------------------------------------- | --------------------------------------- |
| Shopify order activity | Contact exists in IS-Messenger with an email | Add tags to IS-Messenger Contact |
| Shopify order activity | Contact does not exist in IS-Messenger | Zap will stop and send an error message |
| Shopify order activity | Contact exists in IS-Messenger without an email | Zap will stop and send an error message |
**How-to**
Use this template to add tags to IS-Messenger Contacts so agents can see Contacts’ Shopify purchase activity:
Add custom tags to contacts in IS-Messenger after new purchases in Shopify
### **Trigger Configuration**
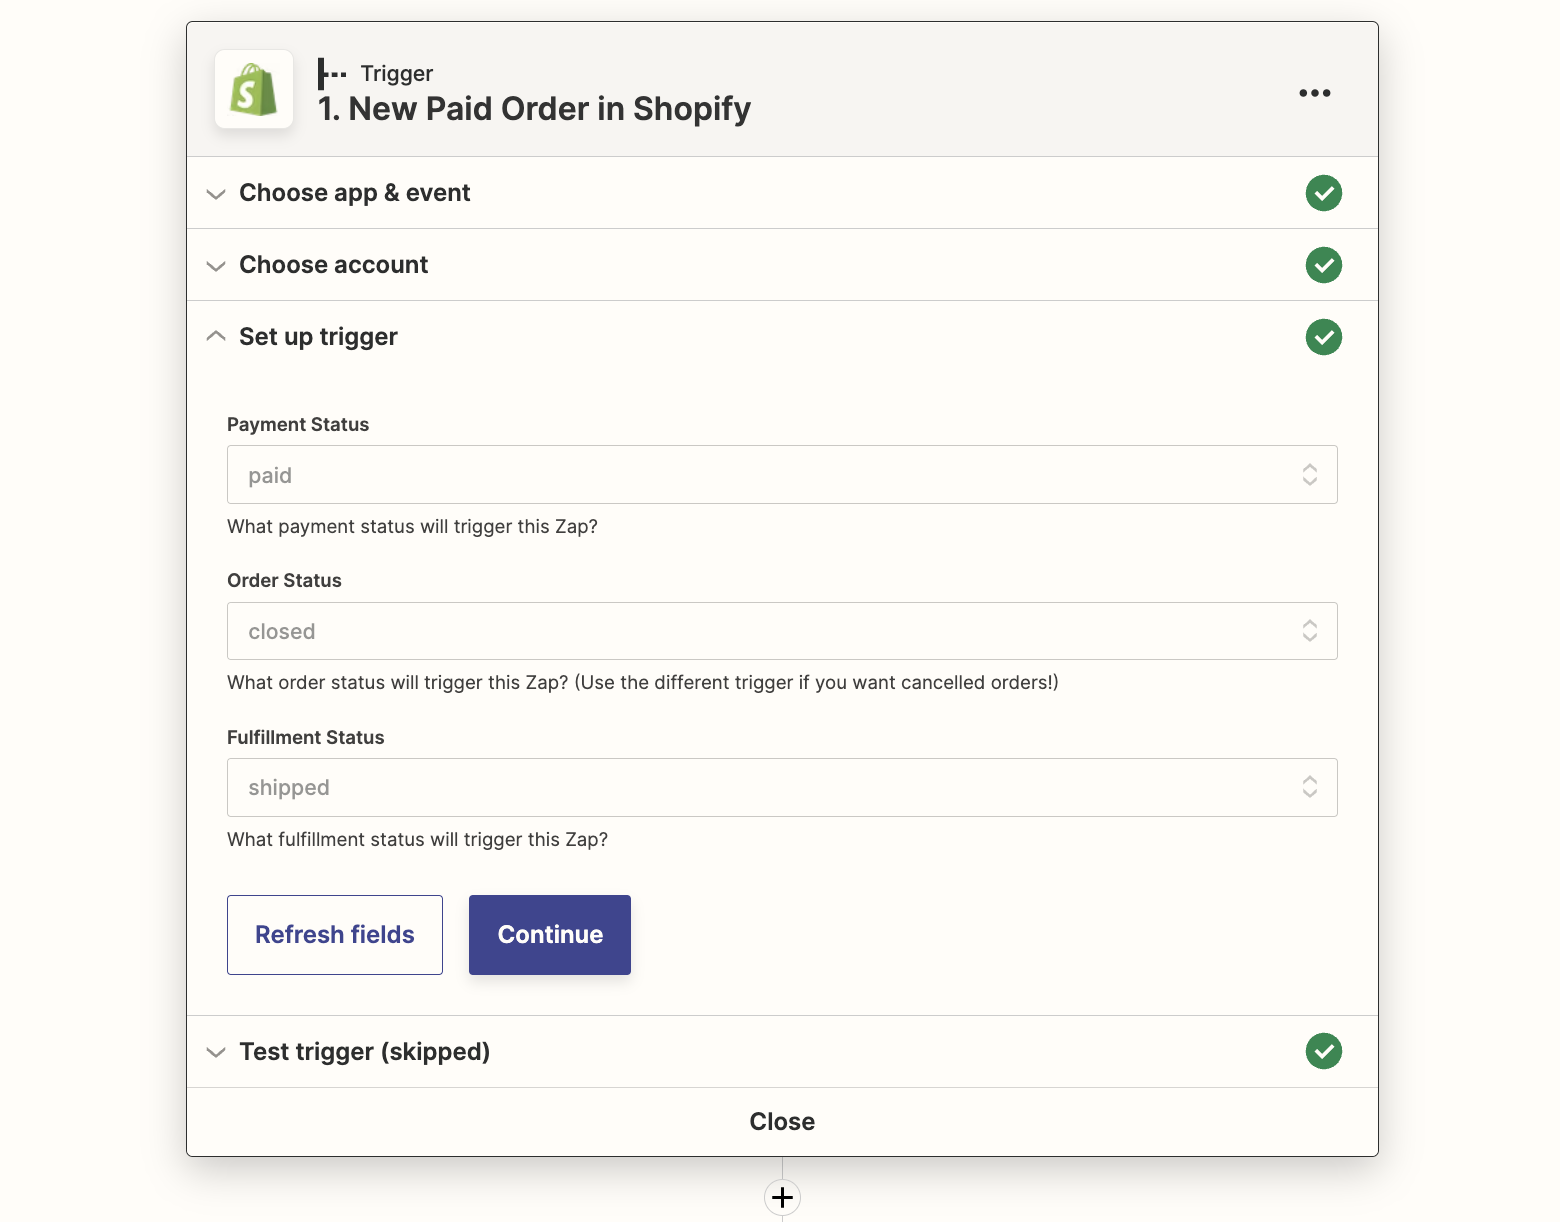
**Shopify Trigger**
Select your Shopify account and the type of order activity you want to trigger the Zap. For this example, we’re using paid, closed, shipped orders. You may set up different Zaps for different order statuses.
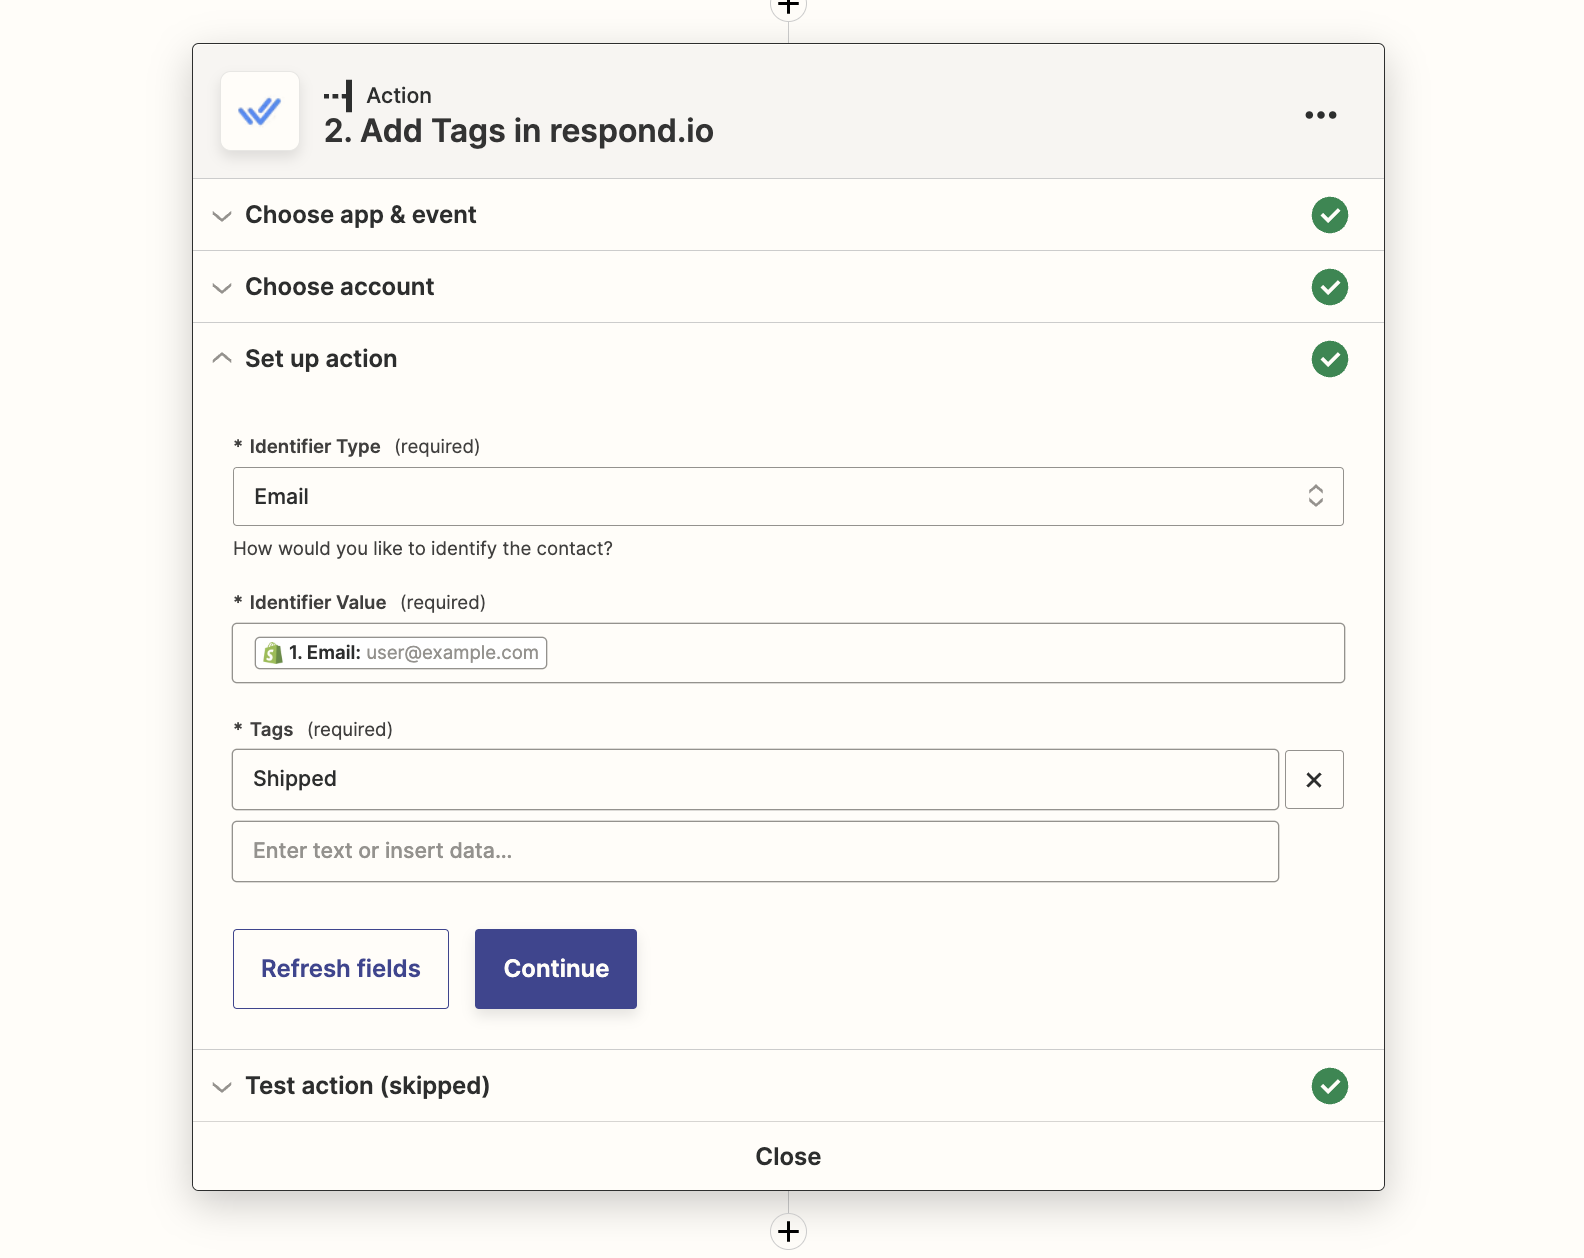
**IS-Messenger Action - Add Tags in IS-Messenger**
First, follow the steps to set up a IS-Messenger[ Zapier integration here](/ismessenger/workspace-setting/integrations.md).
Choose email as the identifier and fill in the Shopify customer email as the value. You may type in the tags or choose from Shopify fields.
---
# Agent Instructions: Querying This Documentation
If you need additional information that is not directly available in this page, you can query the documentation dynamically by asking a question.
Perform an HTTP GET request on the current page URL with the `ask` query parameter:
```
GET https://docs.is-messenger.com/ismessenger/workspace-setting/integrations/e-commerce-and-crm-integrations/e-commerce-integration-shopify.md?ask=
```
The question should be specific, self-contained, and written in natural language.
The response will contain a direct answer to the question and relevant excerpts and sources from the documentation.
Use this mechanism when the answer is not explicitly present in the current page, you need clarification or additional context, or you want to retrieve related documentation sections.