# How to Enrich Contact Data and Qualify Leads
After collecting basic information, sales agents often need additional data about the lead for qualification purposes. Automated processes can be used to enrich data to provide further context about leads.
### Benefits of Data Enrichment and Lead Qualification
Use data enrichment and lead qualification to:
* Provide agents with more information and context about leads.
* Qualify and prioritize leads.
* Categorize leads for routing purposes.
### Methods for Data Enrichment and Lead Qualification
* Retrieve details about leads and qualify them by sending their identifiers to lead intelligence databases using a Workflow.
* Enrich Data and Qualify Leads by asking a question with Workflows.
* Enrich lead data by integrating with CRM and E-commerce software via Zapier.
### **Get Information from Lead Intelligence Software**
{% hint style="success" %}
**Use this method** when you want to retrieve lead qualifying information from a lead intelligence database or an external CRM.
{% endhint %}
This method is most commonly used by B2B businesses.
**Method Objectives**
* Provide lead’s identifier to your database software.
* Save retrieved information.
* Record the data received in IS-Messenger.
* Set up an automated qualification process based on the data received.
{% hint style="info" %}
**Tip:** Learn how to retrieve [information about leads from your CRM here](/ismessenger/support-use-cases/support-closing-conversations.md).
{% endhint %}
**Workflow Setup**
{% hint style="info" %}
**Tip:** Consider using the [ask for phone number or email method](/ismessenger/sales-use-cases.md) earlier in the Workflow.
{% endhint %}
Here’s an example of a Workflow using this method. You can adapt it based on your business needs.
**Provide lead’s identifier to your database software**
{% hint style="info" %}
**Tip:** Learn more about sending [HTTP requests here](/ismessenger/modules/workflow.md).
{% endhint %}
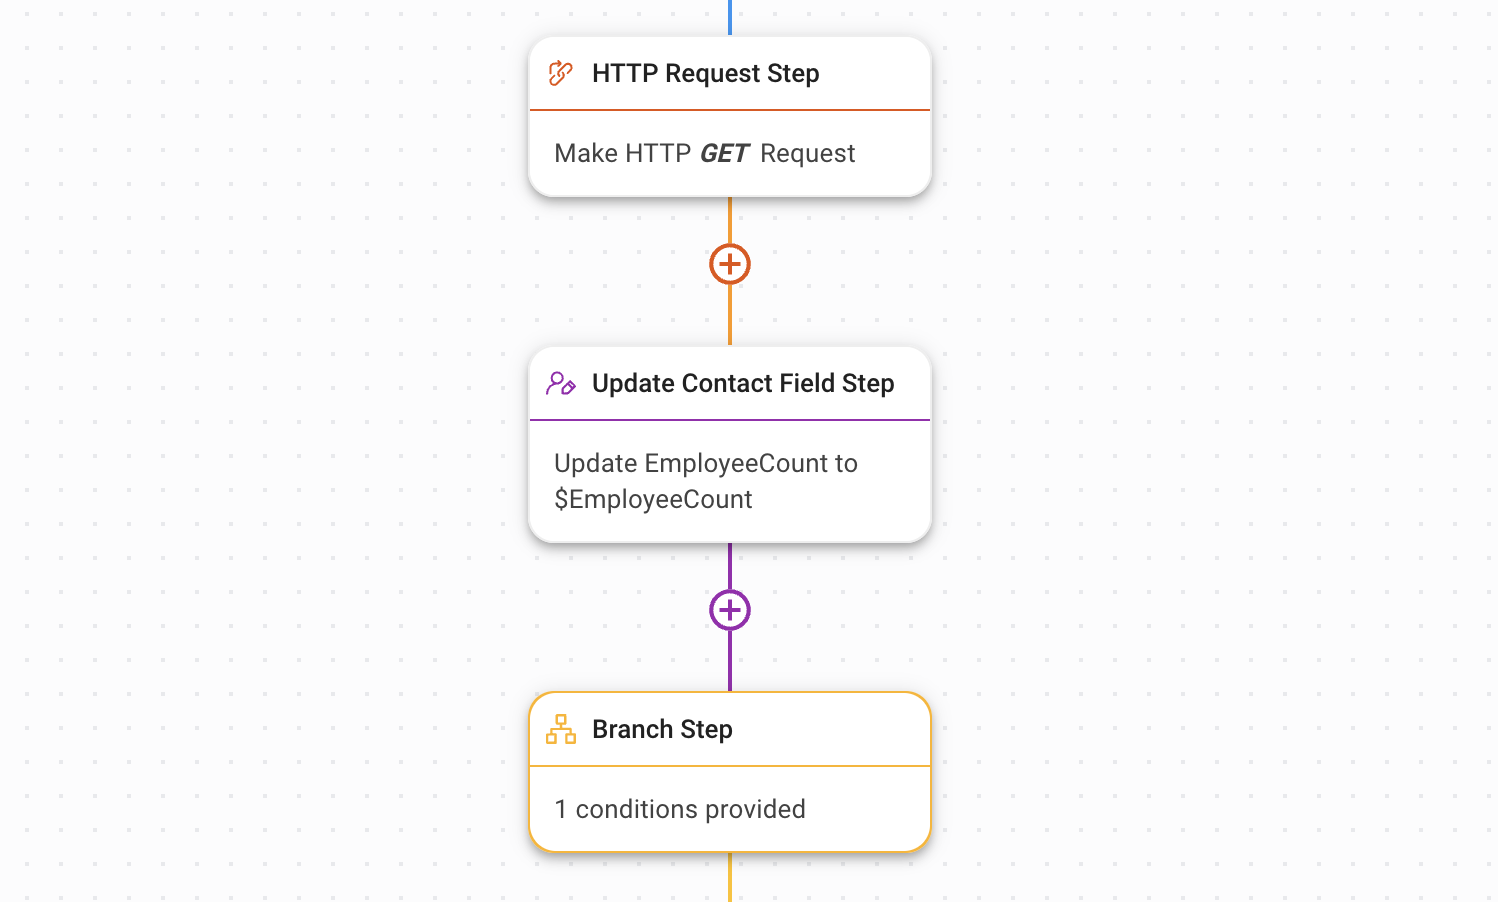
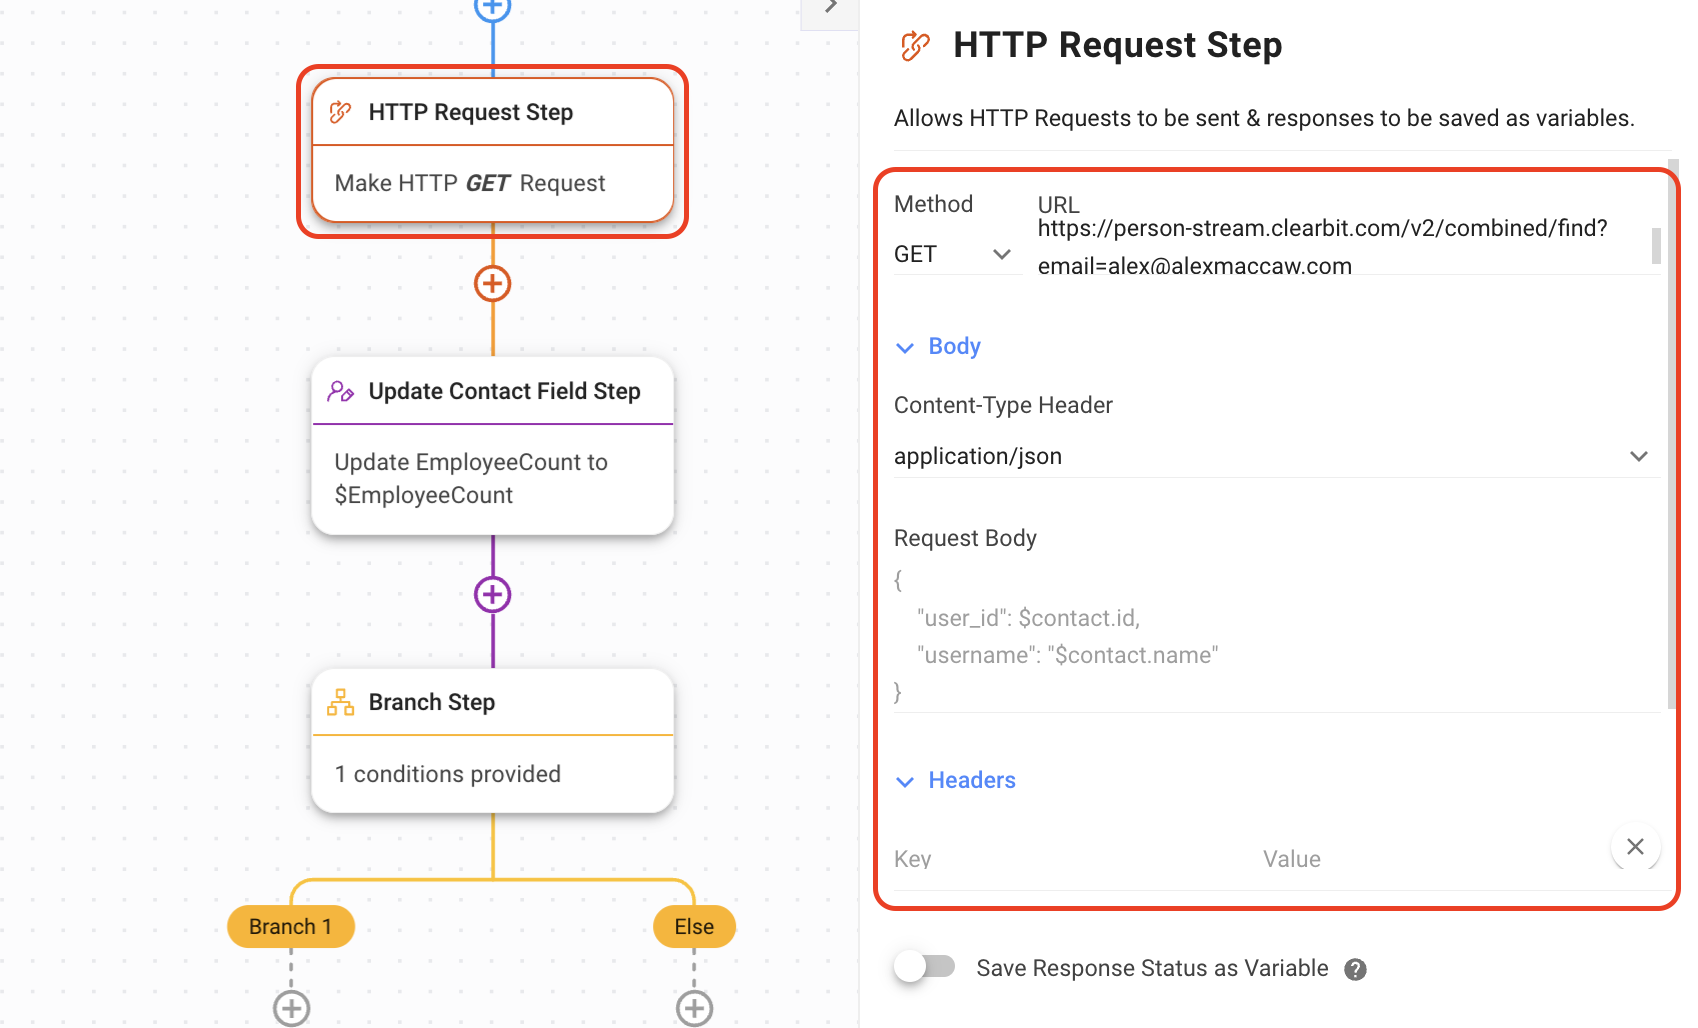
The HTTP Request step is used to retrieve additional Contact information from database software.
HTTP Request Step initial configuration
1. Select HTTP Request Step.
2. Use the GET method and enter the URL of your lead intelligence database. For this example, we're using Clearbit to search for a Contact by company email.
3. Lead the Body section blank as it's not necessary for a GET request.
4. Under Headers, fill in the necessary authentication key if it's required by the database software. This will vary depending on where you're sending the request.\
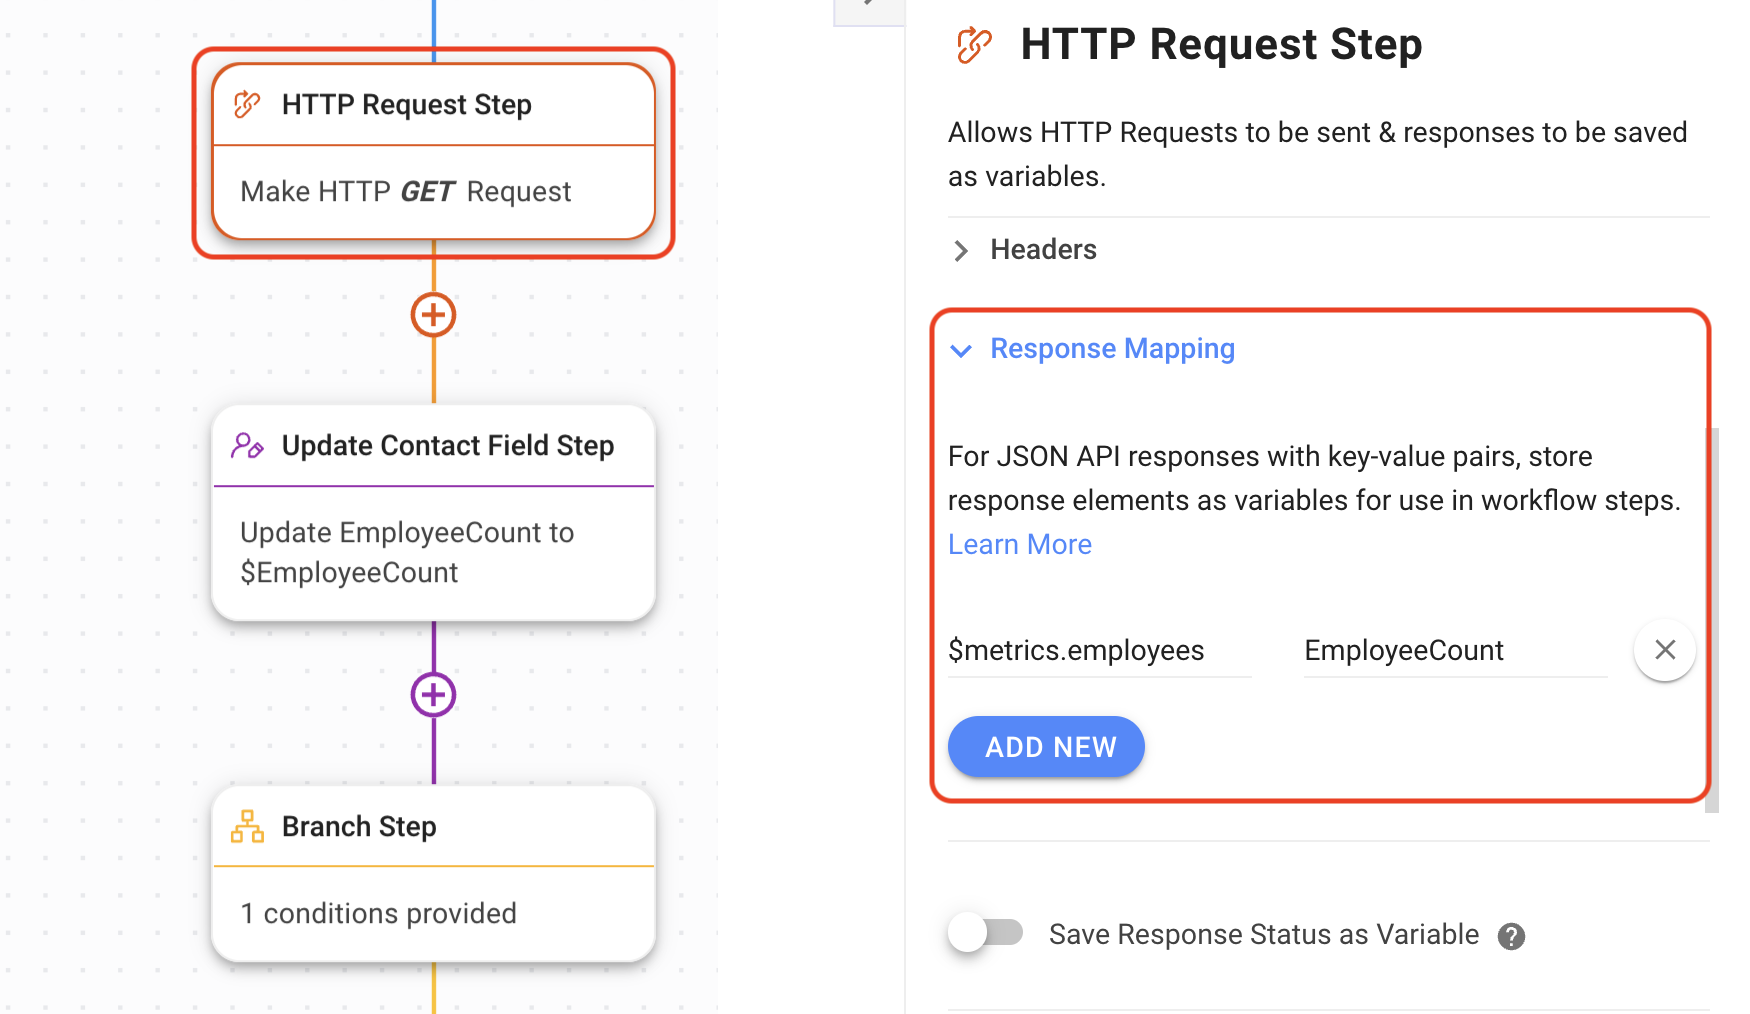
### **Save retrieved information**
Response Mapping is used to save the information you get from the lead intelligence database as a Variable. The Variable can later be used to update the Contact Field on IS-Messenger. This example will show you how to save the EmployeeCount field as a Variable.
Response Mapping configuration
In order to map the retrieved data, you'll need to know what the response looks like. The [response code looks like this in Clearbit](/ismessenger/modules/untitled.md). It may be slightly different in other database software like ZoomInfo, but the process is similar. To see what your specific response looks like, send the request in [Postman](https://www.postman.com/).\
\
1\. To find the company's employee count, look for Metrics and Employees.\
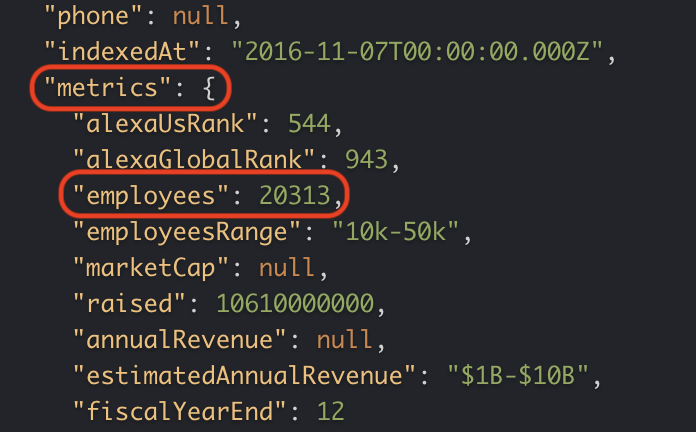
2. In the HTTP Request configuration panel, expand the Response Mapping toggle, add $metrics.employees in the JSON Key field and give it a Variable name\
**Record the data received in IS-Messenger**
{% hint style="info" %}
**Tip:** Learn more about the [Update Contact Field Step](/ismessenger/modules/workflow.md) here
{% endhint %}
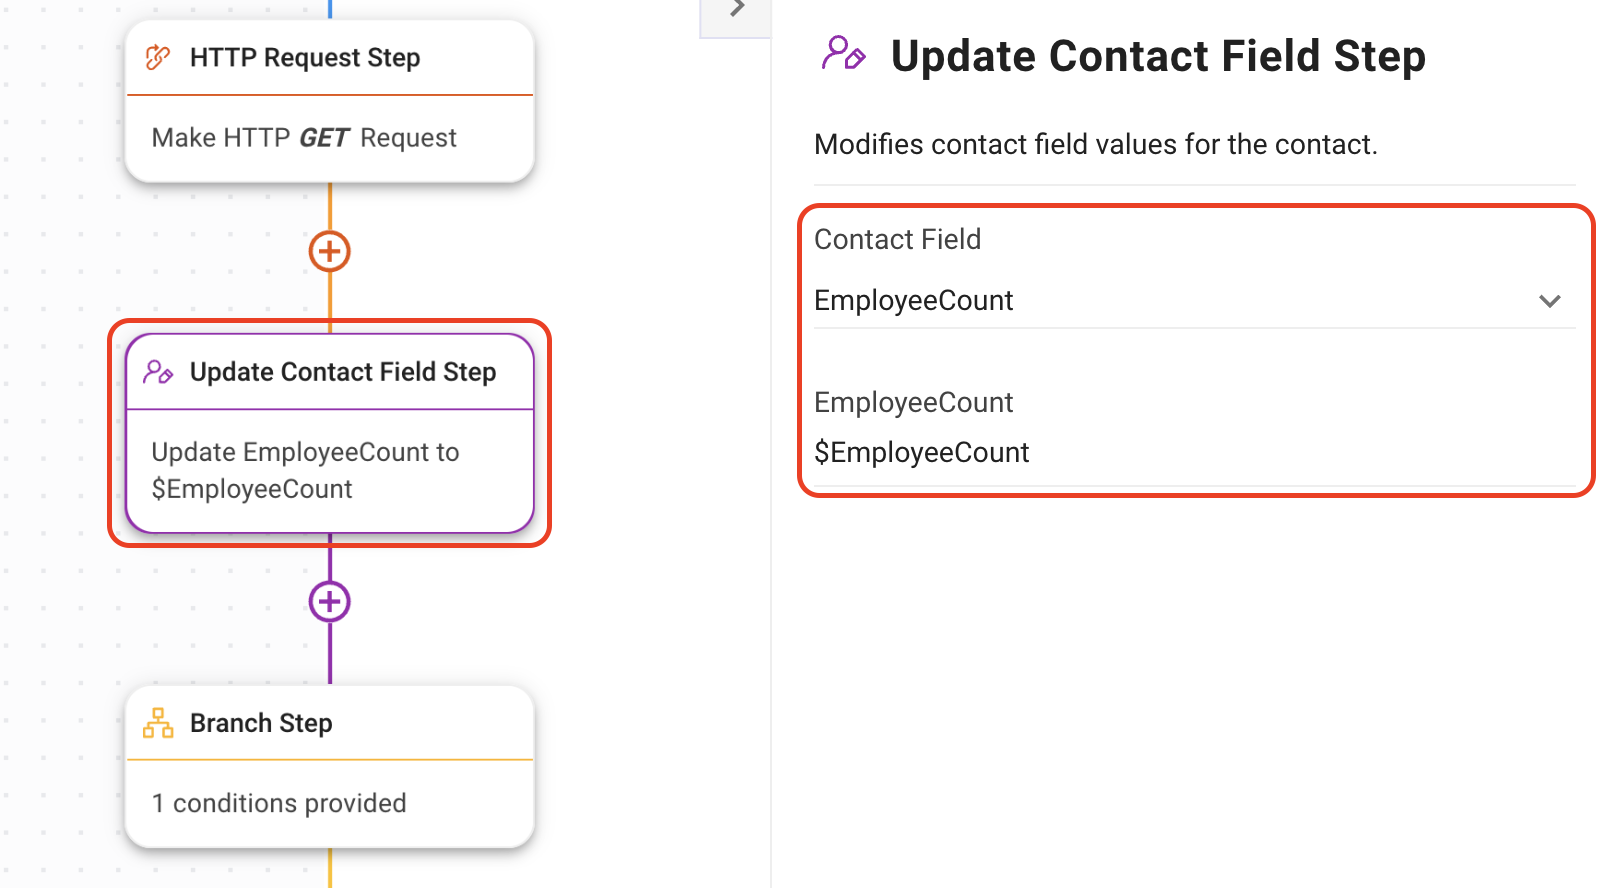
Use Update Contact Field Step to automatically update a Contact’s data in IS-Messenger. Here’s an example of how to update one field.
Update Contact Field configuration
1. Add Update Contact Field Step and select the field you want to save from the dropdown.
2. Input the field with the Variable from the Response Mapping section.\
{% hint style="info" %}
**Tip:** Another option is to use the [Add Comment Step](/ismessenger/modules/workflow.md) to give agents visibility into the data received from the request.
{% endhint %}
### **Set up automated qualification based on the data received**
{% hint style="info" %}
**Tip:** Learn more about the [Branch Step](/ismessenger/modules/workflow.md) here.
{% endhint %}
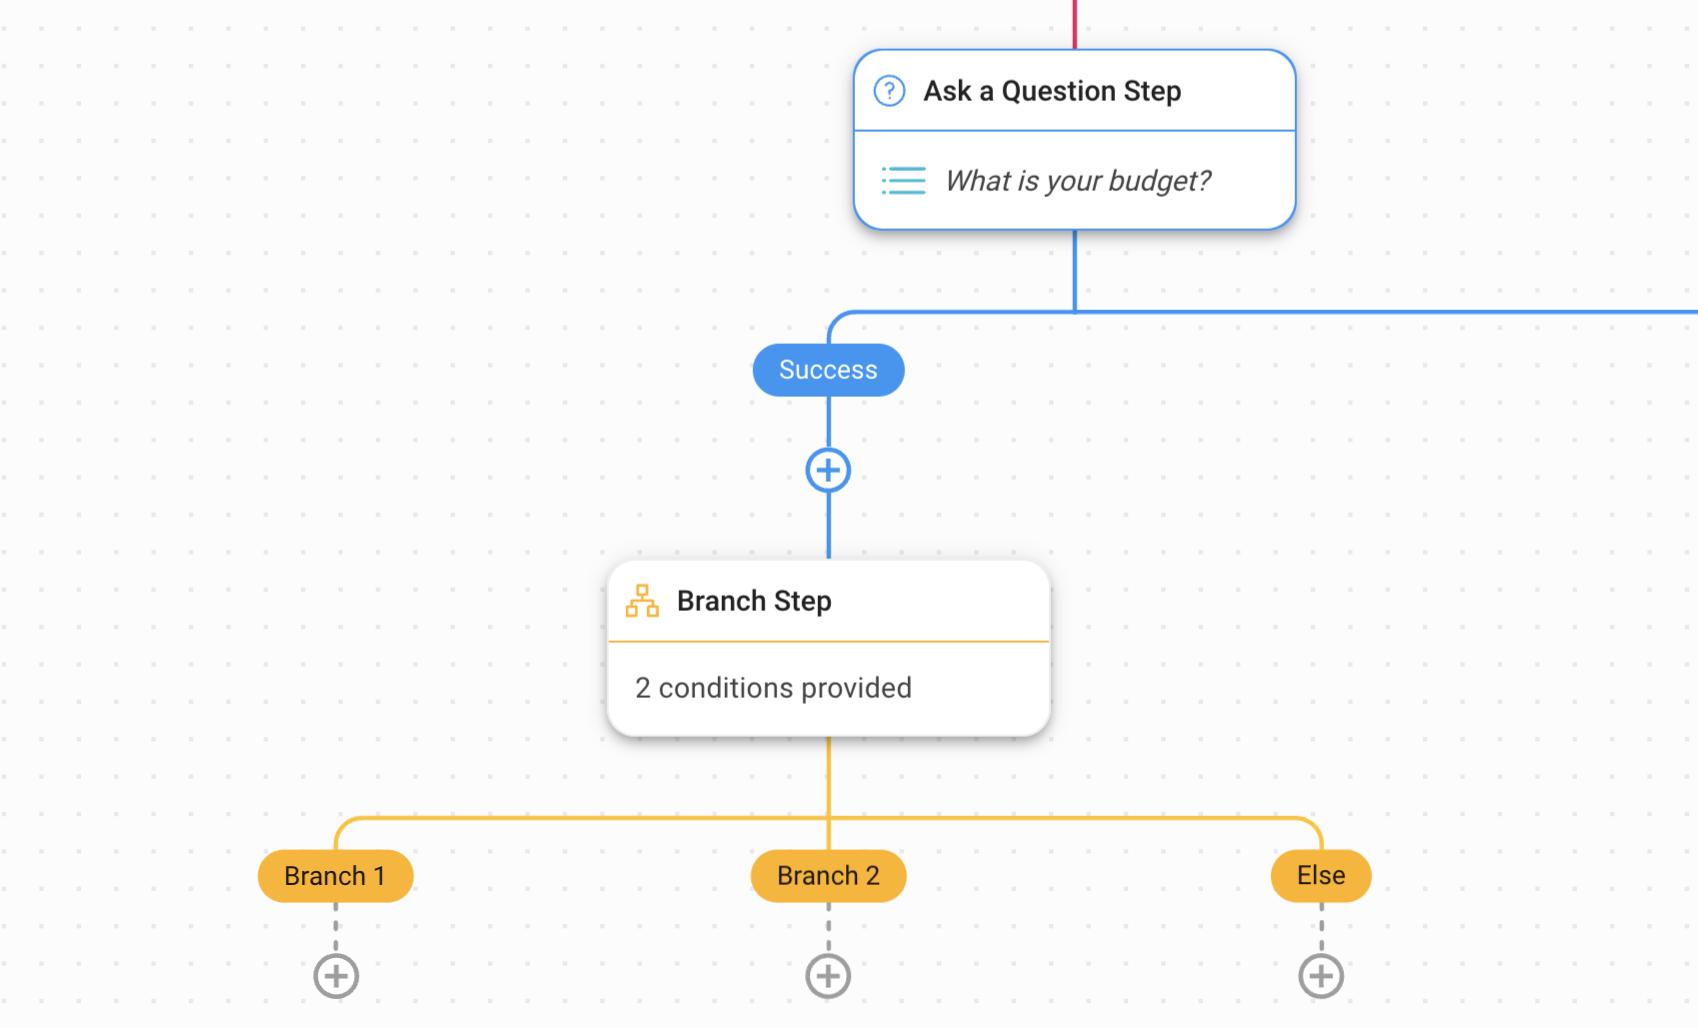
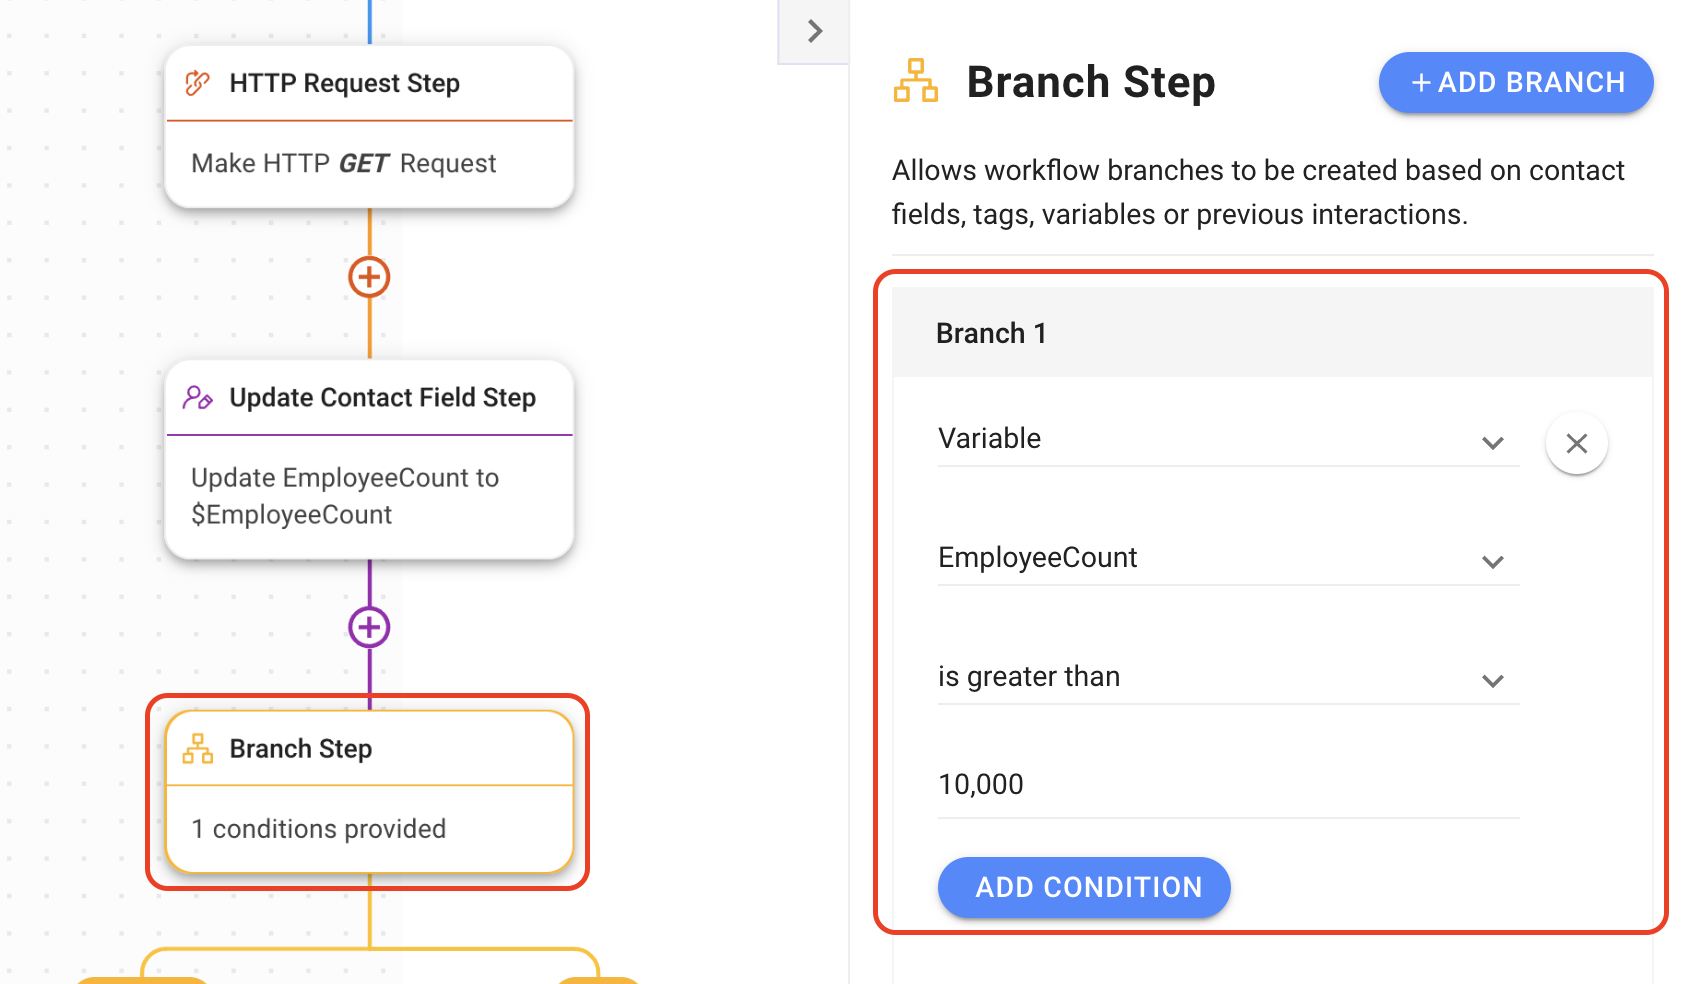
When you retrieve the data, use the Branch Step to make automated decisions that can be used to qualify leads. In the example, we’ll use the EmployeeCount field as the qualifying factor.
Lead qualification configuration
1\. Add the Branch Step.\
2\. Select Variable from the first dropdown, the select the Variable name that was saved in the previous step as the Field, in this case, EmployeeCount.\
3\. For the Operator, select *is greater than* to get results of companies that have more than a certain number of employees. The Value is that number of employees.\
{% hint style="info" %}
**Tip:** Possible next steps include [Update Tag](/ismessenger/modules/workflow.md), [Routing](/ismessenger/sales-use-cases.md) and [Auto-assignment](/ismessenger/sales-use-cases.md).
{% endhint %}
### **Enrich Data and Qualify Leads by Asking a Question with Workflows**
{% hint style="success" %}
**Use this method** when you want to ask leads questions to gain additional qualifying information.
{% endhint %}
This additional information received can help you route leads to the next step in the qualification process.
**Method Objectives**
* Gain further information about leads by asking a multiple choice or open-ended question.
* Use the information gained from the questions to automate your lead qualification process.
**Workflow Setup**
There’s no limit to the number of questions you can add to a Workflow. For example, you can add an email question, then a multiple choice question, then an open-ended question.
Here’s a sample Workflow with some basic steps you can adapt for your business needs. We will show you one question for each example.
### **Ask a question to gain further information about leads**
{% hint style="info" %}
**Tip:** Learn more about the [Ask a Question Step](/ismessenger/modules/workflow.md) here.
{% endhint %}
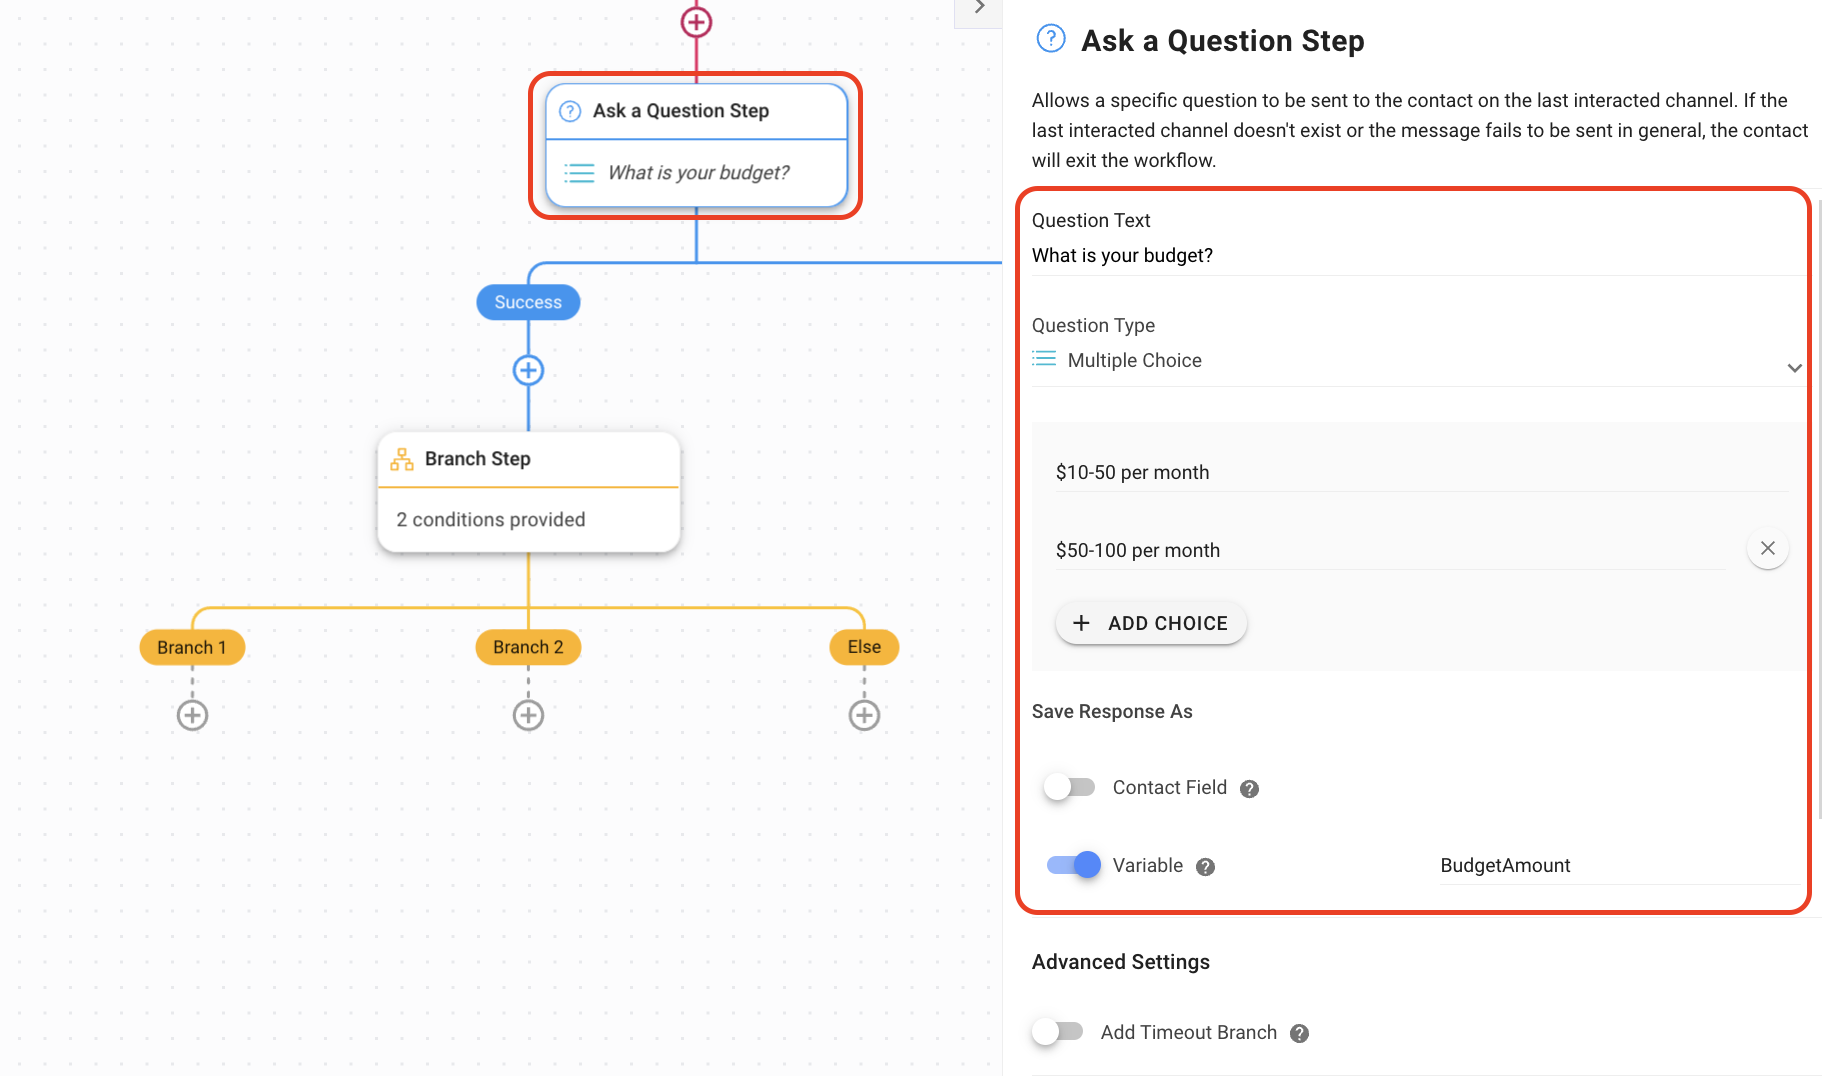
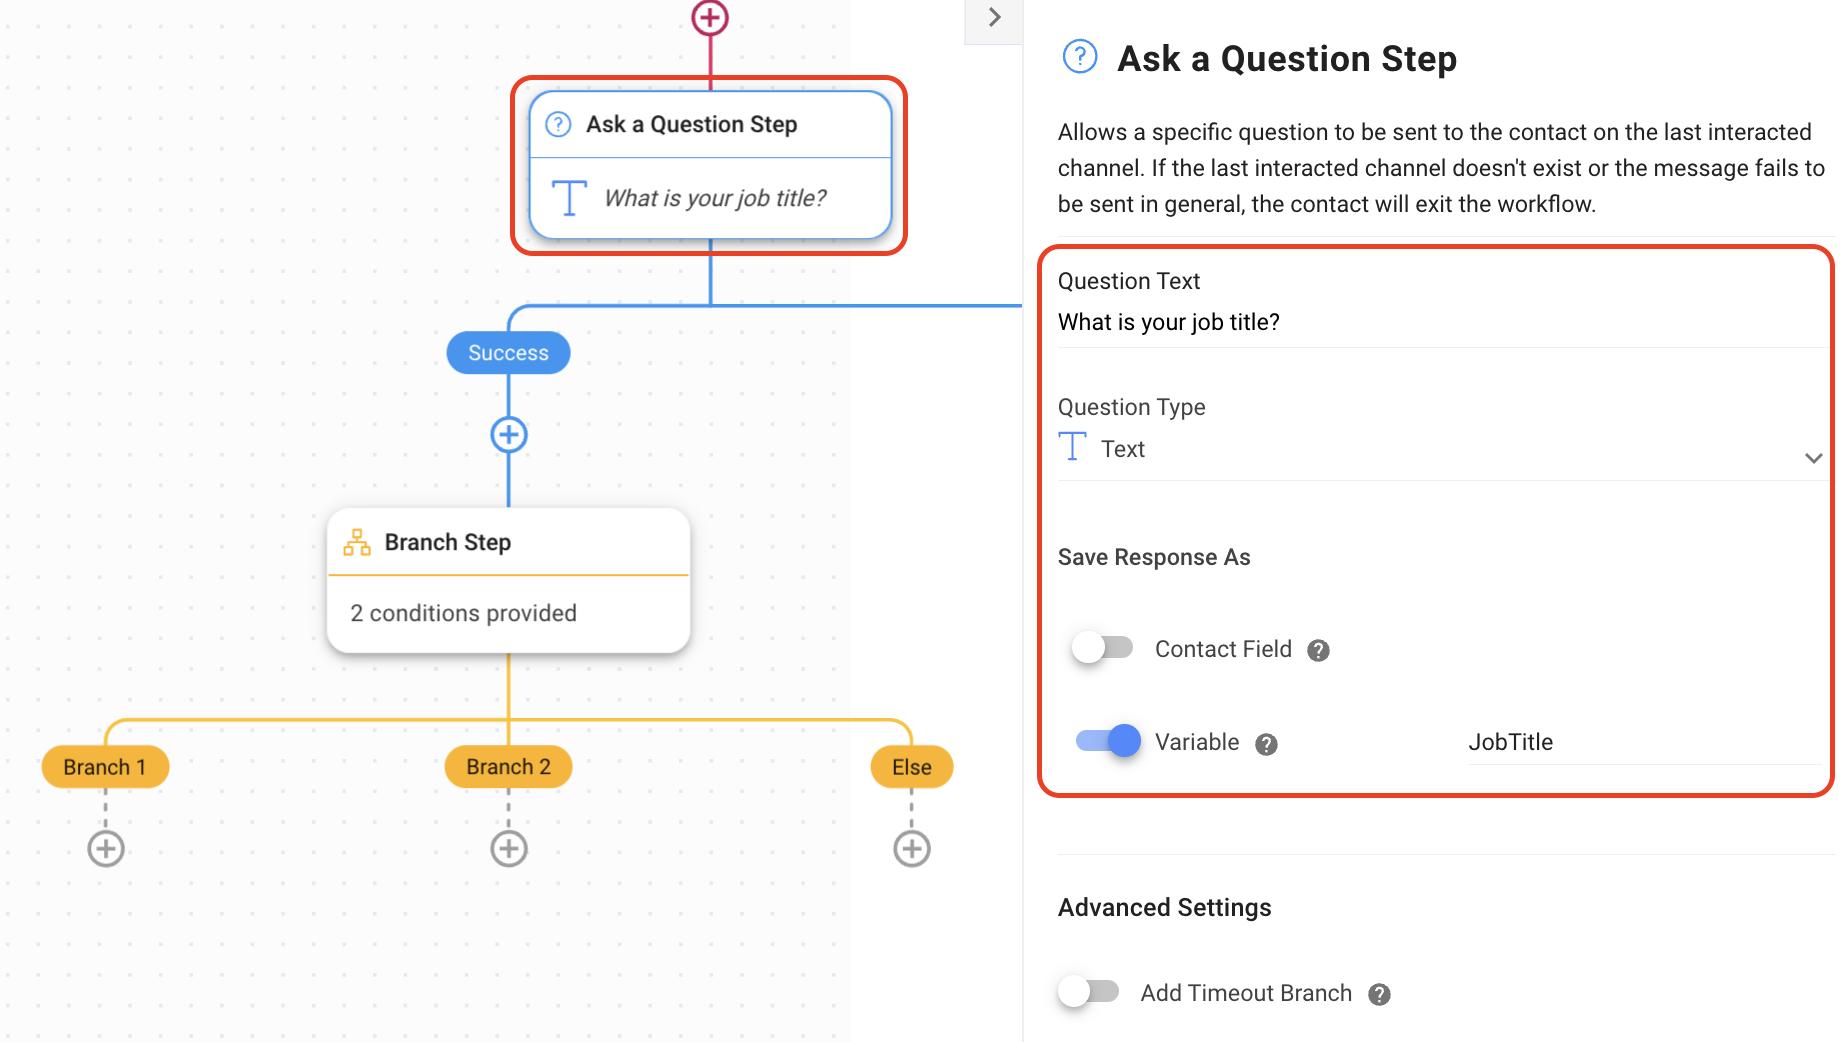
Use the Ask a Question Step to enrich your contact data. These are just examples of the types of questions you can ask.
Ask a Question Step for multiple choice questions configuration
1. Add Ask a Question Step and fill in the Question Text field.
2. Select Multiple Choice Question from the Question Type dropdown.
3. Add your answer options. Up to 10 answer options is possible.
4. Enable Save Response As Variable and name the Variable. This Variable will be used in the Branch Step of this Workflow.\
Ask a Question Step for open-ended questions configuration
1. Select Text from the dropdown.
2. Enter the Question Text.
3. Enable Save Response As Variable and name the Variable. This Variable will be used in the Branch Step of this Workflow.\
### **Use the information gained from the questions to qualify leads**
{% hint style="info" %}
**Tip:** Learn more about the [Branch Step here](/ismessenger/modules/workflow.md).
{% endhint %}
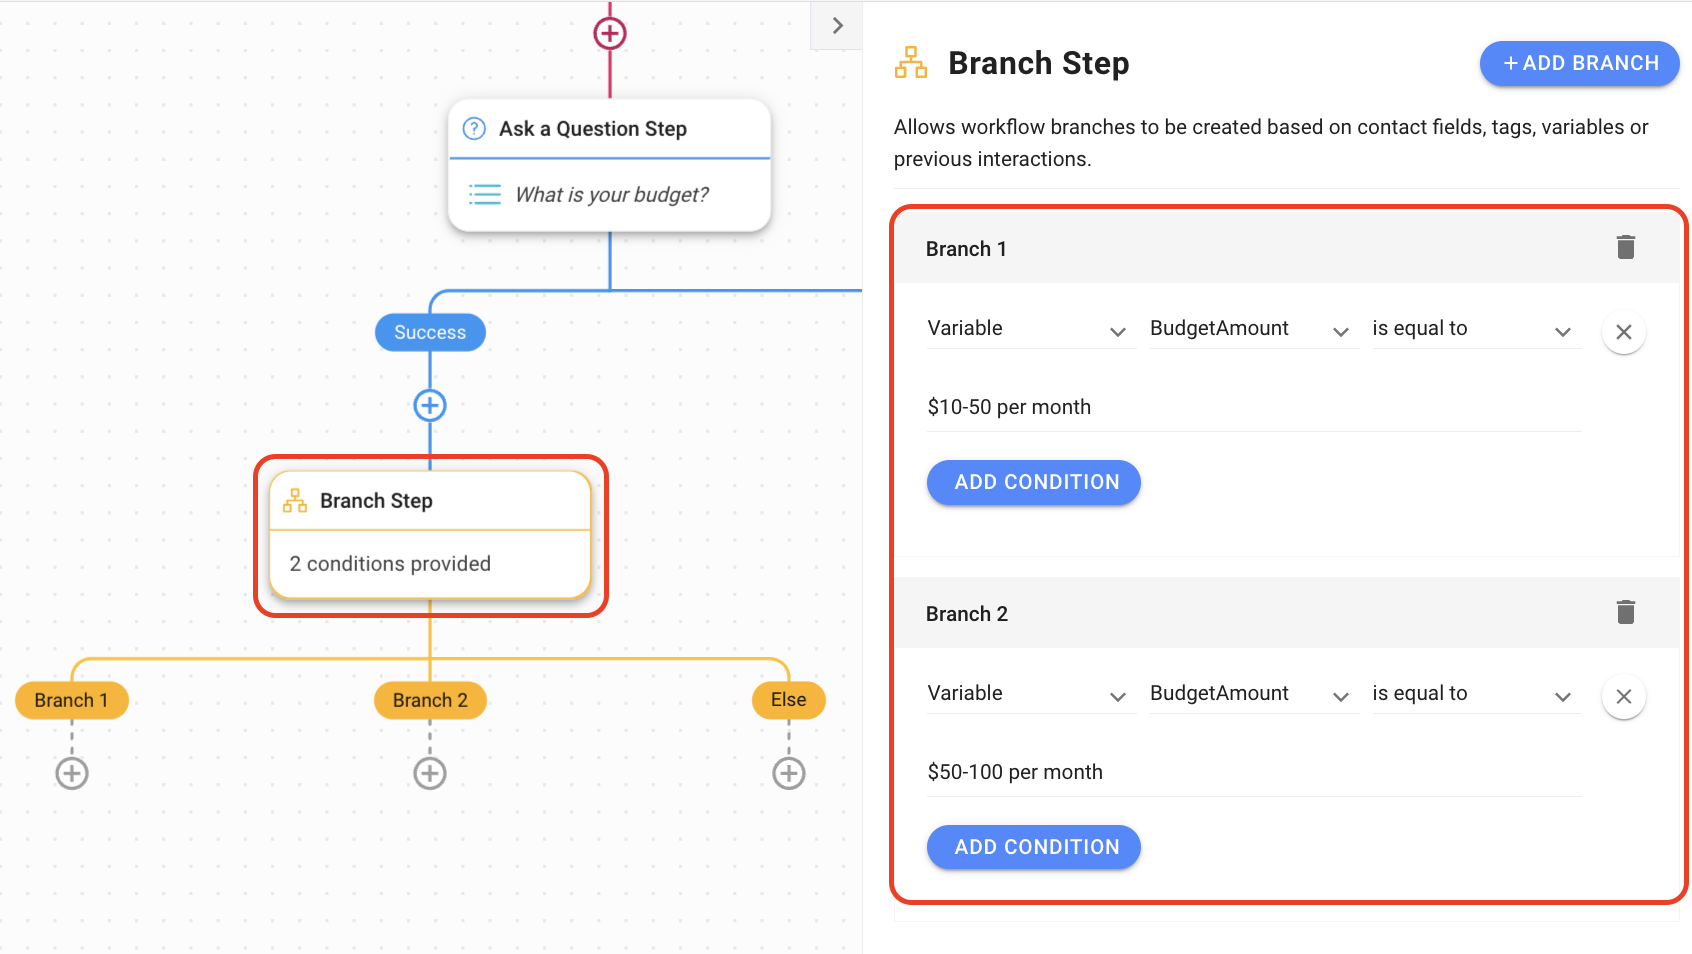
Use the Branch Step to route leads to the next Workflow step based on their answers. In this example, we’re using the BudgetAmount Variable as a condition.
Branch Step configuration
1\. Add the Branch Step.\
2\. Select Variable from the dropdown, then choose the previously saved Variable as the Field, in this case, BudgetAmount.\
3\. From the Operator dropdown, we're selecting *is equal to*. The Value is the budget amount the lead answers.\
{% hint style="info" %}
**Tip:** Possible next steps include [Update Tag](/ismessenger/modules/workflow.md), [Routing](/ismessenger/sales-use-cases.md) and [Auto-assignment](/ismessenger/sales-use-cases.md).
{% endhint %}
---
# Agent Instructions: Querying This Documentation
If you need additional information that is not directly available in this page, you can query the documentation dynamically by asking a question.
Perform an HTTP GET request on the current page URL with the `ask` query parameter:
```
GET https://docs.is-messenger.com/ismessenger/sales-use-cases/how-to-enrich-contact-data-and-qualify-leads.md?ask=
```
The question should be specific, self-contained, and written in natural language.
The response will contain a direct answer to the question and relevant excerpts and sources from the documentation.
Use this mechanism when the answer is not explicitly present in the current page, you need clarification or additional context, or you want to retrieve related documentation sections.